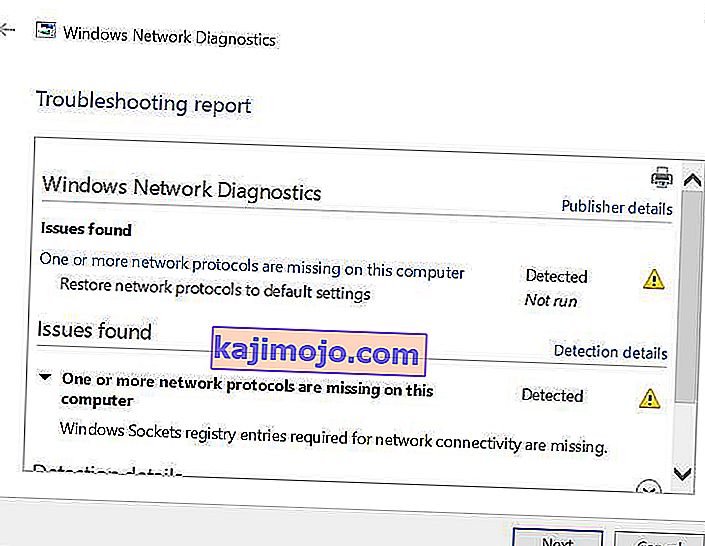
Satu atau lebih protokol jaringan yang hilang di komputer ini adalah kesalahan yang terjadi karena entri registri Windows Sockets yang diperlukan untuk konektivitas jaringan. Ketika entri ini hilang ”ini memicu kesalahan yang dilaporkan oleh Diagnostik Jaringan Windows. Ini muncul ketika sistem Anda gagal terhubung ke internet, dan Anda mengklik tombol Diagnosis. Anda mungkin dapat melakukan ping ke alamat tujuan Anda tetapi browser Anda tidak akan dapat melakukan hal yang sama. Dalam banyak kasus, ketidakkonsistenan di Windows Sockets API juga dikenal sebagai Winsock adalah penyebab utama masalah ini.
Ini bertanggung jawab atas permintaan jaringan dari program, baik yang masuk maupun keluar. Masalah ini juga dapat berasal dari Penyedia Internet Anda, tetapi jika internet berfungsi di perangkat Anda yang lain yang terhubung ke ISP yang sama, maka ISP tersebut Oke dan kami dapat melanjutkan dengan langkah pemecahan masalah.
Metode untuk Memperbaiki Satu atau Lebih Protokol Jaringan yang Hilang
Panduan ini kompatibel dengan semua versi Windows.
Metode 1: Pulihkan File Protokol yang Hilang
Unduh dan jalankan Restoro untuk memindai file yang rusak dengan mengklik di sini , Jika ternyata file tersebut rusak, perbaiki.
Metode 2: Nonaktifkan IPv6
Lihat langkah-langkah di sini untuk Menonaktifkan IPv6
Metode 3: Setel Ulang Winsock
Korupsi Winsock diketahui memicu kesalahan tersebut. Dalam kebanyakan kasus, masalah diselesaikan dengan mengatur ulang winsock. Untuk mengatur ulang winsock, ikuti langkah-langkah di bawah ini.
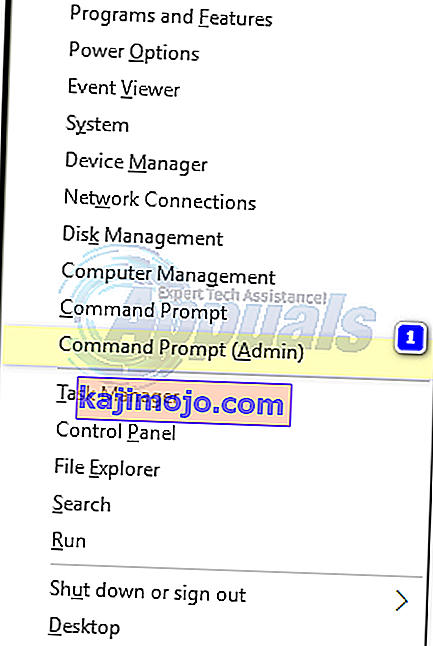
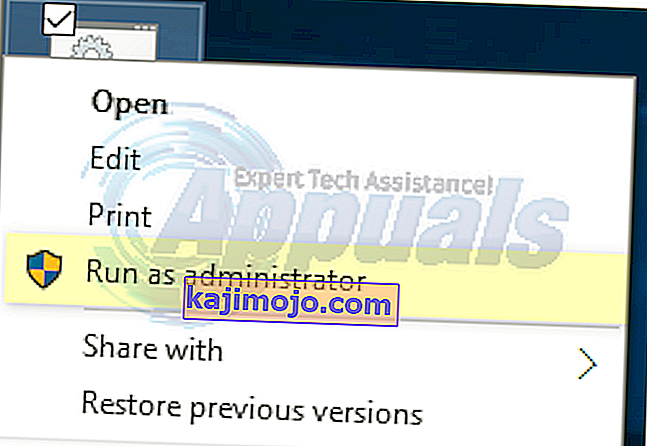
- Tekan tombol Windows . Di kotak pencarian, ketik cmd . Dari daftar hasil yang ditampilkan; klik kanan pada cmd dan klik Run as Administrator . Jika Anda menggunakan Windows 8 atau 10, tahan Tombol Windows dan Tekan X. Pilih Command Prompt (Admin) dan Klik di atasnya.
- Di jendela prompt perintah hitam, ketik netsh winsock reset dan tekan Enter .

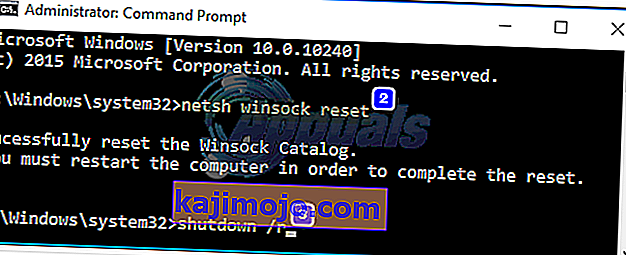
Mulai ulang sistem Anda dan periksa masalah telah teratasi.
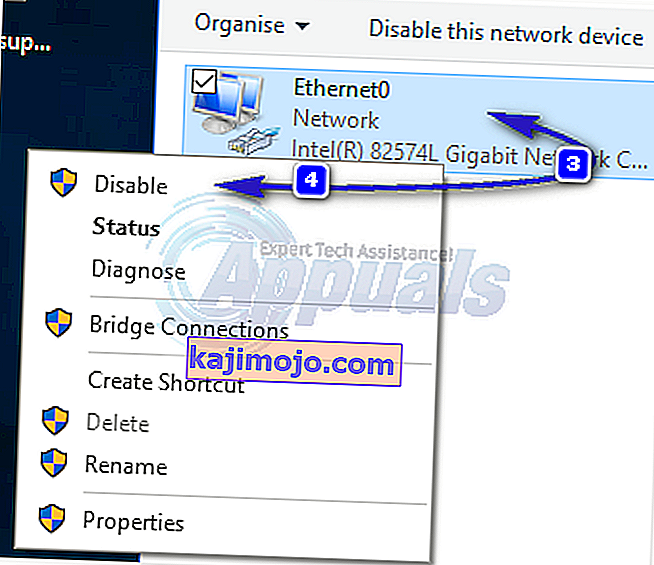
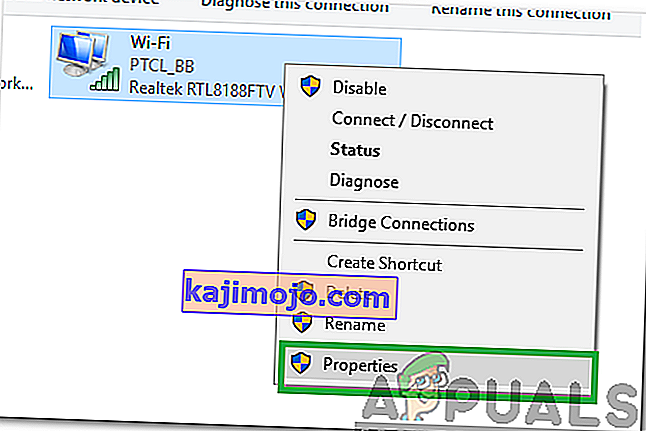
Metode 4: Mulai Ulang Adaptor Jaringan Anda
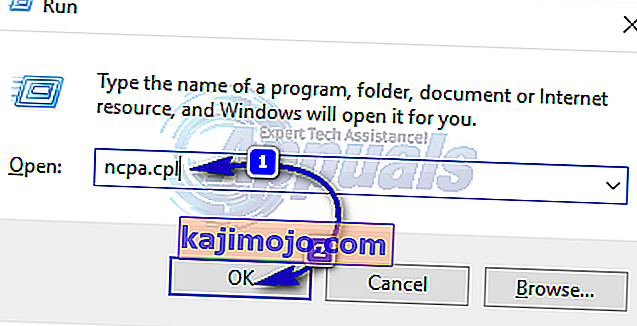
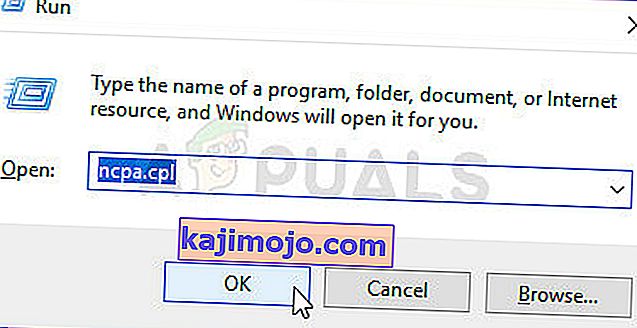
Kesalahan sementara pada adaptor jaringan dapat mencegahnya mengambil protokol. Restart sederhana juga dapat memperbaiki masalah. Untuk melakukan ini; Tahan Windows Key dan Tekan R . Di dialog jalankan, ketik ncpa.cpl dan Klik OK.
Anda akan melihat daftar adapter jaringan, jika Anda tidak tahu yang mana milik Anda maka Anda dapat mengulangi langkah-langkah di bawah ini pada semua adapter yang terdaftar, jika tidak lakukan pada yang Anda gunakan untuk menghubungkan.
Klik kanan Adaptor Jaringan Anda, dan pilih Nonaktifkan . Kemudian klik kanan lagi dan Pilih Aktifkan .
Metode 5: Setel Ulang Komponen
Dalam solusi ini, kami akan mengatur ulang dan menyegarkan komponen yang terlibat dalam konektivitas jaringan.
Buat file teks dan simpan sebagai fixnetwork.bat dengan kode berikut di dalamnya.
ipconfig / flushdns ipconfig / registerdns ipconfig / rilis ipconfig / perbarui netsh winsock katalog ulang netsh int ipv4 reset reset.log netsh int ipv6 reset reset.log jeda shutdown / r
Klik kanan pada file yang diunduh atau file bat yang Anda buat (menggunakan perintah di atas) dan klik Run as Administrator . Carilah pesan akses ditolak , jika Anda melihat ada, kemudian lanjutkan dengan langkah-langkah di bawah ini lagi tekan tombol apa saja ketika dikatakan di jendela hitam, untuk reboot. Setelah reboot, TEST.
Ini diimpor untuk membuat cadangan registri sebelum melakukan langkah-langkah registri. Anda dapat melakukan ini dengan mengklik File -> Ekspor (dengan Komputer) yang dipilih dari panel kiri atas dan mengekspornya (menyimpannya di suatu tempat di komputer Anda). Ini harus dilakukan untuk setiap metode yang Anda ikuti di mana perubahan registri terlibat.
Untuk mengubah izin, edit kunci registri berikut ini:
Untuk melakukan itu, terus Windows key dan tekan R . Ketik regedit dalam dialog run dan tekan Enter . Jendela editor registri akan dibuka.
Tahan CTRL kunci dan Tekan F . Di kotak Temukan, ketik nilai berikut dan klik Temukan Berikutnya.
Wait for it to search for the key, once it searches it, expand this key to look for the folder called 26
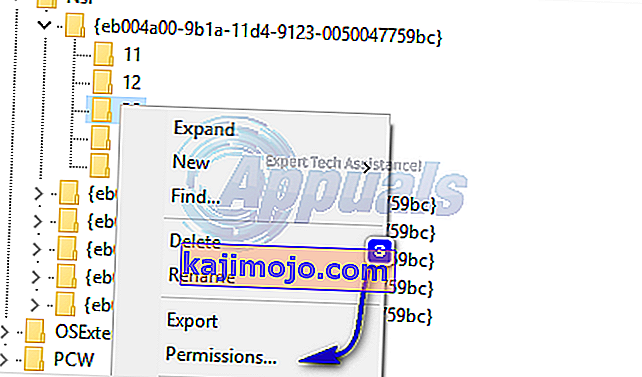
eb004a00-9b1a-11d4-9123-0050047759bc
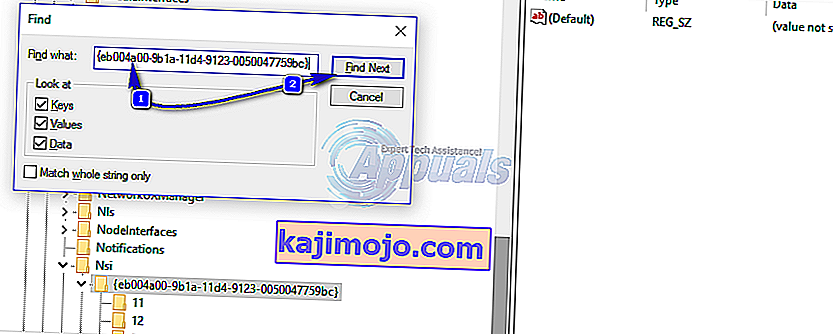
Full Path to Key Is
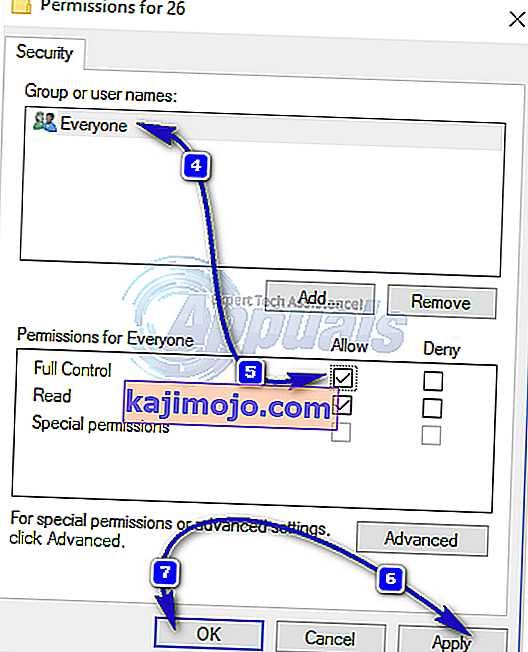
HKEY_LOCAL_MACHINE/SYSTEM/CurrentControlSet/Control/Nsi/{eb004a00-9b1a-11d4-9123-0050047759bc}/26.Right click on 26 and click Permissions.
Click Add button. Type everyone in the textbox and press OK. If everyone is already there, then grant Full Access. Click OK. Now run the downloaded file as Administrator.
Method 6: Reinstall TCP/IP
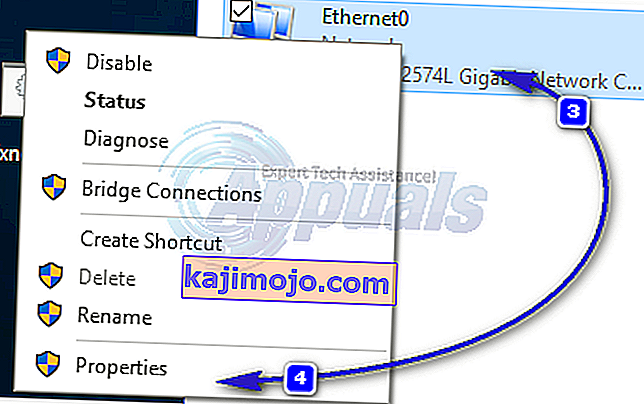
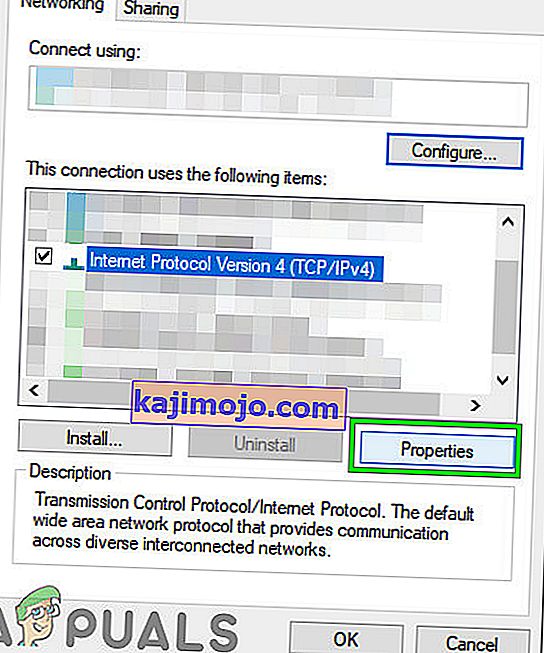
TCP/IP are a set of protocols that defines how you connect to the Internet. Any discrepancy in them can block your internet access immediately. Hold the Windows Key and Press R. Type ncpa.cpl and Click OK
You will either have a wired connection or wireless, whatever is the active connection, right click on it and choose Properties.
Under This Component Uses the Following Items, click Install button. Click Protocol, then click the Add button.
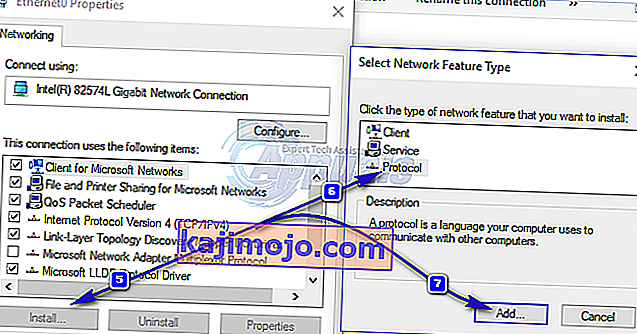
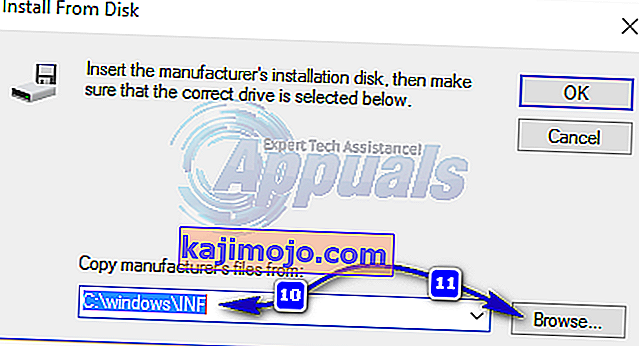
Click the HaveDisk button. Under Copy Manufacturer’s files from box, type C:\windows\inf and click OK.
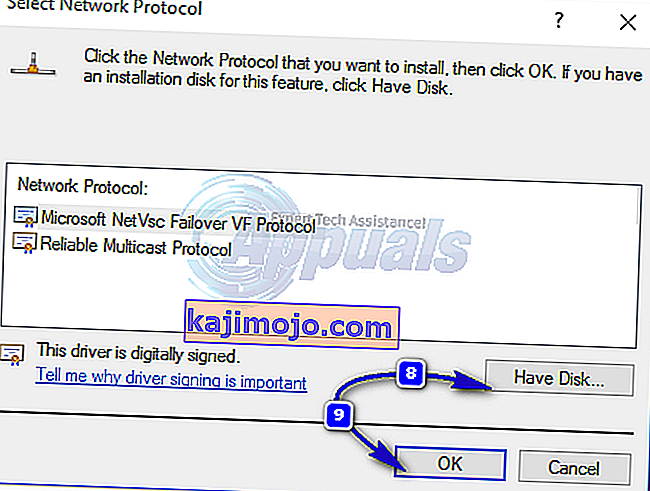
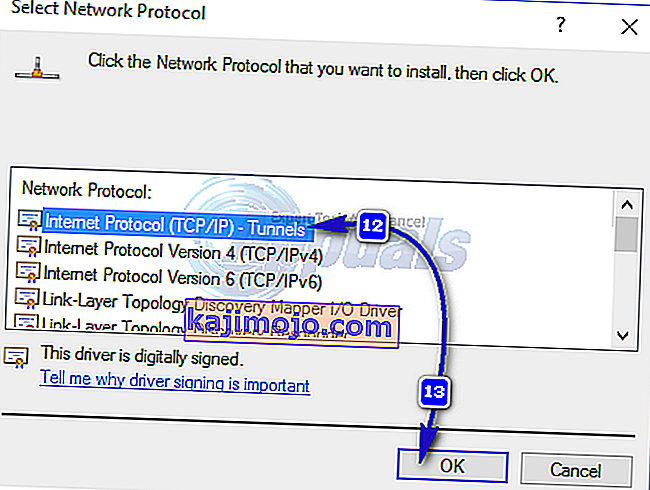
Under the Network Protocol list, click Internet Protocol (TCP/IP) and then click OK.
If you get the This program is blocked by group policy error, then there is one other registry entry to add to allow this install. Hold Windows key and press R.
Type regedit and press Enter.
In the Registry Windows, navigate to HKEY_LOCAL_MACHINE\SOFTWARE\Policies\Microsoft\Windows\safer\codeidentifiers\0\Paths
Right click on paths in the left pane and click Delete. Now repeat the above process to reinstall TCP/IP.
Close all windows, and restart your system. Your problem should be gone now. If not, move on to the next solution. This method does not apply to home based versions of windows.
Method 7: Uninstall and Reinstall Your Security/Antivirus Software
If you have recently installed any Internet Security Software, it may be blocking your access to the internet. Temporarily disable it to check if that’s what causing the problem. Quicket way is to just uninstall it, reboot the PC and then test – if system works without it, then re-install another AntiVirus. Hold the Windows key and press R. In the run dialog type appwiz.cpl and click OK. In the programs list, find your security software and right click on it. Click Uninstall. Follow the onscreen instructions to remove it and restart your system.
Method 8: Powerline Adapters
If you are using a Powerline Adapter, then it can interfere with your network. A reset can solve most of these problems. Refer to the instructions manual for the adapter to reset your Powerline Adapter.
Method 9: Disable Proxy
Go to Settings -> Network -> Proxy -> Manual Proxy Settings and turn it off.
Method 10: Change your internet router’s Wireless Mode to 802.11g
Many people have had luck with fixing this issue by changing their wireless router’s Wireless Mode to 802.11g instead of 802.11b+g+n. By default, almost all wireless routers are set to the 802.11b+g+nWireless Mode out of the box. In order to change your internet router’s Wireless Mode to 802.11g, you need to:
Login to your wireless router’s administration and settings panel through a browser of your choice. Instructions for accessing your wireless router’s administration and settings panel will be found on the user manual that came with your wireless router.
Scour everything under the Wireless category for a setting by the name of Wireless Mode or Mode.
Set your wireless router’s Mode/Wireless Mode to 11g or 11g – whichever applies in your case.
Save the changes and exit your wireless router’s administration and settings panel.
Restart both your wireless router and your computer.
Check to see whether or not the issue has been fixed once your computer boots up.
Method 11: Hard reset your wireless router
If none of the methods listed and described above have worked for you, there is still one more thing that you can try, and that is to hard reset your wireless router. Hard resetting your internet router will cause all of its settings and preferences to revert to their default values, and that, in many cases, has been able to fix this issue and restore internet access. In order to hard reset your wireless router, you need to:
Get your hands on a paperclip or a pin or any other pointy object.
Locate the recessed Reset button on your router. This button is basically a tiny hole normally located at the back of a router with the term Reset written above or below it.
Put the pointy end of the pointy object you acquired into the Reset button and push it all the way in. Press and hold the button for a good few seconds. This will successfully reset your router.
Once the router has been reset, restart it and then start reconfiguring it.
Method 12: Install Protocol
It is possible that the right protocol hasn’t been installed for internet settings. Therefore, in this step, we will be installing the correct protocol for the computer. For that:
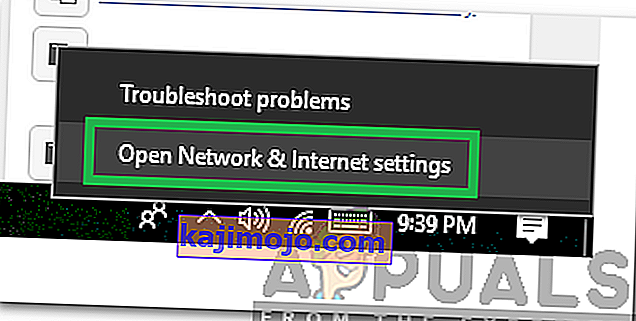
- Right–click on the “Wifi” icon in the system tray and select “Network and Internet Settings“.
- Click on the “Wifi” option in the left pane if you are using wifi and “Ethernet” option if you are using an ethernetconnection.
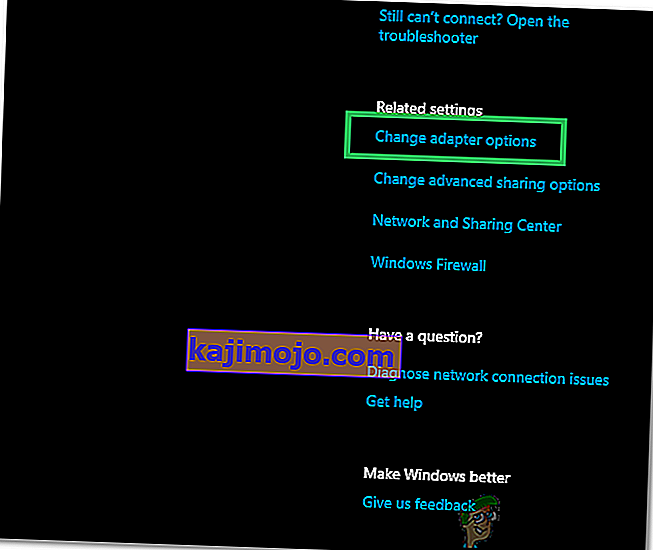
- Click on the “Change Adapteroptions” option.
- Right-click on the connection you are using and select “Properties“.
- Click on the “Client for Microsoft Networks” option and select “Install“.
- Select the “Reliable Multicast Protocol” option and select install.
- Tutup jendela dan periksa untuk melihat apakah masalah masih berlanjut.


Metode 13: Gunakan Pengaturan Otomatis
Mungkin saja PC Anda dikonfigurasi untuk menggunakan Alamat DNS tertentu tetapi tidak memberikan konfigurasi jaringan yang benar ke adaptor jaringan Anda. Oleh karena itu, pada langkah ini, kami akan menggunakan pengaturan otomatis untuk memperbaiki masalah ini. Untuk itu:
- Tekan tombol "Windows" dan "R" dan ketik "ncpa.cpl".
- Klik kanan pada koneksi internet Anda dan pilih "Properties".
- Klik dua kali pada opsi "IPV4" dan centang " Dapatkan Alamat Server DNS Secara Otomatis ".
- Klik "OK" dan periksa apakah masalah masih berlanjut.

