This error will appear when you are trying to access a certain file either to delete, rename, or open it. Logically speaking, if you can locate and view a file on your computer, you should also have clear access to it. However, this strange error occurs and you are unable to do anything with that file.

Sometimes this occurs with files created by third-party services and it occurs because the file’s extension is not properly defined. There are other obscure causes as well. Follow the several methods in this article to either delete the file successfully since that is what users mostly want to do. Good luck!
Solution 1: Use the Following Command to Delete the Problematic File
This is one of the commands which can be used to delete the problematic file or folder. Deleting it may be important if it is linked to software you uninstalled a while ago, especially if the file takes up a lot of space on the disk. Try this method but make sure you type in the correct path to the file instead of our placeholder.
- Search for “Command Prompt” either in the Start menu or by clicking the search button right next to it, right-click on it, and select the “Run as administrator” option. You can also use the Windows Key + R key combination and type in “cmd” in the Run dialog box.

- Copy and paste the command below and make sure you tap the Enter key on your keyboard afterwards. Also make sure to use the correct path to the file including its name. X is the placeholder letter as well, you should input the letter corresponding to the drive’s letter where the file is located.
rd /s \\?\X:\bad\folder\path
- You should see the Operation completed successfully message. If you don’t check to see if you have input the file’s location correctly. If you have, try checking out other solutions below.
Solution 2: A Command Prompt Tweak to Rename the Folder and Operate with it Normally
If you don’t want to delete the folder (if it contains important files), you can rename it using this commands to a non-problematic name and deal with it the normal way by handling it via the Windows Explorer. Follow the commands below carefully.
- Search for “Command Prompt” either in the Start menu or by clicking the search button right next to it, right-click on it, and select the “Run as administrator” option. You can also use the Windows Key + R key combination and type in “cmd” in the Run dialog box.
- Type in cd followed by the path to the file in the format C:\Folder1\Folder2\Folder3. However, this time you need to omit the problematic file. In other words the last folder in the command should be the folder where the problematic file is located:
cd C:\Folder1\Folder2\Folder3
- Press Enter after this command. Use the following set of commands which will be displayed below. Each command is in a new line so press Enter after you type in or copy each line:
DIR /A /X /P
RENAME (the current name of the problematic file) (a non-problematic name)
EXIT
- Make sure you only write the current name and the new name separated by a space. Don’t write the brackets in the command. If everything goes well, you should now be able to operate the file normally via Windows Explorer.
Solution 3: File without Any Extension
This method can be applied to scenarios where the problematic file does not have a viable extension meaning Windows just doesn’t know what to do with it and it displays the error message from above. The usual scenario occurs with files created by browser plugins (Mozilla Firefox plugins most notably) so here is how you can delete those files:
- Follow the steps 1 and 2 from the solution above in order to correctly navigate to the file’s location on your computer. Be careful while inputting the folders.
- Press Enter after the command and use the following one in order to delete the problematic file with the problematic extension (or the lack of one, to be more exact):
del *.*
- Open File Explorer to check if the file is really gone.
Solution 4: Workaround without Command Prompt
This solution is more of a workaround but it gets the job done as a side-effect of another action. That being said, it’s perfect for users who don’t like using Command Prompt and who want to do everything using their mouse in a graphical environment. It’s also easy to use so make you try this one out!
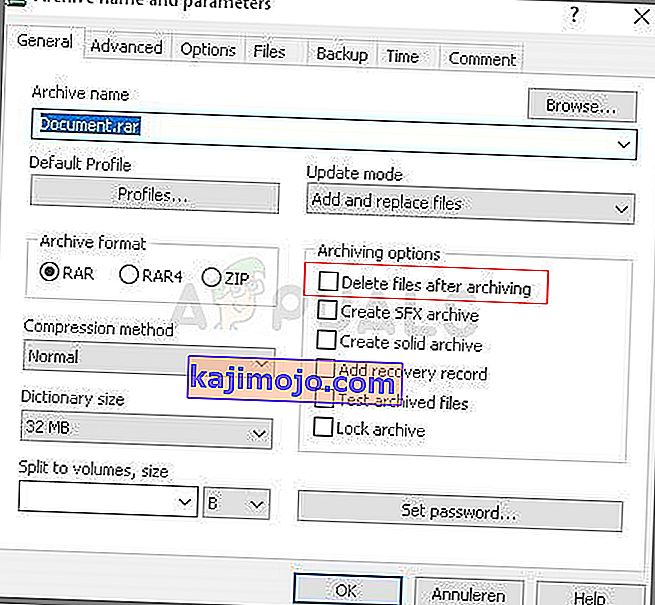
- Locate the problematic file or folder on your computer by navigating to it in the File Explorer. Right-click on it and choose the Add to archive option from the context menu.
- When the archiving options window opens, locate the Delete files after archiving option and make sure you select it. Click OK to start the archiving process and, after it finishes, you should notice that your problematic file is missing!
- Delete the archive you created as well by right-clicking on it and choosing the Delete option from the context menu.
