The Witcher 3: Wild Hunt adalah sebuah permainan aksi peran yang diterbitkan dan dikembangkan oleh CD Projekt. Ini adalah seri game berkelanjutan yang telah meninggalkan jejak cukup banyak di dunia digital.

Terlepas dari popularitas gim tersebut, kami menemukan masalah khusus di mana gim tersebut mogok selama bermain game atau sinematik. Setelah game mengalami crash, tidak ada jenis pesan error apa pun dan pengguna dialihkan kembali ke Desktop. Hal ini membuat frustasi karena tidak ada pesan kesalahan sama sekali dan penyebab masalahnya juga tidak ditentukan.
Pada artikel ini, kami akan membahas semua penyebab mengapa masalah ini terjadi dan solusi yang terlibat untuk menyelesaikan masalah.
Apa yang menyebabkan Witcher 3 Crash?
Setelah menganalisis semua laporan pengguna dan bereksperimen di komputer kami, kami menyimpulkan bahwa masalah tersebut terjadi karena beberapa alasan berbeda mulai dari masalah perangkat lunak hingga masalah perangkat keras. Beberapa alasan mengapa Anda mungkin mengalami masalah ini, tetapi tidak terbatas pada:
- Kartu video / perangkat keras terlalu panas: Ini mungkin salah satu penyebab paling populer yang kami temui. Jika kartu video Anda atau perangkat keras lain terlalu panas, komputer untuk memperbaiki masalah crash permainan.
- Instalasi rusak / tidak lengkap: Jika instalasi Anda entah bagaimana rusak atau file-nya hilang, Anda mungkin mengalami crash tiba-tiba. Memverifikasi file game mungkin membantu dan memperbaiki masalah.
- Layanan Streaming NVIDIA: Meskipun layanan streaming yang ditawarkan oleh raksasa grafis adalah salah satu alat sejenis, diketahui dapat menyebabkan konflik dengan gim meskipun Anda tidak menggunakannya dan menyebabkannya macet.
- Mods: Mod membuat gameplay lebih menyenangkan di Witcher 3 tetapi seperti semua kekurangan dari setiap mod, ini tidak terkecuali. Jika mod bentrok dengan gim Anda kapan saja, itu akan macet.
- Steam Cloud Menyimpan: Steam Cloud Menyimpan adalah fitur yang ditawarkan oleh Steam untuk menyimpan permainan Anda saat dalam perjalanan. Layanan ini menyimpan file Anda secara berkala; tindakan ini diketahui menyebabkan konflik dengan Witcher 3 dan menyebabkannya crash.
- Overclocking: Overclocking adalah 'alat' untuk meningkatkan kemampuan Anda dari PC. Namun, ia juga diketahui membuat sistem tidak stabil dan menyebabkannya macet tanpa alasan yang jelas. Menonaktifkan tindakan biasanya menyelesaikan masalah.
- Driver kartu grafis rusak: Kartu grafis adalah kekuatan pendorong utama dalam memainkan permainan di komputer Anda. Jika drivernya sama sekali tidak sinkron dengan perangkat keras, game Anda mungkin macet di antaranya.
- Overlay di GOG Galaxy: GOG Galaxy adalah platform koleksi game seperti Steam dan overlaynya diketahui menyebabkan masalah dengan Witcher 3. Menonaktifkan overlay berfungsi di sini.
- Konektor GPU: GPU terhubung ke motherboard utama Anda melalui konektor yang berbeda. Konektor ini, jika longgar, mungkin tidak mengirimkan informasi dengan benar dan karenanya menyebabkan masalah dalam pengoperasian game.
- Pengaturan grafik tinggi: Jika Anda memiliki pengaturan grafik yang sangat tinggi tetapi tidak memiliki PC yang tepat untuk menanganinya, Anda akan mengalami beberapa masalah dan permainan mungkin macet / crash.
Sebelum kita mulai dengan solusi, pastikan bahwa Anda masuk sebagai administrator dan juga menyimpan pekerjaan Anda sebelumnya karena kami akan sering merestart komputer Anda.
Prasyarat: Persyaratan Sistem
Sebelum kita mulai dengan solusinya, Anda harus terlebih dahulu memeriksa apakah komputer Anda memenuhi persyaratan sistem permainan.
Persyaratan Sistem Minimum Perburuan Liar
CPU : Intel CPU Core i5-2500K 3.3GHz / AMD CPU Phenom II X4 940 RAM : 6 GB OS : 64-bit Windows 7 atau 64-bit Windows 8 (8.1) KARTU VIDEO : Nvidia GPU GeForce GTX 660 / AMD GPU Radeon HD 7870 PIXEL SHADER : 5.0 VERTEX SHADER : 5.0 RUANG DISK GRATIS : 40 GB VIDEO BERDEDIKASI RAM : 1,5 GB
Persyaratan Rekomendasi Perburuan Liar
CPU : Intel CPU Core i7 3770 3,4 GHz / AMD CPU AMD FX-8350 4 GHz RAM : 8 GB OS : 64-bit Windows 7 atau 64-bit Windows 8 (8.1) KARTU VIDEO : Nvidia GPU GeForce GTX 770 / AMD GPU Radeon R9 290 PIXEL SHADER : 5.0 VERTEX SHADER : 5.0 RUANG DISK GRATIS : 40 GB VIDEO BERDEDIKASI RAM : 2 GB
Perlu dicatat bahwa Anda harus memiliki setidaknya persyaratan sistem yang disarankan untuk memainkan game dengan lancar.
Solusi 1: Memverifikasi Integritas File Game
Sebelum kami mencoba metode pemecahan masalah teknis, pertama-tama kami akan memeriksa apakah Anda memiliki instalasi game yang valid atau tidak. Kami menemukan beberapa kasus di mana file game rusak atau memiliki instalasi yang tidak lengkap. Pengguna mungkin mengalami masalah ini jika proses pembaruan terganggu atau file game dipindahkan antar folder.
Dalam solusi ini, kami akan membuka Steam dan menggunakan fungsi bawaan untuk memverifikasi integritas file game. Jika aplikasi menemukan sesuatu, itu akan diganti.
Catatan: Jika Anda menggunakan perangkat lunak penerbitan lain untuk memainkan permainan, Anda juga harus melakukan langkah serupa di dalamnya.
- Buka aplikasi Steam Anda dan klik Game dari bilah atas. Sekarang pilih Witcher 3 dari kolom kiri, klik kanan dan pilih Properties .
- Setelah berada di Properties, klik kategori Local Files dan pilih Verify Integrity of Game Files .

- Sekarang tunggu sampai prosesnya selesai. Mulai ulang komputer Anda setelah verifikasi selesai dan luncurkan Witcher 3 lagi. Periksa apakah masalah mogok sudah teratasi.
Solusi 2: Mengubah prioritas game
Prioritas suatu proses atau aplikasi memberi tahu komputer pentingnya dan apakah itu harus didahulukan daripada yang lain saat mengalokasikan sumber daya. Secara default, prioritas semua aplikasi adalah normal kecuali proses sistem. Jika Witcher 3 tidak mendapatkan cukup sumber daya, itu akan macet tanpa batas. Dalam solusi ini, kami akan menavigasi ke pengelola tugas, mencari proses The Witcher 3 dan kemudian mengubah prioritas ke Prioritas Tinggi dan melihat apakah ini berfungsi untuk kami.
- Luncurkan Witcher 3 di komputer Anda. Untuk pergi ke Desktop sementara permainan ini masih berjalan, tekan Windows + D . Tekan Windows + R, ketik " taskmgr " di kotak dialog dan tekan Enter.
- Sekarang klik pada tab Detail , cari semua entri Mordhau dan Karena peluncur utama Witcher 3 adalah Steam itu sendiri, Anda juga harus mengubah prioritasnya.
- Klik kanan pada setiap entri, arahkan kursor ke setel prioritas dan setel ke Di Atas Normal atau Tinggi .
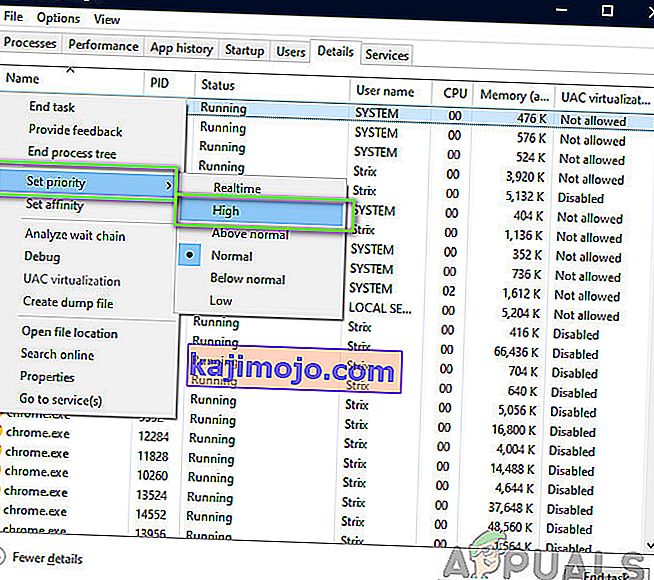
- Lakukan ini untuk semua entri Anda. Sekarang Alt-tab ke game Anda dan mulailah bermain. Amati apakah ini membuat perbedaan pada masalah crashing.

Solusi 3: Menonaktifkan Layanan Streamer NVIDIA
Layanan NVIDIA Streamer dibundel dengan kartu grafis terbaru yang dirilis oleh NVIDIA. Ini berjalan sebagai layanan latar belakang di komputer Anda sepanjang waktu dan mulai berfungsi saat Anda streaming menggunakan aplikasi NVIDIA. Kami melihat bahwa layanan ini banyak berkonflik dengan Wither 3 dan menyebabkan beberapa masalah termasuk kerusakan. Dalam solusi ini, kami akan menavigasi ke Layanan Anda dan menonaktifkan layanan secara manual.
- Tekan Windows + R, ketik "services.msc" di kotak dialog dan tekan Enter.
- Setelah berada di Layanan, cari entri Layanan Streamer NVIDIA . Setelah Anda menemukannya, klik kanan padanya dan pilih Properties .
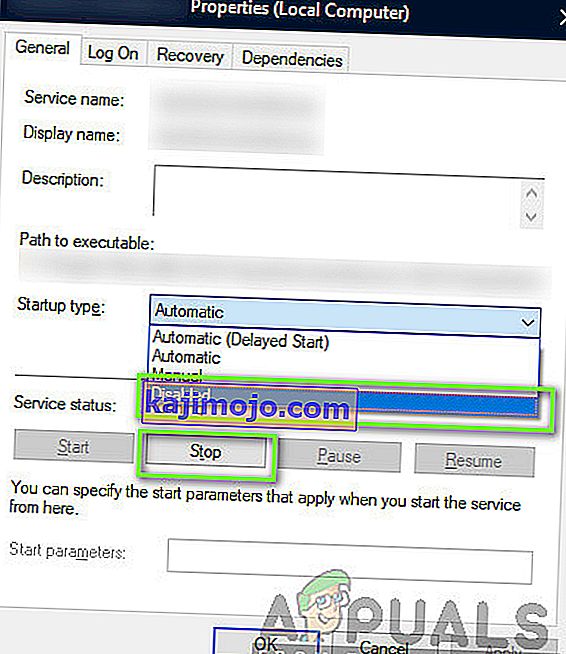
- Setelah berada di properti, klik Stop untuk menghentikan layanan dan pilih jenis startup sebagai Manual . Simpan perubahan dan keluar.
- Now try launching Witcher 3 and see if the crashing issue is resolved.

Solution 4: Disabling Steam Cloud Saves
The Steam Cloud is a platform which allows games and users to save their progress and data over the Steam cloud so whenever a user logs into the client, the client automatically downloads and updates the progress and preferences. This is a pretty nifty feature which makes Steam more preferable to other engines but is also known to cause several issues.
In this solution, we will navigate to the Steam settings and turn the synchronization off.
- Launch Steam as an administrator and click on Library present at the top.
- Now, all the games will be located at your left-side panel. Locate Witcher 3, right-click on it and select Properties.
- Once in properties, click on the Updates tab and uncheck the option of Enable Steam Cloud Synchronization.

- Save changes and exit. Restart Steam and launch the game. Check if the issue still occurs.

Solution 5: Disabling VSync
Vsync (Vertical Sync) allows users to synchronize the frame rate of the game with the monitor refresh rate for better stability. This feature is embedded in Witcher 3 and is usually enabled by default. Even though this mechanism is quite nifty, it is known to cause issues with the gameplay and induce crashing.
In this solution, we will navigate to the settings of the game and disable the option.
- Launch Witcher 3 and click on Options from the main menu.
- Now, click on Video and then select Graphics.

- Once in Graphics options, click on VSync and turn the option off.
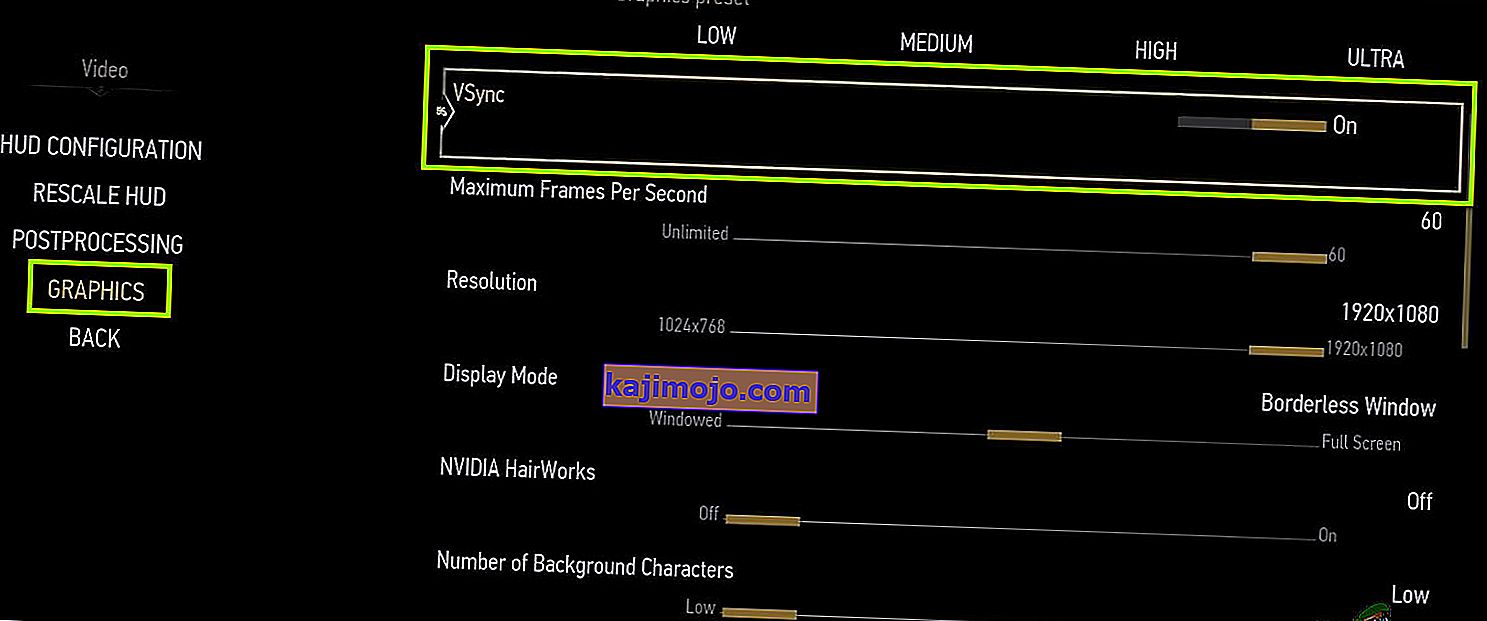


Note: You can also tweak other graphics settings from here if this doesn’t work.
- Save changes and exit. Restart Witcher 3 and see if the issue is resolved.
Solution 6: Disabling Frame Rate Cap
Witcher 3 also provides an in-game option which allows you to set the maximum frame rate. However, even though this allows you to manage your frame rate, it causes issues with the game. In this solution, we will navigate to graphics settings and remove the cap.
- Navigate to Graphics settings using Options in the main menu as we did in the last solution.
- Once in graphics, look for the option of Maximum Frames Per Second. Move the slider to unlimited.

- Restart the game and check if the issue is resolved for good.

Solution 7: Playing in Full Screen
Another thing to try before we jump into more technical methods is changing the game type to Fullscreen. It seems that the borderless window causes more load on the CPU as the Desktop is also running in the background. In this solution, we will navigate to Witcher 3 settings and tweak the changes.
- Navigate to Graphics Settings using Options from the main menu as we did earlier.
- Now, click on Display Mode and set the option to Fullscreen.
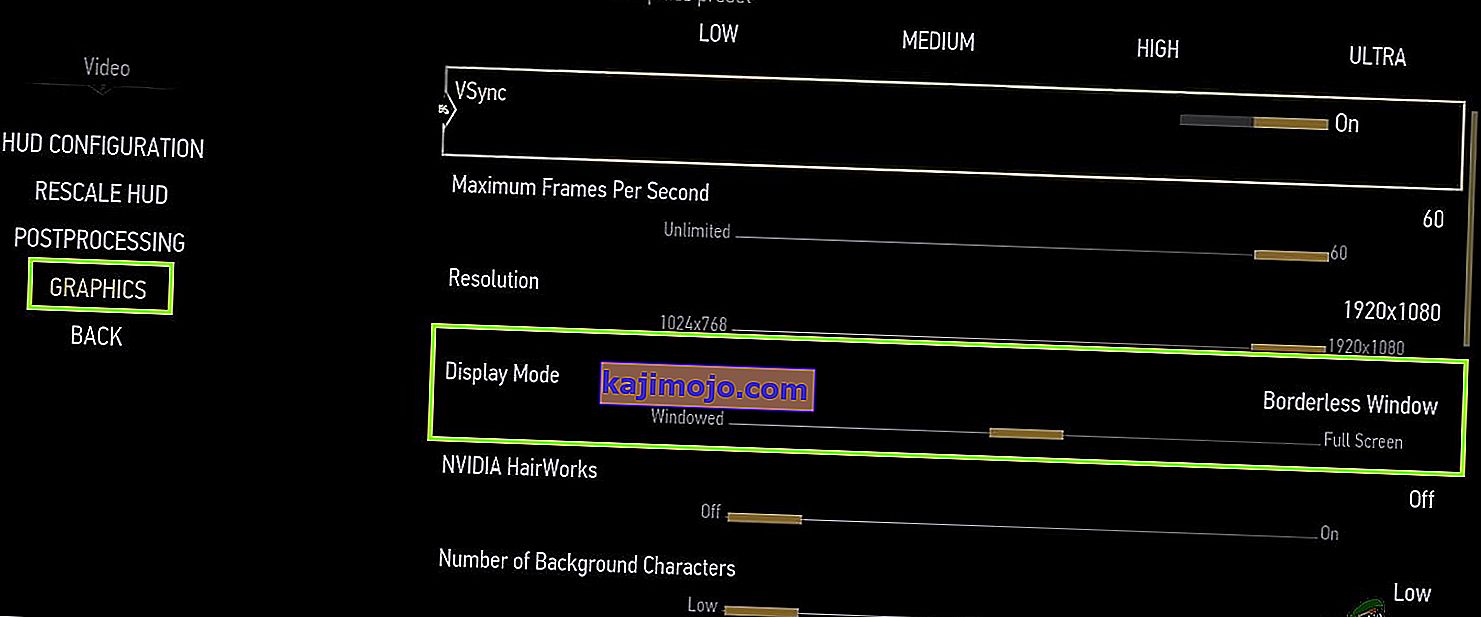
- Save changes and exit. Restart the game and check if the crashing issue is resolved.

Solution 8: Disabling Overclocking
All high-end PC builds nowadays have the option of Overclocking which can help in outputting more juice than what your specifications already have. Overclocking means running the graphics card/processor faster than its default clock speed. When this occurs, the hardware reaches its threshold temperature in a while. The computer detects this and reverts to the normal clock speed until the hardware cools off. When the hardware is cool enough again, the clock speed is increased again.

This act increases your computer’s performance a lot and helps if you don’t have a powerful computer with good processing/graphics capability. The thing to note here is that not all games support overclocking in their mechanisms. The same is the case with Witcher 3. Hence you should try disabling all overclocking on your computer and then try launching the game. If things go well, you will not experience the crashing anymore.
Solution 9: Disabling Mods
Mods are third-party plugins which are meant to enhance the experience of users by changing the graphics a little bit and adding more features than the stock game. This gives players a whole new level of customization to create a better and enjoyable gaming environment. However, since Mods are third-party, they are known to conflict with the game’s very engine and cause several issues.

Also, if the mod’s version and the game’s version are not in sync with each other, the game will crash whenever the mods try to change something in the game. Hence, in this solution, you should try disabling all types of mods on your computer and then see if the issue gets solved. Consider copy-pasting the mod content to another location until we complete the troubleshooting process. After removing the mods, restart your computer and check if the issue is resolved.
Solution 10: Checking for Overheating
Computers often get overheated when they used extensively or when they are performing heavy computations. Similar cases were seen to occur with Witcher 3. It seemed that whenever the computer overheated, the users were given no warning of any such and the game automatically crashed.

Here, you should check your components whether the cooling system is indeed working properly and dust isn’t blocking anything. You can also download temperature checking utilities and measure the temperature when the game is running. Make sure that no components (especially the graphics card) are overheating.
Solution 11: Checking Connectors:
Another thing to try is making sure that the connectors connecting the graphics card, RAM, etc. are properly connected with the hardware. This was a very common occurrence with various users. If the connection is not stable, the data will not be transmitted properly and hence, your game might crash.

You can even try placing the hardware on other connectors and see if this fixes the problem at hand. Press the hardware gently into the connectors to make sure.
Solution 12: Updating Graphics Drivers
If all the above methods don’t work, there is a possibility that you don’t have correct graphics drivers installed on your computer. Drivers are the main components which facilitate the interaction between the game and the hardware. If the drivers are outdated or corrupt, the game might not display correctly and cause lagging. In this solution, we will first remove the current drivers using DDU and then install fresh copies.
- Download and install DDU (Display driver uninstaller) from its official website.
- After installing Display Driver Uninstaller (DDU), launch your computer in safe mode. You can check our article on how to boot your computer into safe mode.
- After launching the DDU, select the first option “Clean and restart”. This will uninstall the current drivers completely from your computer.

- Now after the uninstallation, boot your computer normally without safe mode. Press Windows + R, type “devmgmt.msc” in the dialogue box and press Enter. Right-click on any space and select “Search for hardware changes”. The default drivers will be installed. Try launching the game and check if this solves the problem.
- In the majority of the cases, the default drivers will not work for you so you can either install the latest drivers through Windows update or navigate to your manufacturer’s website and download the latest ones.

- After you have installed the drivers, restart your computer and check if the problem is solved.
Note: Also consider uninstalling NVIDIA GeForce Experience from your computer. This is known to cause issues. Also, we saw several cases where rolling back the driver fixes the problem. Make sure that you try it.