I’ve always had a rocky relationship with Samsung. It blows my mind how they manage to innovate stay among the leading pack but fail to listen to their customers and fix underlying issues that have been around for ages.
If you own a Samsung smartphone, chances are that every once in a while you’ll be prompted with a notification saying “Samsung account expired“. If you tap on it, you’ll be taken to a menu in which you have to re-insert your password. If you cancel it, it will be back a few minutes later.

This error is fairly common on all Samsung smartphones or tablets, but devices running on Android 6.0 Marshmallow and Android 7.0 Nougat are even more prone to this issue.
There are several ways to go around fixing this issue and we will through each one in detail. Make sure you go through each method in order until you find the one that solves the “Samsung account session expired” error.
Method 1: Inserting the credentials from Settings
A method that usually works signs in and out of your Samsung account from your phone settings. Instead of tapping on the notification, you’ll access your Samsung account from Settings. This will usually fix the issue for good: Here’s how:
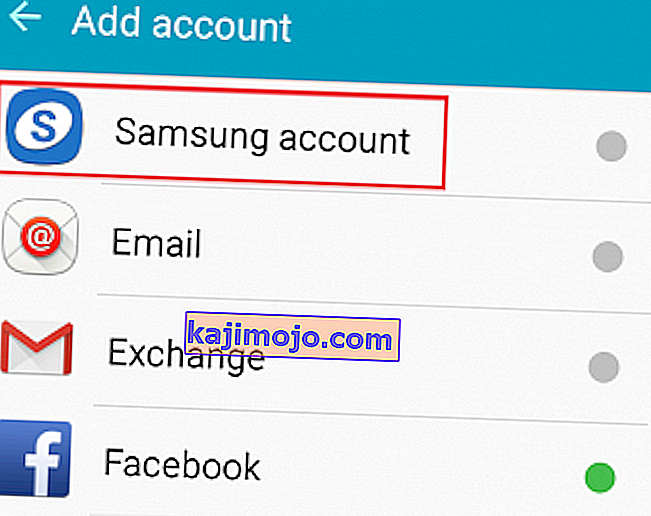
- Go to Settings > Accounts.
- Tap on your Samsung account and then select Profile. If you don’t see an entry with Samsung account, tap on Add account and insert the username and password or create a new account.
- Confirm your password and hit Next.
- Tap on Close and restart your device.

Method 2: Log in to Samsung account with a PC/MAC
If you still get the “Samsung account session expired” error, try logging with your Samsung account on a desktop device. Some users have reported that after successfully login in into Samsung’s Web site, the error disappeared for good. Follow the steps below:
- Visit Samsung’s website and tap on Sign In (located in the top-right corner).
- Insert the email linked to your Samsung account and password here and click on Sign in.
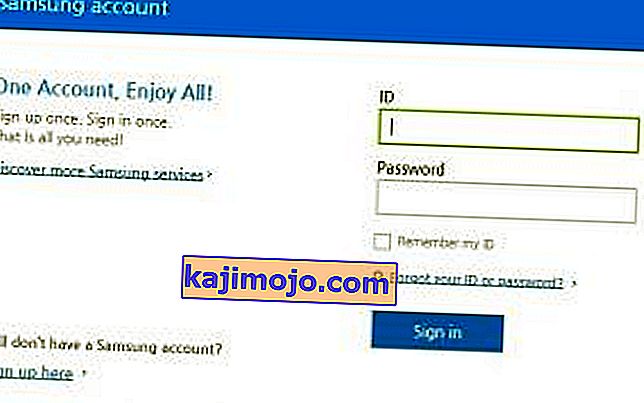
- After you’ve logged in on Samsung’s site, close the window and go about your usual business.
- Next time when you get the “Samsung account session expired” error on your Android, tap on the notification and insert your user credentials again. This should ensure you won’t get a notification ever again.

Method 3: Disabling Auto sync
If you’re still receiving the error, let’s get our hands dirty and disable auto synchronization for the Samsung account. Here’s how:
- Go to Settings and tap on Cloud and accounts.
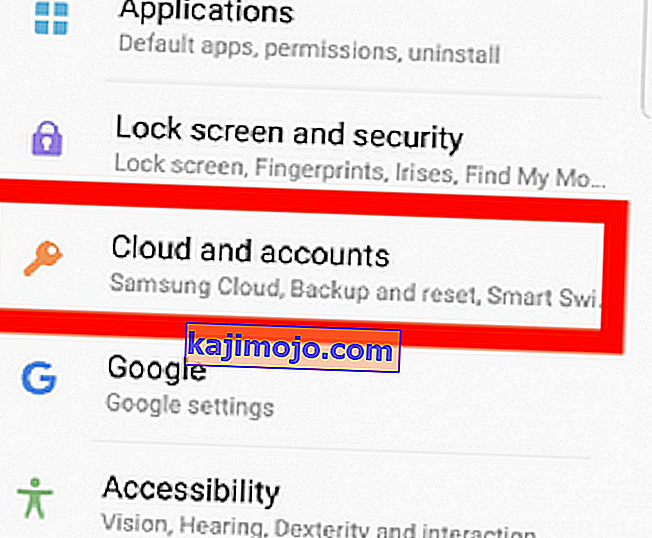
- Once you’re inside, tap on Accounts and look for an entry called Samsung account.
- If you’re already logged in, you should see the action button located in the top right section of the screen. Tap on it.
Note: If you’re not logged in, make sure you insert your credentials before tapping the action button.
- Select Sync all and restart your device.
- If you’re still welcomed by the dreadful notification after you restart, go back to Settings > Cloud and accounts > Accounts and tap on Samsung account. But this time, instead of tapping on Sync all, tap on Disable auto sync.

Method 4: Canceling Sync
If you’re running on an older Android version, the steps of disabling sync for your Samsung account are a little different. The end result is the same as disabling auto sync. Here’s how:
- Go to Settings > Accounts.
- Scroll down and tap on Samsung account.
- Instead of tapping on the action icon, you will see a Cancel sync entry a the bottom of the screen. Tap on it and wait until you get a toast message saying “sync canceled“.
Note: If you aren’t able to see Cancel sync, you have a newer Android version that had that entry removed.
- Restart your phone and see whether the notification appears again. If it does, retype your password and hit Done.