Warframe adalah gim aksi daring orang ketiga yang bebas bermain dan kooperatif dengan latar dunia sci-fi yang terus berkembang dan mengumpulkan cukup banyak basis penggemar di sekitarnya. Gim ini bergerak cepat dan mencakup hal-hal yang belum pernah Anda lihat sebelumnya dalam latar sci-fi yang indah.

Namun, Anda telah menjalankan versi game terbaru untuk memainkannya dan mengunduh pembaruan terbaru terkadang tidak dapat dilakukan karena kesalahan "pembaruan gagal". Masalah ini tersedia di Steam dan pada klien game mandiri, jadi kami telah mengumpulkan metode yang dapat diterapkan di kedua skenario ini untuk Anda periksa.
Apa Penyebab Pembaruan Warframe Gagal?
Ada berbagai hal berbeda yang dapat menyebabkan pembaruan Warframe gagal dan kami telah memfokuskan pada hal yang paling umum yang muncul kepada pengguna secara teratur. Sayang sekali bahwa beberapa hal yang hampir tidak terkait dengan game dapat menyebabkannya berperilaku buruk tetapi semuanya dapat diselesaikan dengan mudah. Berikut daftar lengkapnya:
- Penginstalan Microsoft Visual C ++ Redistributable yang salah
- Pengaturan koneksi internet
- Pengaturan peluncur Warframe
- Instalasi DirectX yang rusak atau hilang
- Cache game
- Malware berjalan di komputer Anda
Solusi 1: Perbaiki Microsoft Visual C ++ Redistributables Anda
Masalah gagal pembaruan Warframe sering disebabkan oleh pembaruan Windows yang rusak atau rusak yang entah bagaimana merusak instalasi Microsoft Visual C ++ Redistributables. File sistem lain mungkin juga terpengaruh dan Anda harus merawatnya juga setelah memperbaiki instalasi Microsoft Visual C ++ Redistributable Anda.
- Klik tombol menu Start dan buka Control Panel dengan mencarinya di sana. Selain itu, Anda dapat mengklik ikon roda gigi untuk membuka aplikasi Pengaturan jika OS yang Anda instal adalah Windows 10
- Di Panel Kontrol, alihkan Lihat sebagai opsi ke Kategori di sudut kanan atas dan klik Hapus Program di bawah bagian Program di bagian bawah jendela panel Kontrol.
- Jika Anda menggunakan aplikasi Pengaturan pada Windows 10, cukup mengklik Aplikasi akan segera membuka daftar semua program yang diinstal pada PC Anda.
- Temukan Paket Microsoft Visual C ++ Redistributable di Control Panel atau Pengaturan dan klik Modify setelah mengkliknya sekali. Anda mungkin memperhatikan bahwa ada beberapa versi utilitas yang berbeda. Anda perlu mencatatnya dan mengulangi proses perbaikan untuk masing-masingnya.
- Anda mungkin perlu mengkonfirmasi beberapa kotak dialog dan mengikuti instruksi yang akan muncul bersama wizard. Pastikan Anda memilih Perbaiki untuk setiap versi utilitas.
- Klik Selesai saat wizard selesai dengan proses dan ulangi proses untuk semua versi Paket Visual C ++. Periksa untuk melihat apakah Warframe dapat memperbarui sekarang dengan meluncurkannya.
Sekarang, jika ini tidak berhasil. Anda dapat memilih untuk Menghapus setiap Microsoft Visual C ++ Redistributable dan mengunduhnya lagi. Anda perlu menginstal ulang Visual C ++ dengan menempatkannya di sini. Pilih versi yang ingin Anda unduh dan pilih unduhan sesuai dengan prosesor Anda (32-bit atau 64-bit).
Temukan file yang baru saja Anda unduh di folder Windows, jalankan, dan ikuti petunjuk di layar untuk menginstal Paket Microsoft Visual C ++ Redistributable yang Anda pilih untuk diunduh. Ulangi proses yang sama untuk semua versi yang sebelumnya Anda hapus instalannya dan periksa untuk melihat apakah pembaruan Warframe gagal lagi.
Juga, coba jalankan pemindaian SFC untuk memverifikasi bahwa semua driver dan file penting Windows ada di tempatnya.
Solusi 2: Atur Ulang Pengaturan LAN
Jika Anda telah mengubah pengaturan tertentu mengenai koneksi Internet Anda agar sesuai dengan program lain atau jika Anda hanya ingin meningkatkan sesuatu, Anda harus tahu bahwa banyak program bergantung pada koneksi Internet Anda yang diatur secara normal. Pastikan Anda membatalkan perubahan ini dengan mengikuti langkah-langkah di bawah ini.
- Buka Internet Explorer di komputer Anda dengan mencarinya di Desktop atau menu Start. Klik ikon Roda Gigi yang terletak di sudut kanan atas. Dari menu yang terbuka, klik opsi Internet untuk membuka daftar tentang pengaturan koneksi terkait.
- Jika Anda tidak memiliki akses ke Internet Explorer, Buka Control Panel dengan mencarinya di menu Start atau dengan menggunakan kombinasi tombol Windows Key + R, ketik “control.exe” di bilah Run, dan klik OK untuk jalankan Control Panel.
- Di Panel Kontrol, pilih Kategori " Lihat sebagai " di pojok kanan atas dan klik tombol Jaringan dan Internet untuk membuka bagian ini. Di dalam jendela ini, klik opsi Internet untuk menavigasi ke layar yang sama seperti yang Anda lakukan jika membuka Internet explorer.
- Arahkan ke tab Connections dan klik Pengaturan LAN.
- Centang kotak di sebelah Automatically Detect Settings dan pastikan server Proxy kosong kecuali Anda secara aktif menggunakannya, yang tidak disarankan jika Anda tidak ingin pengaturan koneksi lebih lanjut saat bermain Warframe.
- Pastikan Anda menerapkan perubahan yang Anda buat dan restart komputer Anda sebelum Anda memeriksa untuk melihat apakah kesalahan pembaruan Warframe gagal masih muncul.
Solusi 3: Sesuaikan Beberapa Pengaturan Peluncur
Tidak semua pengaturan di jendela peluncur dapat digunakan di setiap komputer dan terkadang ada pengaturan yang harus dinonaktifkan agar proses pembaruan berfungsi. Anehnya, beberapa pengaturan tersebut bahkan termasuk menonaktifkan DirectX10, DirectX11, atau bahkan keduanya! Namun, menonaktifkan unduhan Massal juga akan membuat prosesnya berjalan!
- Buka peluncur Warframe baik dengan mengklik dua kali pintasan permainan atau dapat dieksekusi dari Desktop atau tempat lain di komputer Anda seperti menu Mulai, dll.
- Jika Anda mengunduh dan menginstal game di Steam, buka, navigasikan ke tab Library, dan klik dua kali entri Warframe untuk meluncurkannya.
- Saat peluncur game terbuka, cari ikon roda gigi di sudut kanan atas, di sebelah 'x' dan tombol perkecil, dan klik di atasnya untuk membuka pengaturan peluncur.
- Nonaktifkan opsi Download Massal di jendela baru yang akan terbuka dan klik OK. Coba perbarui gim sekarang. Selain itu, pengguna telah melaporkan bahwa menonaktifkan opsi DirectX10 dan DirectX11 0 juga dapat memperbaiki masalah, jadi pastikan Anda mencobanya juga.
Solusi 4: Instal ulang DirectX
Jika instalasi DirectX Anda rusak dan jika Anda menggunakan DirectX 9 atau lebih lama yang tidak diinstal sebelumnya pada versi Windows OS yang lebih lama, Anda pasti harus mempertimbangkan untuk mengunduh penginstal DirectX dan menjalankannya untuk menginstal ulang dan mungkin menyelesaikan masalah. . Ini telah berhasil untuk pengguna lain dan kami berharap ini akan berhasil untuk Anda!
- Kunjungi Halaman Unduhan Penginstal Web DirectX End-User Runtime di situs web resmi Microsoft yang ditautkan dalam langkah ini.
- Scroll down, locate, and click the red Download button at the site and follow the instructions which will appear on screen in order to directly download the Web Installer for DirectX on your computer.
Note: Microsoft will probably offer a couple of their applications after you click the Download link, but you should uncheck those products if you’d rather not have them on your computer. If you choose not to download these utilities, the Next button will be renamed to No thanks and continue.
- Perform the DirectX installation process by opening the downloaded .exe file in your Downloads folder and following any instructions from the DirectX installation wizard. You will need to scroll through the Terms & Conditions page (while reading it, of course) and click on the Next button.

- Restart your computer and check to see if the Warframe update error still appears after launching the game.
Solution 5: Failing to Connect Due to Network Errors
If you suspect you have to blame your Internet connection for the fact Warframe won’t launch, you should definitely try this method out. It’s particularly useful if you find out that you can update the game using your mobile data connection by connecting to a hotspot created by your phone. Follow the steps below for these ultra-helpful commands!
- Search for “Command Prompt” by typing it either right in the Start menu or by pressing the search button right next to it. Right-click the first entry which will pop up as a search result and select the “Run as administrator” context menu entry.
- Additionally, you can also use the Windows Logo Key + R key combination in order to bring up the Run dialog box. Type in “cmd” in the dialog box which appears and use the Ctrl + Shift + Enter key combination in order to run Command Prompt using administrator privileges.

- Type in the following commands in the window and make sure you press Enter after typing each one. Wait for the “Operation completed successfully” message or something similar to know that the method has worked and you haven’t made any mistakes while typing. Make a short pause between these two commands.
ipconfig/flushdns ipconfig/release ipconfig/release6 ipconfig/renew
- Reopen Warframe either by double-clicking its shortcut on your computer or by launching it through Steam and check to see if the Warframe update failed problem has disappeared.
Solution 6: Run the Game’s Launcher as an Administrator
Running an app as an administrator gives it extra privileges and access to actions that may have been blocked by default on your operating system. This shouldn’t occur normally but users have reported that simply running the launcher with admin privileges enables it to download and install the update so make sure you try this out before giving up!
- Open up Steam by double-clicking its icon on the Desktop or by searching for it in the Start menu. Head over to the Library section in the Steam window by locating the Library tab at the top, and locate Warframe in the list of games you own in your library.
- Right-click on its entry and choose Properties. Navigate to the Local Files tab and choose Browse Local Files.

- If you have the standalone client version of Warframe, you can still locate the game’s installation folder manually. The easiest way would be to right-click the game’s shortcut on Desktop or anywhere else and choose Open file location from the menu.
- Anyway, once inside the installation folder, locate and open the Tools folder. Inside, you should be able to see a file named Launcher or launcher.exe. Right-click on this file and choose Properties. Navigate to the Compatibility tab in the Properties window and check the box next to the “Run this program as an administrator” option.

- Apply the changes you have made and try relaunching Warframe from where you installed in order to see if the problem still occurs.
Solution 7: Switch Languages from the Launcher
Switching the language to anything else than the one you had when the error occurred appears to have worked for plenty of Warframe players even though the method appears too basic. This is more of a workaround for the problem but you can simply switch everything back to English after the update is downloaded and installed successfully.
- Open Warframe’s launcher by double-clicking the game’s shortcut or executable from Desktop or any other place on your computer such as Start menu, etc as this will automatically open the launcher.
- If you downloaded the game via Steam, open it, navigate to the Library tab and double-click the Warframe entry in order to open it.
- When the game’s launcher opens, locate the language text at the top right corner, next to the ‘x’, minimize, and settings buttons. Change it to something else and wait for the launcher to reload. Repeat the same process for a couple of languages until it finally works!

Solution 8: Reset the Game’s Cache
The games keep its cache internally on your computer, inside its installation folder, and deleting or renaming it should reset its updating process and start certain things from scratch. This is a great fix as it allows you to skip any uninstallation and fix the problem simply by using File Explorer and/or Steam on your PC!
- Open up Steam by double-clicking its icon on the Desktop or by searching for it in the Start menu. Head over to the Library section in the Steam window by locating the Library tab at the top, and locate Warframe in the list of games you own in your library.
- Right-click on its entry and choose Properties. Navigate to the Local Files tab and choose Browse Local Files.
- If you have the standalone client version of Warframe, you can still locate the game’s installation folder manually. The easiest way would be to right-click the game’s shortcut on Desktop or anywhere else and choose Open file location from the menu.
- Anyway, once inside the installation folder, locate the Cache. Windows folder. Right-click on this folder and choose the Rename option. Change its name to Cache.Windows.old or something like that and click Enter. Reopen the launcher and check to see if the update will start properly. If other errors appear, revert the changes to the folder’s name.
Solution 9: Scan Your Computer for Malware
Users have reported that they have contacted the Warframe support team and they claimed that the error is sometimes caused by malware residing on users’ computers. When Warframe servers register the unusual behavior, they block the ISP and you need to get rid of malware before gaining access again.
Here, we will show you how to scan your PC with Malwarebytes as it often shows the best results considering the fact that it really has a vast database. Good luck!
- Malwarebytes Anti-Malware is a great anti-malware tool with a free trial version you can download from the Internet. Hopefully, you won’t need the full program after you solve this issue (unless you want to buy it and have it ready for other problems) so make sure you download the free trial version by clicking here.

- Locate the executable file you just downloaded and double-click on it in order to open it on your computer.
- Select where you want to install Malwarebytes and follow the instructions which will appear on the screen in order to complete the installation process.

- Open Malwarebytes and select the Scan option available at the home screen of the application.
- The tool will probably launch its update service in order to update its virus database and then it will proceed with the scan. Please be patient until the process finishes which might definitely take a while. If malware is detected on your computer, confirm to have it deleted or quarantined.
- Restart your computer after the scanning process is over and check to see if you still experience issues with the Warframe update failed.
Note: You should also use other security tools if you can tell the type of malware you have on your computer (ransomware, junkware, etc.) as one tool probably won’t register all types of malicious apps.
Solution 10: Reconfigure Launcher Settings
If you are running the game in 64-bit mode from the launcher configurations and have recently changed this setting or if you have made any changes to the computer recently, you might be getting this issue. Therefore, in this step, we will be reconfiguring the launcher settings to stop the game from running in 64-bit mode. For that:
- Click on the war frame to open the launcher menu.
- Select the cog at the top right corner of the launcher menu and select the “Launcher Settings” option from the list.
- In the launcher settings, uncheck the “Enable 64-bit Mode” option and then save your changes.

- Try to update the game and then check to see if the issue still persists.

Solution 11: Allow the game through Firewall
It is possible that the connection between the Warframe servers and your computer is getting derailed due to blockage from your Windows Firewall. Therefore, in this step, we will be making sure that the Windows Firewall isn’t blocking Warframe from making contact with its servers by adding a rule that allows the game to function without any restrictions by the Firewall. For that:
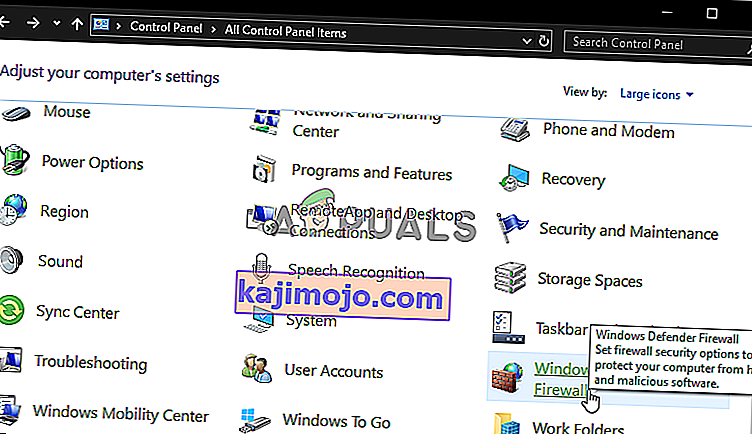
- Press “Windows” + “R” to launch the run prompt.
- Type in “Control Panel” and press “Enter” to launch the Classical Control Panel Interface.

- Click on the “View By:” button on the top and then click on the “Large Icons” option.
- Click on the “Windows Defender Firewall” button and then click on the “Advanced Settings” option from the late side.
- First of all, click on the “InboundRules” option from the left side and then click on the “New Rule” option on the right side of the window.
- Now select “Program” from the Rule Type window and click Next. (This includes SQLbrowser.exe).
- Hit browse below “This Program Path” to select the program executable file, then click Next.
- Make sure that “Allow the Connection” box is selected, then click Next.
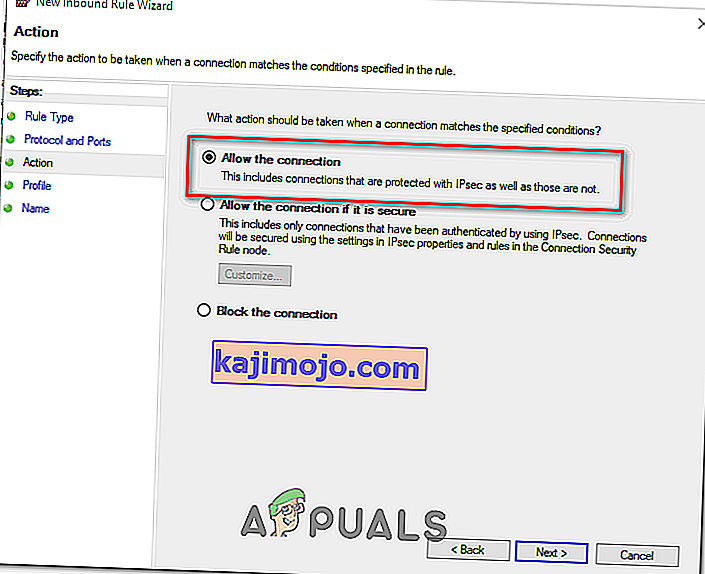
- Select when to apply the rule (Domain, Private, Public), in this window, make sure to allow it for all connections and click on “Next”.
- Choose a name for the rule and enter a description if you want to.
- Click on Finish to add an Inbound rule that allows Warframe requests that are coming to the computer.
- In order to fully allow Warframe through the Firewall, we will also have to create a similar Outbound rule to ensure that the game is allowed to fully connect with its servers.
- Similarly, create an outbound rule by selecting “Outbound Rules” instead of “Inbound Rules” in the fifth step.
- Check to see if the issue persists after creating this exception.


Solution 12: Update Windows
Updating your Windows is necessary and an effective way for your system to run smoothly and in optimal conditions. It allows the latest features and various bug fixes to work on your PC. Installing the latest windows update could be really beneficial in resolving such errors and we will be performing exactly that by checking for any available updates on our computer. For that:
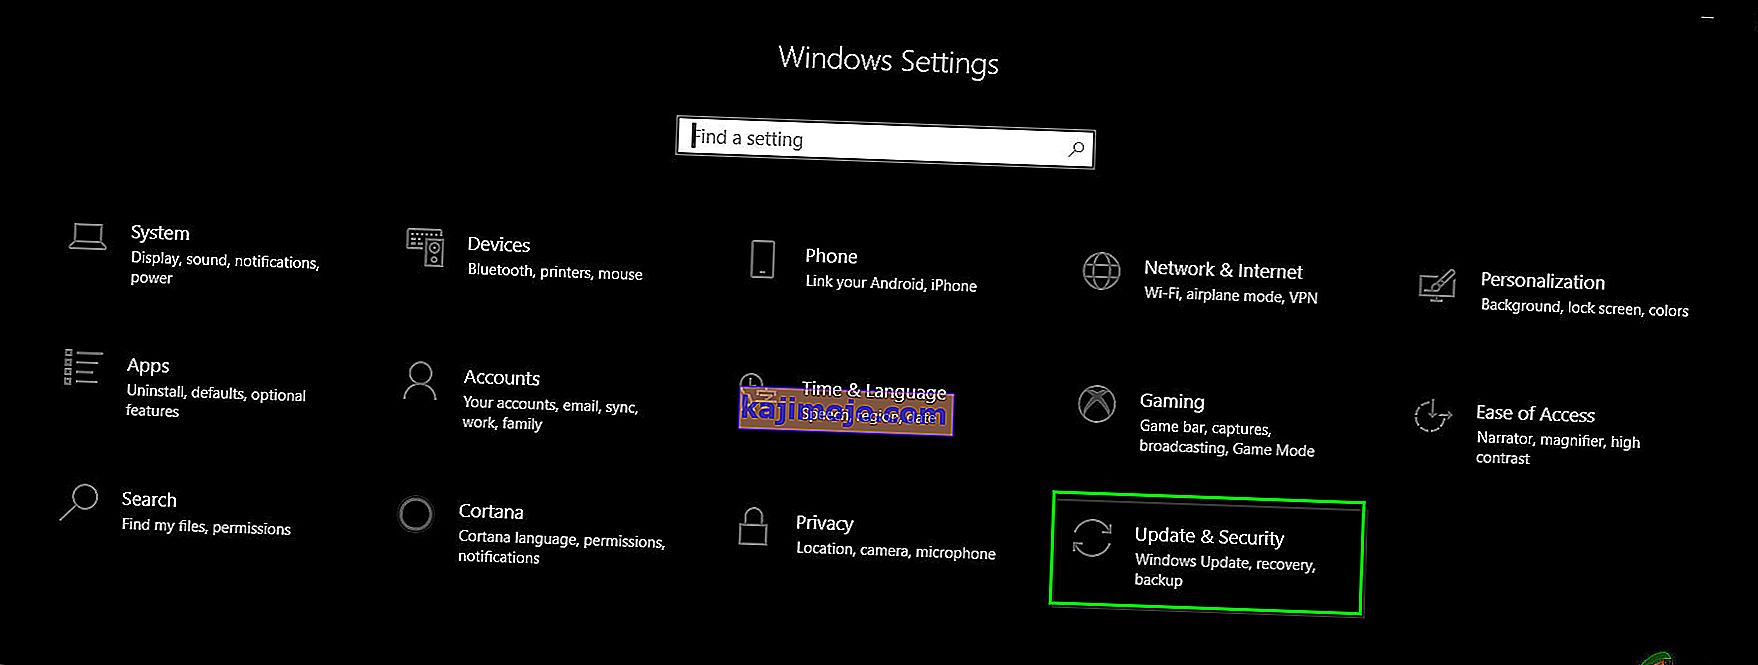
- Press “Windows’ + “I” buttons on your keyboard to open the settings.
- Click on the “Update& Security” option from this menu and then select “Windows Update” from the sidebar.
- Click on the “Check for Updates” option to prompt an automatic update check on your computer.
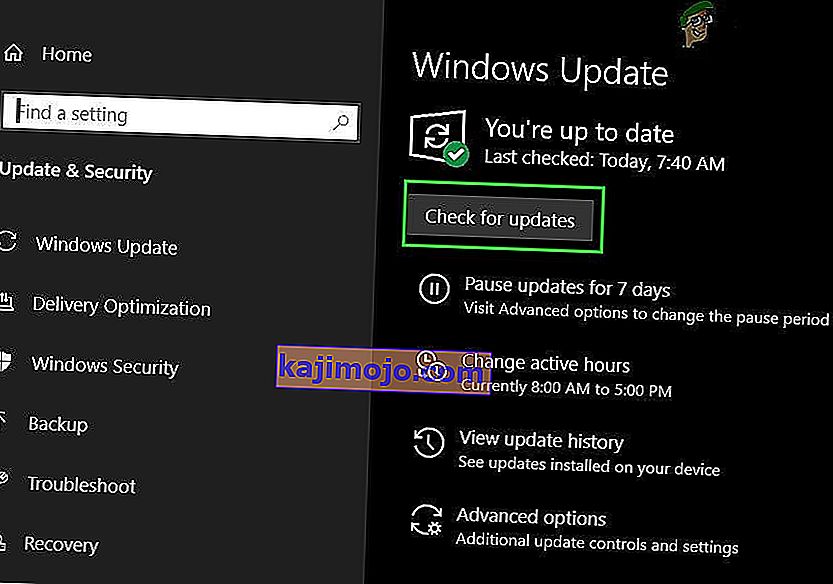
- Your computer will now automatically check and install any available Windows updates.
- After updating your computer, check to see if the issue persists.


Solution 13: Disable Avast
Avast Antivirus is generally known not to play well with games like Warframe and it can often block them from being able to communicate with their servers. Therefore, as a temporary check, you can try disabling Avast and see if the game works with the Antivirus disabled. In order to do that:
- Go to the Windows taskbar and search for the Avast icon. Right-click on it and select the “Avast Shields Control”. Choose among one of the following given options:
Disable for 10 minutes
Disable for 1 hour
Disable until computer is restarted
Disable permanently
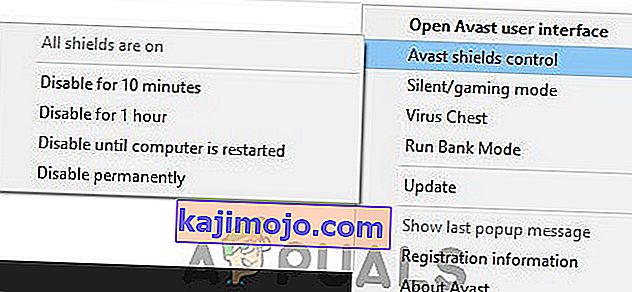
- Confirm your choice by tapping Yes when Avast asks you and its done. Avast antivirus and all the shields should be now paused for the period you have chosen.
- To check whether the antivirus is really disabled just open its main window. If it is red and says “All antivirus shields are off” then everything worked as it should. To return the function, click on the button “Resolve” and wait for a second to see the message “You’re protected”.
- While the Antivirus is disabled, confirm if the game works or not.

Solution 14: Disable VPN
If you are using a VPN or a proxy on your computer to mask your internet connection by bouncing it off of a couple of servers and are actively hiding your internet usage, you might get this error with the game. Therefore, it is advised that you temporarily disable all VPN connections on your computer if you have ever set one up and make sure you aren’t masking your location in any way.
Most servers get suspicious if the internet connection is being bounced from a couple of other servers before it reaches there and is trying to access resources. They might consider it a harmful connection and perceive the attempt as a threat and block it from being able to access the server resources. Therefore, it is always best to check if the issue goes away with the VPN disabled.
Solution 15: Reset the Internet Connection
Most of the time, a bad internet connection is always the main trigger behind all failed updates and downloads. Prior to seeking any other remedy, you should try to reset your internet connection. Whenever the internet stops working or you face a network connection problem always try to restart your equipment first. Proceed as follows:
- As a first step, you must unplug your router and modem from the power supply (You may have to remove the battery for some devices as well).

- Now wait for around 30 seconds and then plug them back in: first the modem and then the router.
- Wait for a while for them to completely power back on.
- After all the hardware gets their full functionality back, check to see if this little maneuver has fixed the issue for us.

Solution 16: Try Using a VPN
If you haven’t ever set up a VPN connection on your computer and are using your main ISP without masking your location, you might get this error due to a regional problem. While sometimes the VPN can be the source of the problem, it can also come to save the day in some situations. If your area is facing a location ban from the server either temporarily or permanently, a VPN just might be able to fix the issue for you by masking your location and bouncing the request off of another server. Make sure to use a reputable VPN and check if doing so fixes the issue.
Solution 17: Check Computer’s Connection with Warframe Website
Sometimes the failed update error can also be caused when you are unable to access the Warframe.com website with the internet explorer. So, make sure to check whether your PC can connect to the war frame website or not. Try to browse the //warframe.com website in the internet explorer. Some specific Windows components are used by the War frame launcher which are in turn used by the Internet Explorer. So, if you can’t access the war frame website in internet explorer, chances are, your connection has been blocked. To overcome this issue, you are required to send a ticket to War frame Support.
Solution 18: Reconfigure Internet Explorer
There exists an offline mode in Internet explorer which helps to download the websites automatically even when the internet is not available. This feature can sometimes prevent applications from being able to establish a secure connection between their servers. Therefore, in this step, we will be disabling this option. For that:
- Press “Windows” + “R” on the keyboard and type in “inetcpl.cpl”.
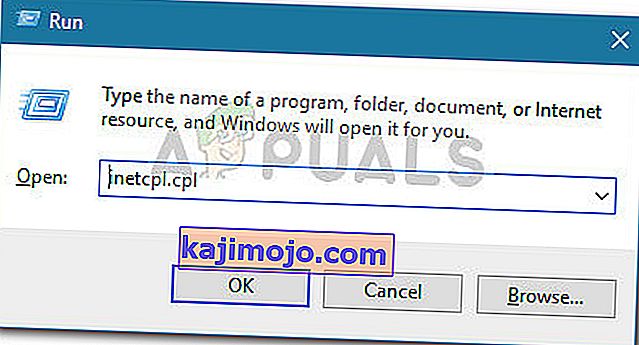
- Press “Enter” to launch the internet explorer options window.
- Click on the “Connections” tab and ensure that the “Never Diala Connection” option is selected.
- Also, click on the “Advanced” tab, and under the “Browsing” options, uncheck the “Enable Offline items to be synchronizedona Schedule” option.
- After making these changes, save them and exit out of the window.
- Check and see if doing so has fixed the issue with the game.

Solution 19: Remove Temporary Internet Files
In this step, try to delete all the temporary internet files from the Internet Explorer which might get saved whenever you access a website through your browser. After doing so, we will be checking if doing so has rectified the error with the game or not. In order to do that:
- Press “Windows’ + “R” on the keyboard, type in “Inetcpl.cpl” and then press “Enter” to launch the internet explorer options window.
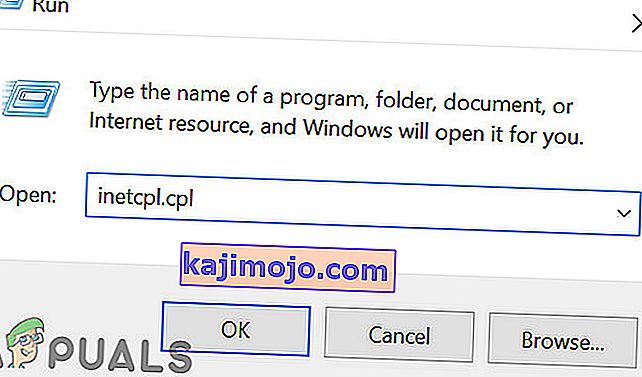
- Under the “General” tab, click on the “Delete” option.
- After that, uncheck each box except “Temporary Internet files” and press the “Delete” button.

- After doing this, check to see if the issue is fixed.


Solution 20: Set the Date and Time
Sometimes, the incorrect setting of the Date and Time might actually be triggering this issue on your computer. According to our research, the date and time settings are important because they are used by the computer to check the validity of a site or a server’s security certificate and if the date and time aren’t set properly, the certificate cannot be properly verified. Therefore, in this step, we will be correcting the computer’s date and time. For that:
- Search and locate for the time icon in the lower right corner of your PC desktop.
- Right-Click on the Date and Time display tile and click on the “Adjust Date/Time” button.
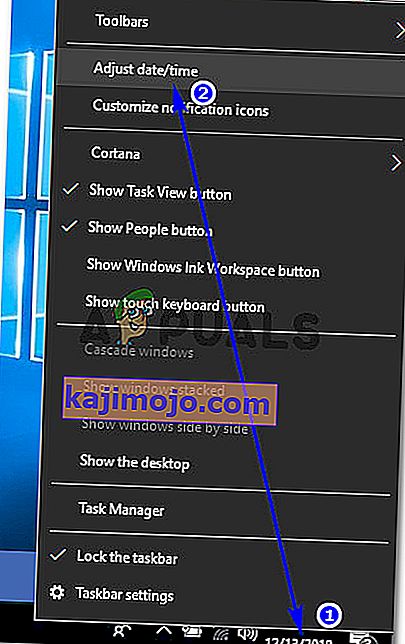
- Toggle the “Automatic Date and Time” off and select the option “Change” under the “Set Date and Time Manually” heading.
- Reconfigure the date and time to match the current date and time in your region.
- Check to see if doing so has fixed the error message.

Solution 21: Give an interval between the download process
Penyebab utama di balik terjadinya kesalahan ini bisa jadi adalah masalah server bingkai Perang. Server terkadang kelebihan beban saat banyak orang mencoba mengunduh pembaruan pada saat yang bersamaan. Dalam hal ini, Anda hanya perlu duduk dan terus mencoba beberapa saat hingga proses pengunduhan selesai. Anda mungkin juga menerima pesan “download akan segera dimulai ulang”. Dalam skenario ini, Anda tidak perlu campur tangan dan membiarkan sistem memulai proses pengunduhan secara otomatis. Proses ini mungkin memakan waktu dan Anda harus bersabar sampai beban server dilepas dan koneksi Anda dapat mulai mengunduh pembaruan.