Steam Cloud menyediakan cara yang mudah dan transparan untuk menyimpan data game Anda di sistem penyimpanan jarak jauh. File yang ditentukan dalam konfigurasi Auto-Cloud atau jika ditulis ke disk akan secara otomatis direplikasi ke server cloud Steam (menggunakan Cloud API) setelah game tersebut ada.

Ini sangat berguna jika pengguna mengganti komputernya. Kemajuan game akan dilanjutkan dengan Cloud API atau membaca langsung dari disk. File akan diunduh secara otomatis sebelum game diluncurkan karena Anda sudah memasukkan kredensial Steam Anda. Tugas utama Steam Cloud adalah memastikan bahwa semua file disinkronkan di semua komputer yang digunakan pengguna.
Pengguna memiliki opsi untuk menonaktifkan seluruh sinkronisasi Cloud yang ada di Pengaturan Steam di klien. Pengguna juga memiliki fleksibilitas untuk menonaktifkan sinkronisasi Cloud per game. Tetapi sebelum melanjutkan dengan solusi, perbarui klien Steam ke versi terbaru.
Apa Perbedaan Metode Memanfaatkan Steam Cloud?
Steam menawarkan dua metode berbeda untuk memanfaatkan Steam Cloud.
Yang pertama adalah Steam Cloud API. Cloud API menyediakan serangkaian fungsi yang memungkinkan Anda mengintegrasikan Steam Cloud secara langsung ke dalam game Anda. Cloud API juga melakukan tugas mengisolasi file pengguna Steam individu dari satu sama lain dan juga memberikan kontrol yang lebih baik atas Steam Cloud secara keseluruhan.
Yang kedua adalah Steam Auto-Cloud. Fitur ini dirancang terutama untuk game lama yang sulit menggunakan Cloud API. Ini adalah cara cepat untuk memulai dengan Steam Cloud tetapi tidak memiliki fleksibilitas dan daya yang disediakan oleh Steam Cloud API.
Direkomendasikan oleh pengembang untuk menggunakan Cloud API daripada Steam Auto-Cloud karena menyediakan integrasi dan penyesuaian yang lebih dalam dan efektif. Ini memungkinkan Anda untuk mendapatkan hasil maksimal dari cloud Steam.
Bagaimana cara saya menyelesaikan konflik awan uap?
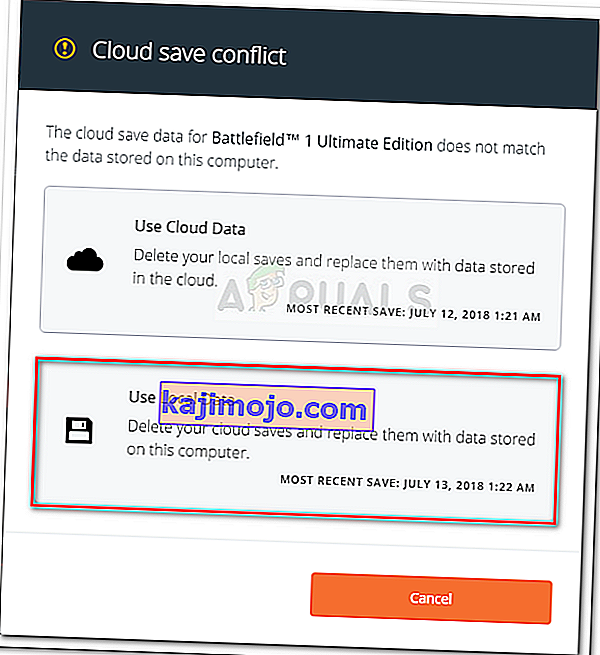
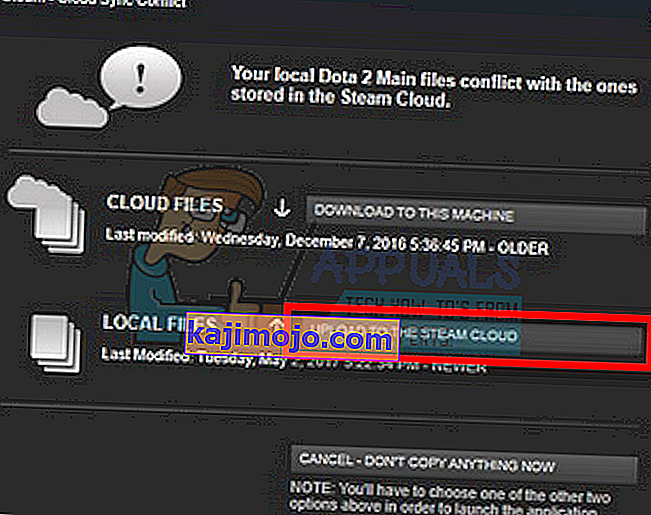
Konflik Steam Cloud terjadi ketika konten Steam Cloud tidak cocok dengan file game lokal Anda yang disimpan di hard drive Anda. Ini dapat terjadi di komputer yang Anda gunakan saat itu atau mungkin terjadi di komputer lain sebelumnya. Karena file dimodifikasi di dua lokasi berbeda tanpa sinkronisasi di antara mereka, Steam tidak dapat menentukan file mana yang akan disimpan.

Anda kemungkinan besar akan memilih file yang paling baru diubah. Artinya perkembangan terbaru dalam game Anda akan disimpan. Anda harus dengan hati-hati memeriksa data yang dipratinjau di jendela. Tinjau dengan hati-hati tanggal dan waktu konteksnya dan sesuaikan ini dengan terakhir kali Anda memainkan game di Steam. Konteks ini dapat membantu Anda dalam menentukan versi mana yang akan disimpan.
Perhatikan bahwa bermain game dalam mode offline akan membuat game Anda tidak disinkronkan dan ini adalah penyebab paling mungkin dari konflik Steam Cloud.
Bagaimana Jika Steam Tidak Dapat Menyinkronkan File ke Cloud?
Kesalahan ini menunjukkan bahwa Steam tidak dapat menyinkronkan file lokal Anda dengan Steam Cloud. Ini bisa menjadi masalah sementara yang mungkin dihadapi server Steam Cloud. Anda dapat memeriksa status Steam Cloud dari situs web Steam untuk memastikan bahwa masalahnya ada di pihak mereka.

Jika layanan cloud Steam aktif dan berjalan dengan sempurna, itu berarti masalahnya ada di pihak Anda. Anda dapat memeriksa koneksi Steam Anda dan memecahkan masalah. Anda juga dapat memeriksa apakah hanya Anda yang mengalami masalah sinkronisasi dengan Steam Cloud.
Jika Anda mengabaikan pesan tersebut dan mengklik "Mainkan game", ini dapat menyebabkan potensi konflik antara file lokal Anda dan Steam Cloud. Itu juga dapat mengakibatkan hilangnya kemajuan dan data game.
Bagaimana Jika Saya Kehilangan File atau Kemajuan Setelah Pindah ke Komputer Lain?
Jika Anda kehilangan kemajuan terbaru dan telah memeriksa ulang bahwa gim tersebut menggunakan Steam Cloud menggunakan Pengaturan, itu berarti Steam tidak dapat menyinkronkan data Anda dengan sukses atau sinkronisasi mengakibatkan data Anda sebelumnya diunggah ke Awan.
Ada kemungkinan file asli Anda atau kemajuannya masih ada di komputer lama dan tidak dapat disinkronkan. Dimungkinkan jika Anda meluncurkan Steam di komputer itu, kemajuan Anda akan ditampilkan. Jika ya, itu akan secara otomatis diperbarui di semua mesin lain yang terhubung dengan akun Steam Anda.
Selain itu, banyak game tidak menggunakan fasilitas Steam Cloud. Anda dapat memeriksa halaman resmi gim jika dukungan Steam Cloud tersedia. Jika tidak dan Anda tidak memiliki akses ke mesin yang lebih lama, itu berarti kemajuan Anda hilang dan tidak ada cara untuk memulihkannya.
Bagaimana Cara Menghapus File yang Disimpan di Server Cloud Steam?
Steam Cloud digunakan untuk mencadangkan setiap kemajuan gim Anda sehingga Anda tidak kehilangan kemajuan jika Anda mengakses gim dari komputer lain. Anda dapat mengonfirmasi bahwa kemajuan Anda disimpan oleh Cloud menggunakan metode berikut.
Periksa apakah Game Anda Dicadangkan.
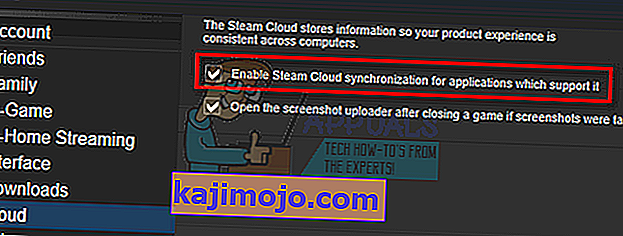
- Buka klien Steam Anda . Buka Pengaturannya dengan menekan tombol Steam yang ada di sudut kiri atas jendela dan pilih opsi.
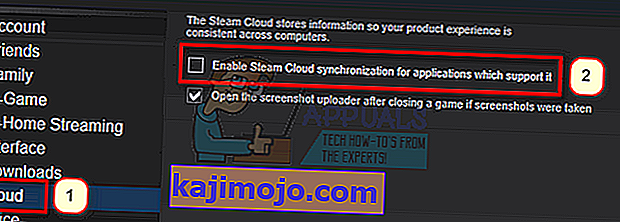
- Buka tab Cloud yang ada di sisi kiri layar. Periksa apakah opsi " Aktifkan sinkronisasi Cloud Steam untuk aplikasi yang mendukungnya " dicentang.
- Selanjutnya klik pada tab Library yang ada di sisi atas klien Steam. Di sini semua game Anda akan dicantumkan.
- Klik kanan pada game dan pilih Properties . Kemudian arahkan ke tab Pembaruan yang ada di bagian atas jendela.
- Di sini, di bagian bawah jendela, Anda akan melihat opsi " Aktifkan sinkronisasi Cloud Steam untuk [nama game] ". Pastikan opsi dicentang .


Jika Anda mengaktifkan kedua opsi, itu berarti game Anda didukung oleh Steam Cloud dan kami juga dapat menghapus data.
Apa itu Mekanisme Cadangan?
Hal pertama yang harus Anda ketahui adalah bahwa ada tiga versi data permainan yang disimpan
- Versi asli disimpan di folder AppData ( D1 ).
- Versi cloud disimpan di lokasi Steam / userdata / SteamID / AppID ( D2 ).
- Versi cloud disimpan di server cloud Steam ( D3 ).
Perhatikan anotasi (D1, D2, D3) yang kami gunakan karena kami akan banyak merujuknya di masa mendatang.
When you start the game for the first time, D1 is created automatically. After you are done playing the game, the game data is updated in D1 and automatically copied to D2. After this D2 is then synced to D3, thus uploading all of your game content.
If you start your game from another computer for the first time, if Steam has D3 on its servers but doesn’t detect D2 on the computer, it will automatically download the data and copy D3 to D2. Steam Cloud also automatically downloads the missing data whenever you start Steam.
In a nutshell, the most important data for us is D2. If we can manipulate it, we can successfully delete the data which you want to delete.
Note: Some games don’t have D1 and they directly save their data to D2. While some games don’t use D2 as a medium and upload the data to the Cloud directly from D1.
What Are the Userdata Contents?
In the directory Steam/userdata, you should have a folder corresponding to your SteamID (You check what your Steam ID is by reading our article on it). After you open it, there will folders made for each game that you play. They will be identified using their AppID (AppID can be easily checked by visiting the game in the Steam store and extracting it from the URL). In this game folder, you will find two entities.
- remotecache.vdf: This file describes all the properties of files that are contained in the remote folder.
- Remotefolder. This contains all the files which are synced with your Steam Cloud server.
Deleting Data from Cloud
In this method, we will be following two important steps. We will first bring up the Steam Cloud conflict notification and then delete the Cloud files.
Do note that you would have to follow these steps game by game to delete all of the Steam cloud content.
First, we need to delete the AppID folder from your Steam directory. After you restart your computer and Steam, Steam will automatically re-create the folder. We need to perform this step to ensure that the Steam Cloud is working perfectly and we can go ahead with the part of deletion.
- Open your Steam directory. The default location for your Steam installation is
C:\Program Files (x86)\Steam
- Search for a folder of AppID and Delete it. Then restart your computer and Steam. Start a game for a few minutes. Make sure that you have a working internet connection.
- Navigate back to the Steam directory and check if the AppID folder is back. If it is, it is confirmed that your Steam Cloud is working perfectly and we can proceed with the method.
Bringing Up Steam Cloud Conflict Dialogue
The first part of the solution is probably the most difficult. To delete all your Steam Cloud data, it is necessary to bring the conflict dialogue. Without it is not possible to delete the data present in your Cloud. Steam Cloud conflict occurs when the Cloud files differ from the data present on your hard drive.
There are two methods to bring about this conflict:
Method 1:
- Make sure that your Steam Cloud is enabled by following the steps mentioned above. Exit Steam completely by ending all the processes starting with Steamclientbootstrapper using the task manager.
- Now will alter all the files in the location
Steam\userdata\SteamID\AppID\remote
The objective is to make sure that all the files are different from those uploaded to the Steam cloud. We can’t simply delete the files from this location as Steam will automatically notice that the files are missing and download the same ones from the Cloud servers. We can achieve our task by corrupting them and making them 0-byte files.
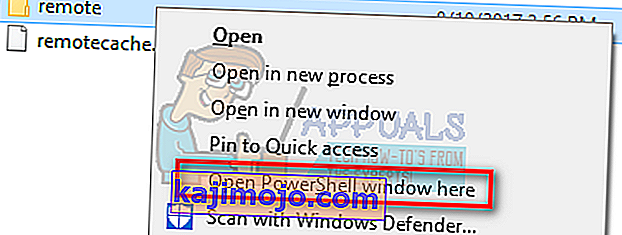
- Navigate to
Steam\userdata\SteamID\AppID\remote
- Now hold shift and right-click on your remote folder. Select the option “Open PowerShell window here”.
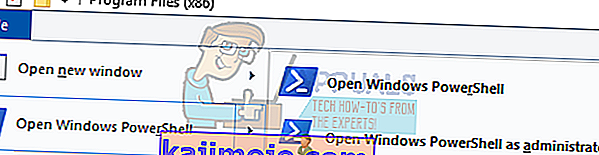
- You can also open PowerShell when in the folder by clicking the File option present at the top left side of the screen and selecting “Open Windows PowerShell as administrator”.
- Once PowerShell is opened, type the exact text written below


clc –path “C:\Program Files (x86)\Steam\userdata\SteamID\AppID\remote\*"
If you fail to write the correct code, you will get an error like this

If you correctly type in the line there will be no confirmatory message and you will get a window like this.

Start your Steam and there will be the conflict windows present on your Steam client.
Method 2:
This is an easier method as compared to the earlier one but it isn’t that efficient.
- Open your Steam client. Open its Settings by pressing the Steam button present at the top left corner of the window and selecting the option.
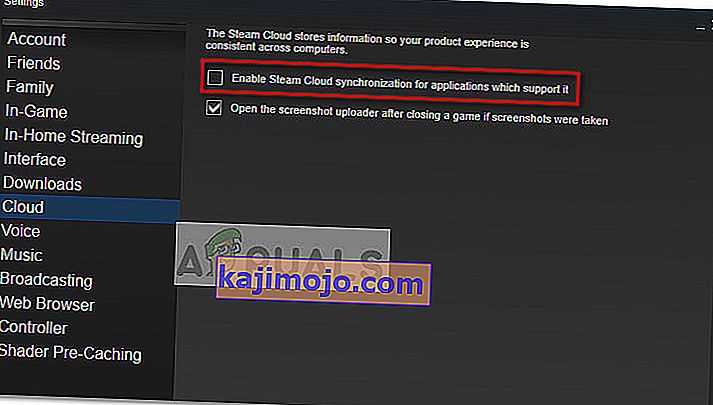
- Open the Cloud tab present on the left side of the screen. Uncheck the option “Enable Steam Cloud synchronization for the applications which support it”.

- Now navigate to your Stream directory as you did earlier and delete all files present in the folder of AppID. The file path for deletion is
Steam\userdata\SteamID\AppID.
- Now start the game to make new and different files in the file location.
- Exit the game and Steam completely by ending all Steam processes in the task manager (end steamclientbootstrapper first).
- Now delete the remotecache.vdf file present in the location
Steam\userdata\SteamID\AppID
- Start your Steam.
- Head over to the client’s Settings and enable the cloud.

Now a Steam conflict dialogue will come forth and we can proceed with the remaining method.
Deleting Cloud files
Once the Cloud conflict error is forth, don’t click any option and follow the instructions below.
- Navigate to the following file path
Steam\userdata\SteamID\AppID
and delete all the files in it. There will be two files (remote folder and remotecache.vdf). Delete both of them.

- Now go back to the conflict window and select the option of “Upload to the Steam Cloud”. Now Steam will sync your AppID folder while there will be nothing in it and the previous data on your Steam Cloud will be deleted.
- Now the game will start automatically but it will create new files that will be synced to your Steam cloud when you close it. We can prevent it from happening by pressing alt + tab. This will open the open windows on your screen. Select the Steam client from the list of windows.
- Once you are in the Steam client, open the client’s Settings. Navigate to the Cloud tab and uncheck the line which enables cloud.
- Now return to the game and exit. No files will be synced to your Steam cloud.
- Exit Steam and delete the AppID folder as we did before.


How to Make Sure If it Worked?
Remember how we checked at the beginning of this method if the Steam Cloud was running as expected by deleting the AppID folder and checking if it was made again. If there is no file present in the Steam cloud, there will be no file downloaded to your computer.
- Enable the Steam cloud as we did in the guide.
- Exit Steam completely by using the task manager.
- Delete the AppID folder (if you didn’t in step 2).
- Now check D3 (these are the cloud files) and compare them with D2 (local files on your computer). If there is nothing in D3, there will be nothing in D2 too!
- Check the following directory Steam\userdata\SteamID
No new AppID folder would have been created.
You can also check by logging Steam in on another computer and checking if the files exist.
If you make it till here without any problems, you have successfully deleted all the files on your Steam Cloud.
How to Delete Steam Cloud Saves from OS X
The procedures above can also be replicated on OS X and older Macs to a slight extent. By following the steps below, you will be able to delete your local saves. You can then disable the Steam Cloud synchronization from the Steam application, start a new game and create a few new saves. Then, when you return to re-enable the Steam Cloud synchronization features, the client will ask you which saves do you want to use. You can then choose the new ones which will delete and replace your old saves from the cloud.
To make things even clearer, here’s a step-by-step guide through the whole thing:
- Open your Steam application and go to Steam > Settings via the ribbon at the top of the window.
- In the settings menu, click on the Cloud tab and uncheck the box associated with Enable Steam Cloud synchronization for applications that support it.
- Close Steam completely and open your Finder app.
- Go to Library > Application Support > Steam > SteamApps > Common and open the folder of whichever game you want to delete the save files.
- Next, open the SAVE folder to reveal the saves of the game.
Note: If the location specified above doesn’t land you to the save files, try the following locations but mind the placeholders:
Users / *Your username* /Library / Application Support / *Game Folder* / Game Documents / *Game* / GameSaves Users/ *Your username* / Library / Application Support / Steam / userdata / *GameNumber* / remote Users/ *Your username* / Library / Containers / *Game Folder* / Data /Library / Application Support / *Game* / GameDocuments / *Game* / gamesaves
- Once you manage to identify and delete the local saves from the game you’re targeting, open the Game and create a few new saves.
- Exit the game, open steam and return to Steam > Settings > Cloud. From the cloud tab, re-enable the checkbox next to Enable Steam Cloud synchronization for applications which support it and click the OK button below.
- Steam will ask you whether you want to use the newly created local saves or the ones that you already have on the cloud. Choosing to use the new ones will delete the old saves that you currently have on Steam Cloud.