Microsoft Word is undoubtedly the best word processing program out there for desktop computers. Among the myriad of features Microsoft Word offers to its users is the ability to add graphics – such as but not limited to, shapes, Text Boxes, WordArt and pictures – to text documents. In addition, not only can Microsoft Word users add graphic elements to their text documents, but they can also format the graphic elements in a wide variety of different ways. From location and size to layout with respect to text and even position, Microsoft Word users have an impressive degree of control over the images they add to their text documents.
One of the most important things Word users can control when it comes to images in Word documents is position – a Word user can rotate an image in a Word document to any angle they want until it sits in their desired position. The same is true for other graphic elements in Word documents (WordArt, for example), and the process of rotating other graphic elements is almost entirely the same as the process of rotating images in Word. Whether you want to rotate an image in a Word document 90°, flip the image horizontally so as to create a mirror image of it or flip the image vertically so as to invert it, Word allows for all of it to be entirely possible.
In addition, the cherry on top of the sundae that is rotating images in Word is the fact that rotating an image in Word is no rocket science and is actually pretty simple. The process is also basically the same on all versions of Microsoft Word. However, there are a few different ways a Word user can rotate an image in a Word document, and the following are the absolute best ones:
Rotating an image 90° in either direction
The absolute simplest rotation you can perform on an image in Word is a 90° rotation in either direction. To rotate an image in Word 90° in either direction, you need to:
- Click on the image you want to rotate to select it.
- Navigate to the Format tab in Microsoft Word’s toolbar.
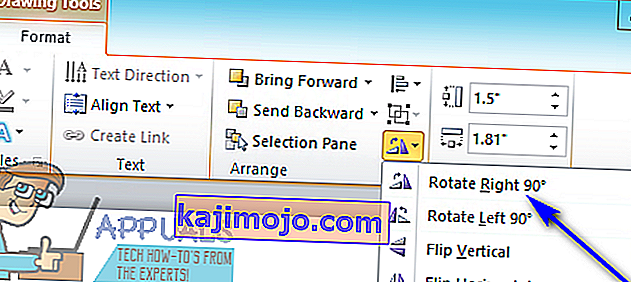
- In the Arrange section, click on the Rotate button.
- In the resulting menu, click on Rotate Right 90° or Rotate Left 90° depending on which direction you want to rotate the image in.

As soon as you do so, the selected rotation will be applied to the selected image.
Flipping an image horizontally or vertically
Another way you can rotate an image in Microsoft Word is by either flipping it vertically – inverting it, or flipping it horizontally – creating a mirror image of the respective picture. To flip an image vertically or horizontally in a Word document, here’s what you need to do:
- Click on the image you want to rotate to select it.
- Navigate to the Format tab in Microsoft Word’s toolbar.
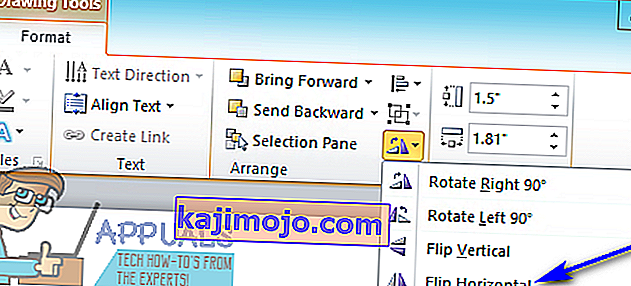
- In the Arrange section, click on the Rotate button.
- If you would like to flip the picture horizontally and create a mirror image of it, click on Flip Horizontal in the resulting menu. On the other hand, if you want the image to be flipped vertically in order to invert it, click on Flip Vertical in the resulting menu.

Once you do so, the image in question will immediately be flipped in the selected manner.
Rotating an image to any angle of your choice
If the angle you want to rotate an image to does not exist as a preset for the rotation of images in Microsoft Word, have no fear – you can manually rotate any image to an angle of your choice. In addition, doing so is pretty simple. To rotate an image to an angle of your choosing, you need to simply:
- Click on the image you want to rotate to select it.
- Left-click on the rotation handle that appears at the top of the image once you select it.
- With the click still held, drag your mouse to rotate the object in basically any direction you want until your desired angle is achieved.


Note: If you would like for the object to be moved in increments of 15° instead of moving freely when you rotate it using its rotation handle, simply press and hold Shift while you move the object using its rotation handle.