The 0xc000000e kesalahan ketika mencoba untuk boot up berarti bahwa Anda sedang berhadapan dengan rusak Boot Configuration Data. Data Konfigurasi Boot adalah penyimpanan global untuk semua opsi dan pengaturan yang terkait dengan boot pada PC Windows yang lebih baru.
Anda akan mendapatkan kesalahan ini ketika mencoba untuk mem-boot perangkat Anda, dan Anda akan disajikan dengan layar hitam yang memberi Anda petunjuk tentang cara memperbaiki komputer Anda menggunakan disk instalasi atau drive pemulihan. Sayangnya, memiliki drive pemulihan itu adalah satu-satunya cara Anda akan menyelesaikan masalah ini, jadi Anda harus mendapatkannya sebelum memulai. Jika Anda tidak memilikinya, cukup mudah untuk membuatnya menggunakan alat Rufus atau Windows Media Creation dari PC atau Laptop lain.

Anda juga perlu boot ke BIOS Anda untuk mengubah urutan boot dan membuat boot PC Anda dari drive pemulihan, bukan dari hard drive Anda. Untuk melakukan itu, gunakan langkah-langkah berikut:
- Masuk ke pengaturan BIOS atau UEFI dengan menekan kunci yang ditunjuk oleh pabrikan motherboard Anda sebelum Windows melakukan booting. Kunci ini biasanya Esc, Delete, F2, F8, F10, F12 atau Backspace, tergantung pabrikannya. Anda dapat melakukan pencarian online tentang cara masuk ke BIOS, diikuti dengan model komputer Anda.
- Setelah masuk, navigasikan ke Boot Gunakan instruksi yang ditemukan di dalam BIOS untuk mengubah urutan boot Anda, dan atur CD-ROM atau port USB menjadi perangkat pertama, tergantung apakah drive pemulihan Anda berupa CD atau flash drive .
- Simpan pengaturan Anda dan keluar.

Metode 1: Membangun kembali Data Konfigurasi Boot
Untuk melakukan ini, Anda harus mem-boot komputer Anda dari drive pemulihan. Jika Anda telah mengkonfigurasi BIOS Anda dengan langkah-langkah di atas, Anda dapat melakukannya dengan menekan sembarang tombol setelah prompt muncul di layar Anda. Setelah komputer di-boot dari drive pemulihan, gunakan langkah-langkah berikut untuk membangun kembali BCD:
- Di kotak dialog Pengaturan Windows , atur semuanya ke nilai yang sesuai, pilih bahasa Anda dan klik
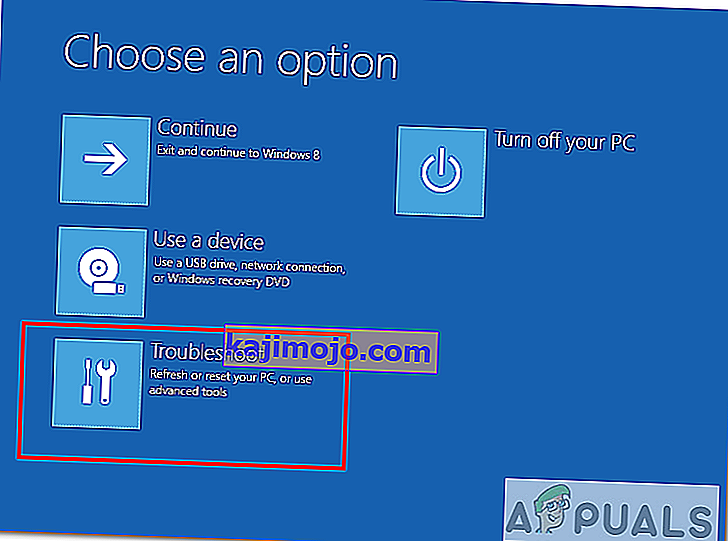
- Di sudut kiri bawah, klik Perbaiki komputer Anda , dan pilih Troubleshoot dari layar Choose an option.
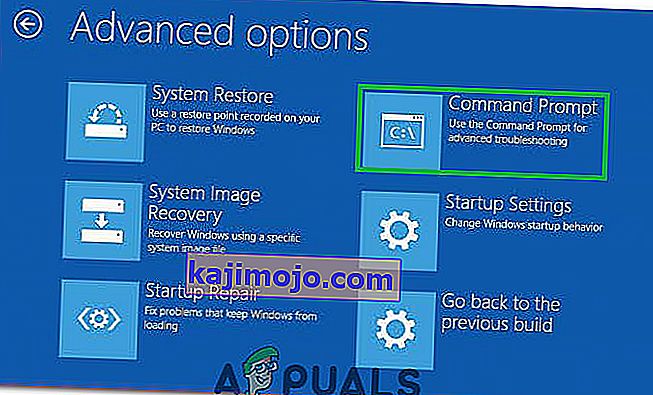
- Di layar Troubleshoot , klik Advanced Options, dan klik Command Prompt.
- Saat Command Prompt terbuka, ketikkan perintah berikut, tekan Enter pada keyboard Anda setelah masing-masing:
bootrec / scanos bootrec / fixmbr bootrec / fixboot bootrec / rebuildbcd
- Nyalakan ulang komputer Anda, dan seharusnya boot dengan baik, tanpa menghadapi masalah lagi.

Metode 2: Perbaiki OS Anda dengan drive pemulihan
Metode ini juga akan memperbaiki OS Anda dengan command prompt dari drive pemulihan, dan Anda harus bisa boot ke Windows tanpa menghadapi masalah lagi. Boot dari drive pemulihan, dan ikuti petunjuk di bawah ini.
- Gunakan langkah 1 hingga 3 dari metode sebelumnya untuk membuka Command Prompt dari drive pemulihan.
- Setelah berada di dalam Command Prompt, ketik perintah di bawah ini, diikuti oleh Enter pada keyboard Anda untuk menjalankannya. The StartRep.exe utilitas mengoreksi nilai-nilai lingkungan boot dan harus memperbaiki kesalahan BCD. Perhatikan bahwa Anda mungkin perlu mengulangi langkah ini beberapa kali jika gagal.
cd x: \ sources \ recovery StartRep.exe
- Jika langkah sebelumnya untuk memperbaiki Windows tidak membantu, ketik bcdedit di Command Prompt, untuk melihat nilai-nilai untuk Windows Boot Manager.
- Perhatikan nilai untuk Perangkat . Jika tidak diketahui , ketik perintah berikut, masing-masing diikuti oleh Enter untuk menjalankannya. Perhatikan bahwa Anda harus mengganti C: dengan partisi tempat sistem operasi Anda diinstal, jika perlu.
bcdedit / set {DEFAULT.EN_US} partisi perangkat = c: bcdedit / set {DEFAULT.EN_US} osdevice partisi = c: bcdedit / set {BOOTMGR.EN_US} partisi perangkat = c:- Ketika Command Prompt selesai, tutup, lepaskan drive pemulihan dan reboot sistem Anda. Seharusnya tidak ada masalah saat boot sekarang.
Satu-satunya kelemahan dari solusi ini adalah bahwa mereka membutuhkan dorongan pemulihan, kesabaran, dan saraf yang kuat. Namun, jika Anda mengikuti mereka seperti yang dijelaskan, Anda harus memperbaiki kesalahan yang Anda dapatkan, dan terus menggunakan perangkat Anda seperti sebelumnya.
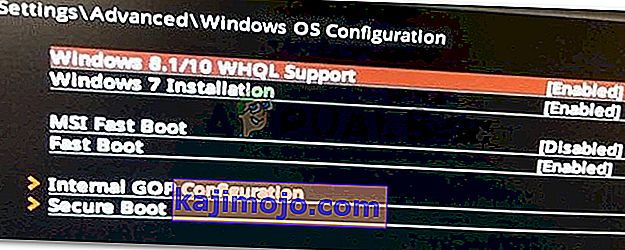
Metode 3: Aktifkan Dukungan WHQL Windows 10 Di BIOS
Pengaturan Dukungan Windows 10 WHQL ada di beberapa OEM. Ini memiliki dua fungsi dasar: memeriksa driver yang ditandatangani selama proses boot dan memungkinkan Anda untuk mengaktifkan dukungan UEFI. Jika Anda menggunakan Windows 10, Anda harus mengaktifkannya dan kemudian komputer Anda dapat boot secara normal. Namun, jika tidak dipilih, komputer Anda mungkin melakukan boot ke kesalahan 0xc000000e. Jadi, Anda dapat mengakses BIOS untuk melihat apakah pengaturan Dukungan WHQL Windows 10 diaktifkan. Jika tidak, aktifkan untuk mencobanya.
Anda harus mencatat bahwa pengaturan Dukungan WHQL Windows 10 tidak didukung di semua komputer. Jika komputer Anda tidak memilikinya, Anda dapat pergi untuk memeriksa apakah dukungan UEFI diaktifkan di komputer Anda. Jika tidak, Anda dapat mengaktifkannya untuk melihat apakah kode kesalahan 0xc000000e menghilang. Untuk mengaktifkannya:
- Matikan komputer Anda sepenuhnya dan biarkan selama setidaknya beberapa menit.
- Setelah memastikan waktu yang cukup telah berlalu, nyalakan kembali komputer dan Anda akan melihat opsi " Tekan Tombol ini untuk boot ke Mode Bios ".
- Tekan tombol untuk boot ke mode Bios.
- Setelah berhasil mem-boot dalam mode Bios, periksa untuk melihat apakah ada pengaturan Windows WHQL di Bios.
- Jika ada, tekan "Enter" untuk memilihnya setelah menyorotnya menggunakan tombol panah, dan pilih opsi "Enabled" untuk mengaktifkannya di komputer Anda.
- Periksa untuk melihat apakah ini menyelesaikan masalah.

Jika kesalahan boot Windows 10 0xc000000e masih muncul setelah mengaktifkan pengaturan Dukungan WHQL Windows 10 atau dukungan UEFI, Anda mungkin perlu mengatur ulang konfigurasi BIOS / UEFI di komputer Anda.
Metode 4: Buat kembali BCD melalui Easy Recovery Essentials
Easy Recovery Essentials adalah fitur perbaikan sistem otomatis sekali klik yang menggabungkan perbaikan penuh dan rekonstruksi BCD untuk menyelesaikan kesalahan "0xc000000e", bahkan dalam kasus di mana Windows tidak bisa boot karena kesalahan tersebut.
Komponen perbaikan boot otomatis EasyRE akan mengatasi semua masalah terkait BCD, memperbaiki BCD, atau membuatnya kembali dari awal menggunakan pengkodean dan jalur yang benar untuk partisi yang menolak memuat dengan benar. Ini juga akan menandai disk sebagai online untuk memastikannya berfungsi dengan benar.
Easy Recovery Essentials dijamin untuk memperbaiki kesalahan "0xc000000e" secara otomatis menggunakan opsi Perbaikan Otomatis bawaannya. EasyRE saat ini tersedia untuk Windows XP, Vista, 7, 8, 10 dan dapat diunduh dan dibuat di PC mana pun.
- Dapatkan komputer lain yang dapat Anda gunakan untuk membuat USB yang akan kami gunakan untuk mem-boot komputer.
- Unduh Easy Recovery Essentials dari sini.

- Bakar gambarnya.
- Boot PC Anda dari CD atau USB Easy Recovery Essentials yang Anda buat.
- Once EasyRE is running, choose the “Automated Repair” option and click Continue.
- After EasyRE scans your computer’s drives, identify and select the drive letter for your Windows installation from the list, and then click on the Automated Repair Option to begin.
- Easy Recovery Essentials will start analyzing the selected drive for problems. EasyRE will test for and attempt to automatically correct errors with the disk, partition, bootsector, filesystem, bootloader, and registry. No intervention is required, as EasyRE’s repair is fully automated.
- Once the process is complete, EasyRE will report its findings. Click on the Restart button to reboot your PC and test the changes.

Method 5: Reset BIOS/UEFI Configuration
Some users said that their error 0xc000000e issue is solved by resetting the BIOS/UEFI configuration. So, you can consider trying this method to see whether this issue can be solved.
Step 1. Open BIOS Menu
To reset BIOS to default settings, you need to access the BIOS menu and find the Default Settings option first.
Windows 10 users can access advanced startup options Windows 10 and get into the BIOS menu. You can click Start -> Power, press and hold the Shift key, and click Restart button to reboot Windows into Windows Recovery Environment. Then click Troubleshoot -> Advanced Options -> UEFI Firmware Settings, and click Restart to enter into the BIOS settings screen.
Alternatively, you can also restart your computer normally and press the required key in the startup screen to boot into the BIOS settings window. The hotkey is varied from different computer manufacturers, and it could be F12, Del, Esc, F8, F2, etc.
Step 2. Find the Setup Defaults Option
The name and location of the “Setup Defaults” option may be different from various computers. It generally calls like: Load Default, Load Setup Defaults, Load Default Settings, Load BIOS Defaults, Load Optimal Defaults, etc.
Use the arrow keys on the computer keyboard to find the BIOS setup default option in the BIOS settings screen. You may find it in one of the BIOS tabs.
Step 3. Reset BIOS
After you find the Load Setup Defaults option, you can select it and press the Enter button to start resetting the BIOS to factory default settings in Windows 10.
At last, you can press F10 to save and exit BIOS. Your computer will automatically reboot. If you need to change BIOS settings again in the future, you can follow the same instructions to access BIOS again to change it.
Method 6: Mark Boot Disk As Online
It is possible in some cases, that the disk that you have connected to the computer or the USB that you are trying to boot from has been marked as offline by the computer. Some computers tend to prevent extra applications, hardware, and other things from being able to run as soon as the computer starts because it allows for more convenient and fast startup experience. Therefore, in this step, we will be marking the Disk as online.
You still need to use a bootable USB medium to do this job. We will show you a step-by-step guide here:
- After booting your computer from the bootable USB drive, you need to go to Next > Repair your computer. Then, you will enter WinRE.
- Go to Troubleshoot > Advanced options > Command Prompt.
- Make sure to properly enter your login credentials if you are asked by the computer.
- Type in the following command inside the command prompt to successfully launch the disk part utility on your computer.
diskpart
- Type in either one of the following commands in the next window to list the currently connected disk drives to your computer.
List Disk List Volume
- Once the disks have been listed, you need to identify the disk that contains the Windows operating system and the one that you want to mark as active.
- After identifying it, select the disk using the following command and replacing the alphabet with the driver letter of that disk.
select disk A Select Volume A (Replace A with the Drive Letter)
- After you have successfully selected the disk, you must mark the disk as online in order to initiate the recognization process of the disk at startup. Use the following commands to do that.
Online Disk Online Volume
- Type in the following command to successfully get out of the command prompt and restart your computer after that.
Exit
- Check to see if marking the Disk as online has fixed your issue.

Method 7: Check your data cables, BIOS and drivers
Unplug all HDD data cables, and then plug them again. Revert to the previous drivers and BIOS settings if they were changed, or use “Restore factory settings” option in the BIOS. Make sure to write down all current BIOS settings that were previously selected, just in case it is required to switch back. If the error is caused by a change of the SATA disk controller’s mode in the BIOS or firmware, the fix can be as simple as entering the BIOS and toggling the SATA controller’s “mode” setting. The exact instructions differ from one manufacturer to the other, but the options will resemble what is shown in the screenshots below.
To check the boot order, follow these steps:
- Restart the computer
- Press the necessary key to open the BIOS menu. This key depends on the computer manufacturer and computer model. This is usually listed on the first screen that appears on the monitor. It can be any of the following: Esc, Del, F2, F8, F10 or F12.
- If the screen shows multiple keys, find the key to open “BIOS”, “setup” or “BIOS menu”
- Attempt to toggle between all three (or more) modes until a combination that results in Windows booting successfully once more is found.
Method 8: Boot Windows In Safe Mode
If above solutions didn’t fix the problem, then Start Windows into safe mode. This will start your PC with minimum system requirements, will not load startup programs, add-ons etc. And allow performing troubleshooting steps to fix Boot Error 0xc000000e:
Before you enter the safe mode, you need to enter the Windows Recovery Environment (winRE). To do this, you will repeatedly turn your device OFF, then ON:
- Hold down the power button for 10 seconds to turn off your device.
- Press the power button again to turn on your device.
- On the first sign that Windows has started (for example, some devices show the manufacturer’s logo when restarting) hold down the power button for 10 seconds to turn off your device.
- Press the power button again to turn on your device.
- When Windows restarts, hold down the power button for 10 seconds to turn off your device.
- Press the power button again to turn on your device.
- Allow your device to fully restart and you should boot into the Windows Recovery Environment.
Now that you are in the Windows Recovery Environment, you will follow these steps to take you to safe mode:
- On the Choose an option, screen, select “Troubleshoot” and then “Advanced options.”

- Now click on “Startup Settings” and click on “Restart.”
- After your device restarts, you’ll see a list of options. Select option “4” from the list or press “F4” to enter Safe Mode.

Note: If you need to exit safe mode, simply restart your device, or:
- Press the “Windows logo key + R.”
- Type “msconfig” in the Run box and then select “OK”.

- Select the Boot tab and under Boot options, clear the Safe boot checkbox.

Method 9: Check your disk with CHKDSK utility
If the hard drive has its file integrity compromised, it is possible to use built-in Windows CHKDSK utility to scan the disk and fix the file system errors.
- Connect a USB drive that has been made bootable or insert the Windows Installation Disk on your computer.
- After connecting one of these, boot from that connected device.
- After booting your computer from the device, click on “Next” and then on the “Repair your Computer” option.
- On the next window, click on “Troubleshoot” and then on the “Advanced” Option.

- On the next screen, make sure to select the “CommandPrompt” option to successfully launch into the command prompt.
- Provide the login credentials of your account in order to boot inside the cmd.
- Inside the command prompt, type in the following command to successfully run the check disk utility on your computer.
chkdsk C: /f (Make sure to replace the "C" with the Drive letter of your partition).
- Confirm any on-screen prompts and wait for the scan to be fully completed.
- Check to see if the issue is fixed by performing this step.
Method 10: Disable fast startup Feature
If your computer has been set up to use the Fast Startup feature, you might be getting this error message on your screen because of doing so. The Fast Startup feature is known to malfunction with some operating systems and hardware combinations.
Basically, when enabled, the feature automatically sends some launch configurations to be stored in your RAM to allow for a faster startup as indicated by its name but this configuration data can sometimes be corrupted which can lead to this error on your computer. Therefore, in this step, we will be disabling it completely. For that:
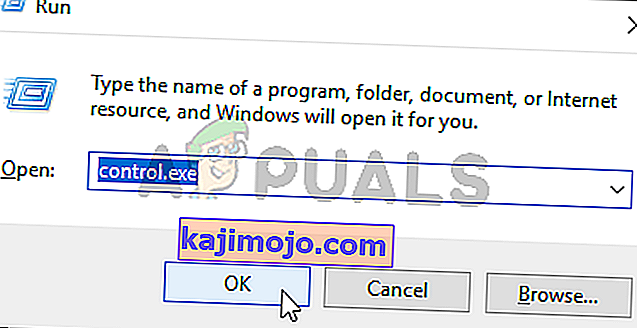
- Press “Windows” + “R” to open the Run prompt.
- Type in “Control Panel” and press “enter” to launch the classical Control Panel interface.
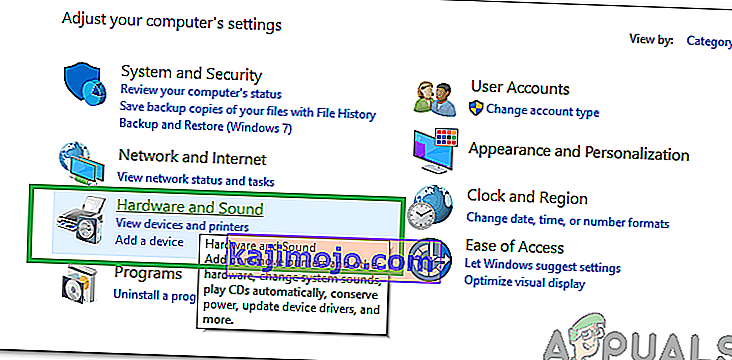
- Inside the control panel, click on the “Hardware and Sound” option and then select the “Power Options” button.
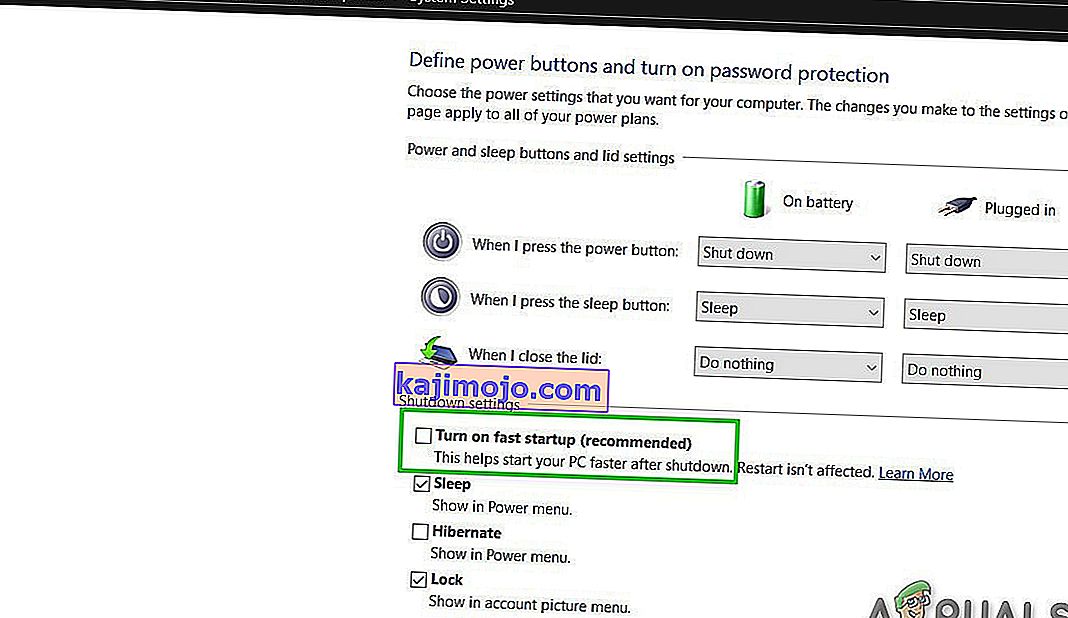
- Inside the power options, click on the “Choose what the power button does” from the left side.
- Click on the “Change Settings” option if the fast startup option is greyed out.
- Make sure to uncheck the “Turn on Fast Startup” option and save your changes.
- Closeout of the window and terminate any unnecessary applications.
- Click on the “Start Menu”, click on the “Power Options” and select “Shutdown” from the list.
- This option should completely power down your computer and after performing a complete shutdown, wait for some minutes before turning your computer back on.
- After the computer turns back on, check to see if the error message is fixed.
Note: This solution can only be applied if you are able to sometimes boot up your computer normally and are only encountering this error momentarily.


Method 11: Repair Corrupted System Files
It also possible in some situations that certain system files might have been corrupted due to a storage failure or due to some other reason. Therefore, in this step, we will be performing a complete repair of the corrupted system files and then we will check to see if doing so fixes this issue. For that:
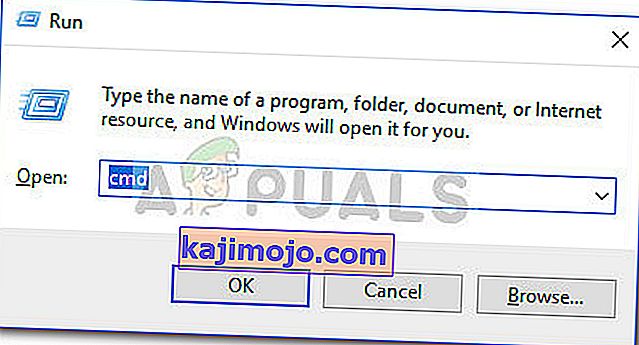
- Press “Windows” + “R” to open the Run prompt.
- Type in “cmd” and then press “Shift” + “Ctrl” + “Enter” to launch the command prompt with admin privileges.
- Type in the following commands one by one and press “Enter” after each to successfully run an SFC scan and a DISM Scan on your computer.
DISM /Online /Cleanup-Image /RestoreHealth sfc /scannow
- Restart your computer completely once these scans are completed.
- Check to see if by performing these scans, you were able to fix this issue on your computer.

Method 12: Run Windows Startup Repair
Startup Repair is capable of diagnosing and fixing the found issues. For example, it can automatically scan system files, registry settings, configuration settings, etc. and try to fix the problem on its own. Startup Repair is especially useful when your computer is unbootable. Since your computer fails to boot, Windows can boot into WinRE automatically. While, if it doesn’t appear, you can interrupt the boot process three times in a row, and then the WinRE screen appears. Alternatively, if you have a bootable USB medium, you can also set your computer to boot from it and go to Repair your computer to enter WinRE.
After you have successfully booted into the Windows Recovery Environment, click on the “Troubleshoot” option, and from there, select the “Advanced Options” screen. Inside the advanced options, select the “StartupRepair” button to successfully initiate the Startup Repairing process. Windows will begin to diagnose your computer automatically. When the process ends, your computer will restart automatically. You can wait to see whether it can boot successfully.

Solusi: Pastikan tidak ada perangkat tambahan yang dicolokkan sebelum beralih ke baris perintah atau Perbaikan Pengaktifan, sebaiknya coba mulai ulang lagi dengan jumlah perangkat dan drive eksternal paling sedikit yang dicolokkan ke komputer. Ini akan memastikan bahwa tidak ada yang baru-baru ini ditambahkan ke komputer tidak menyebabkan masalah ini. Yang terbaik adalah mencabut semua drive USB, CD, DVD, dll. Ini termasuk pembaca kartu memori juga. Pastikan semua drive eksternal dan kunci USB atau drive lompat USB telah dilepaskan, kemudian coba lagi.