Windows 10 adalah salah satu versi Windows yang paling diantisipasi oleh Microsoft. Meskipun, Windows 8 menciptakan tren baru di dunia OS Desktop, ada beberapa masalah dalam desain dan kinerja yang menjadi fokus utama Microsoft di Windows 10. Jadi, Windows 10 Final Build terungkap pada 29 Juli 2015, untuk Desktop sebagai serta Smartphone.
Ini termasuk banyak modifikasi dengan mempertimbangkan kekurangan Windows 8. Faktanya, ini adalah versi lanjutan dari Windows tetapi tetap saja, ada sejumlah konsekuensi yang terjadi setiap hari dengan pengguna yang berbeda.
Bagian utama dari konsekuensi ini adalah kesalahan yang muncul saat mencoba melakukan tugas tertentu. Sejumlah orang datang melalui pesan kesalahan saat mencoba membuka perangkat lunak dan browser yang berbeda di dalam Windows 10. Kesalahan ini muncul dengan pesan kesalahan yang mengatakan Aplikasi tidak dapat memulai dengan benar (0xc0000005). Klik OK untuk menutup aplikasi . Kesalahan ini biasanya terjadi dengan browser internet tetapi tidak terbatas pada ini. Aplikasi apa pun di dalam Windows dapat berhenti merespons karena kesalahan ini. Jadi, itu perlu diperbaiki untuk mengembalikan perangkat lunak penting itu kembali berfungsi.

11/12/2016: Pengguna melaporkan bahwa metode yang tercantum di bawah ini juga akan berfungsi di Windows 7.
Alasan Dibalik Kesalahan Windows 10 0xc0000005:
Ada sejumlah alasan yang diketahui menyebabkan kesalahan ini mengganggu operasi berbagai perangkat lunak di Windows 10. Salah satu alasan yang dianggap sebagai penyebab utama adalah program antivirus pihak ketiga yang menyebabkan konflik dengan file yang dapat dieksekusi dan memengaruhi operasinya. Di sisi lain, pendaftar dapat rusak karena malware dan virus yang menyebabkan program berperilaku tidak normal. Terkadang, driver perangkat keras yang buruk juga bisa menjadi penyebab kesalahan ini.
Solusi untuk Memperbaiki Kesalahan Windows 10 0xc0000005:
Berdasarkan alasan yang disebutkan di atas, solusinya sangat mudah. Jadi, ikuti metode berikut untuk menghilangkan pesan kesalahan yang membuat frustrasi ini.
Memperbaiki File Sistem yang Rusak
Unduh dan jalankan Restoro untuk memindai dan memulihkan file yang rusak dan hilang dari sini , setelah selesai lanjutkan dengan solusi di bawah ini. Penting untuk memastikan bahwa semua file sistem utuh dan tidak rusak sebelum melanjutkan dengan solusi di bawah ini.
Metode # 1: Memperbaiki Program Antivirus
Program antivirus dapat memengaruhi file yang dapat dieksekusi dari sejumlah program. Jadi, untuk memperbaiki masalah ini, Anda diharuskan untuk menonaktifkan program antivirus pihak ketiga untuk memeriksa apakah itu pelakunya atau bukan. Harap dicatat bahwa menonaktifkan program antivirus dapat mengakibatkan beberapa ancaman serius pada komputer Anda saat terhubung ke internet.
Anda juga dapat mengandalkan perangkat lunak keamanan Windows sendiri yaitu Windows Defender . Ini memiliki fungsi yang sama seperti antivirus lainnya. Anda dapat menonaktifkan antivirus dengan menavigasi ke Pengaturannya dan mematikan perisai.

Setelah dinonaktifkan, periksa kesalahannya lagi. Jika masih berlanjut, pindah ke metode selanjutnya.
Metode # 2: Memperbaiki Registri
The registry adalah database pusat dari Windows yang terus-menerus digunakan oleh PC Anda untuk bantuan itu membaca banyak file yang berbeda & pengaturan yang dibutuhkan untuk menjalankan. Registri dapat rusak karena kerusakan pada beberapa file tertentu yang diperlukan untuk menumpuk semuanya. Oleh karena itu, sebagian besar ahli menyarankan agar Anda memastikan untuk membuat cadangan Registri Anda dan menyimpan cadangan ini di stik USB konvensional sehingga Anda dapat menghidupkan kembali Registri di keadaan sebelumnya jika terjadi kerusakan. Namun, jika Anda tidak mencadangkan Registri, ikuti langkah-langkah berikut untuk memperbaiki registri untuk mengatasi kesalahan 0xc0000005 .
1. Unduh perangkat lunak pembersih registri dari tautan ini .
2. Setelah diunduh, instal menggunakan pengaturan yang disarankan. Buka software setelah proses instalasi selesai.
3. Pada antarmuka, klik tab Registri yang ada di panel kiri dan klik tombol berlabel Pindai Masalah . Ini akan mulai mencari kesalahan dalam registri dan ketika pencarian akan selesai, tombol Perbaiki Masalah yang Dipilih akan diaktifkan. Klik tombol itu dan semuanya akan diperbaiki.

Metode # 3: Memperbaiki Driver yang Rusak
Driver adalah program perangkat lunak yang membantu komputer untuk berkomunikasi dengan perangkat keras yang terpasang padanya. Jadi, ketika rusak, perangkat kerasnya cenderung menyebabkan gangguan . Memperbaiki penyelam yang salah ini dapat membantu Anda dalam beberapa cara. Ikuti langkah-langkah di bawah ini.
1. Buka Device Manager dengan menekan Win + X dan pilih dari daftar.
2. Di dalam Device Manager, gulir ke bawah untuk melihat apakah ada perangkat keras dengan tanda kuning. Jika ada, klik kanan di sana dan pilih Perbarui Perangkat Lunak Pengemudi . Jika Anda baru saja menginstal driver, instal ulang driver tersebut juga.

3. Pada jendela yang muncul setelahnya, klik Cari secara otomatis untuk perangkat lunak driver yang diperbarui untuk membiarkannya mencari dan menginstal driver secara otomatis. Jika, Anda telah mengunduh driver secara manual, klik opsi di bawah ini untuk menelusuri dan menginstalnya. Setelah proses selesai, periksa kesalahannya.

Metode # 4: Perbaiki BCD
Metode ini harus dilakukan oleh pengguna dengan risiko mereka sendiri. Ini berhasil untuk beberapa dan tidak untuk beberapa. Anda juga perlu mengaktifkan kembali Windows setelah melakukan langkah-langkah dalam panduan ini.
- Tahan Windows Key dan Tekan X . Pilih Command Prompt (Admin)
- Ketik " bcdedit" dan tekan ENTER. Jika Jalur Boot Loader Windows Anda adalah xOsload.exe maka Anda perlu menghapus beberapa file dan memperbaiki BCD Anda. Anda dapat melihat ini di kolom PATH setelah Anda menjalankan perintah " bcdedit".
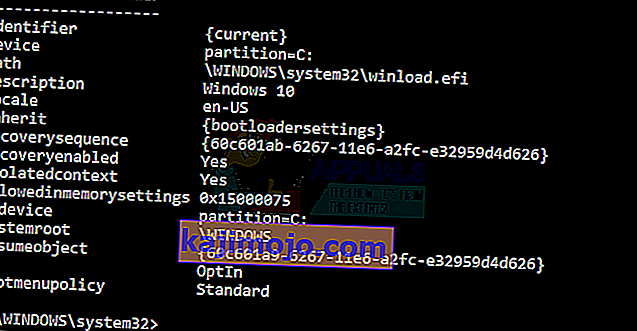
- Setelah selesai, jalankan perintah berikut di bawah ini, beberapa mungkin kembali tidak ditemukan tetapi abaikan kesalahan dan lanjutkan hingga yang terakhir. Pastikan, Anda menekan tombol ENTER setelah setiap perintah.

Del D: \ Windows \ System32 \ xOsload.exe Del D: \ Windows \ System32 \ xNtKrnl.exe Del D: \ Windows \ System32 \ Drivers \ oem-drv64.sys attrib c: \ boot \ bcd -h -r -s ren c: \ boot \ bcd bcd.old bootrec / rebuildbcd
Metode 5: Memeriksa Pembaruan Windows
Pembaruan Windows sering berisi perbaikan untuk beberapa bug dan gangguan tetapi mereka juga terkenal karena memberi jalan ke masalah baru pada komputer orang. Namun, dalam langkah ini, kami akan memeriksa pembaruan apa pun untuk sistem Operasi Anda karena Microsoft sering menambal masalah apa pun yang datang dari pembaruan mereka. Untuk melakukan itu, ikuti panduan di bawah ini.
- Tekan "Windows ' + " I " untuk membuka pengaturan Windows.
- Dalam pengaturan, klik opsi "Pembaruan dan Keamanan" dan dari sisi kiri, pilih opsi "Pembaruan Windows" .

- Pada layar berikutnya, klik opsi "Periksa Pembaruan" dan secara otomatis akan meminta Windows untuk memeriksa pembaruan yang tersedia.
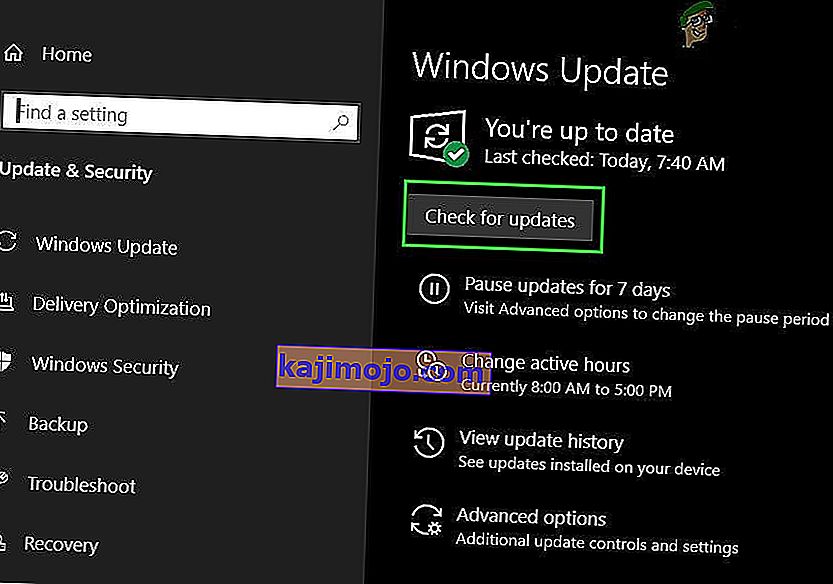
- Setelah pemeriksaan pembaruan selesai, klik tombol "Unduh" untuk memicu pengunduhan dan pemasangan pembaruan baru di komputer Anda.
- Setelah pembaruan ini diinstal, periksa untuk melihat apakah hal itu telah memperbaiki masalah di komputer Anda.


Metode 6: Memulihkan Komputer
Jika Anda baru saja mulai mendapatkan masalah ini, ini mungkin dipicu karena instalasi driver yang salah atau bahkan karena aplikasi jahat yang mungkin telah Anda instal di komputer Anda baru-baru ini. Oleh karena itu, dalam langkah ini, kami akan mengembalikan status komputer ke tanggal sebelumnya dan mudah-mudahan, ini akan memperbaiki masalah kami jika itu karena alasan yang disebutkan di atas. Untuk melakukan ini:
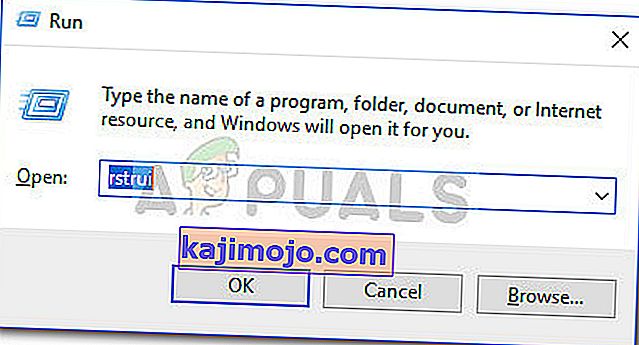
- Tekan "Windows" + "R" untuk membuka prompt Run.
- Ketik "rstrui" dan tekan "Enter" untuk membuka jendela manajemen pemulihan.
- Klik "Next" dan centang opsi "Show more Restore Points" .
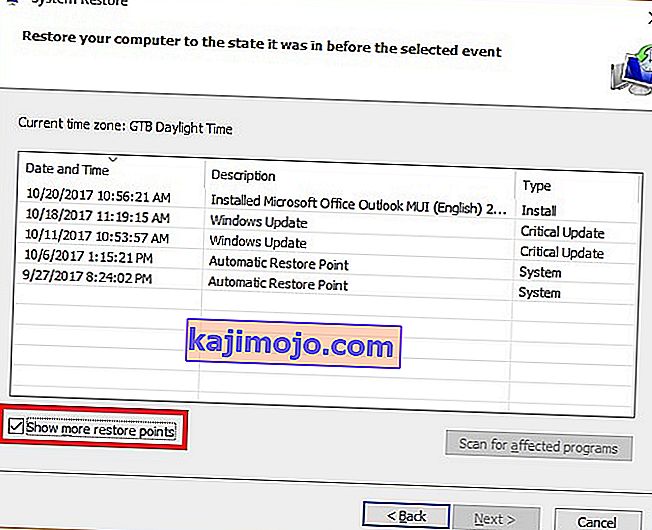
- Pilih titik pemulihan dari daftar sebelum tanggal mulai terjadinya masalah ini.
- Klik "Berikutnya" lagi dan ikuti petunjuk di layar untuk mengembalikan semuanya ke tanggal yang dipilih.
- Setelah pemulihan selesai, periksa untuk melihat apakah masalah masih berlanjut.


Metode 7: Aktifkan Firewall
Ada kemungkinan dalam beberapa kasus, kesalahan dipicu karena aplikasi mencurigakan atau setidaknya jika telah ditandai mencurigakan dan Windows Firewall tidak berjalan di komputer Anda untuk memvalidasi mencurigakan ini. Oleh karena itu, dalam langkah ini, kami akan memastikan bahwa Windows Firewall diaktifkan untuk menghilangkan kesalahan ini. Untuk itu:
- Tekan "Windows" + "R" untuk membuka prompt Run.
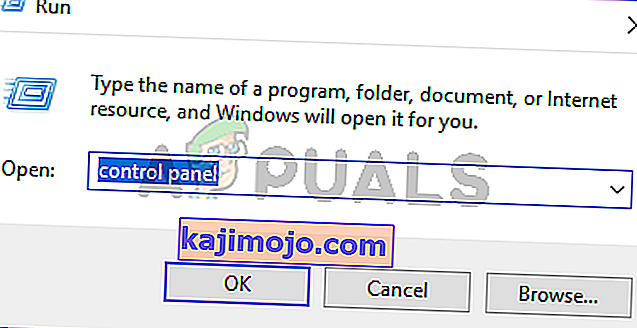
- Ketik "Panel Kontrol" dan tekan "Enter" untuk meluncurkan antarmuka Panel Kontrol klasik.
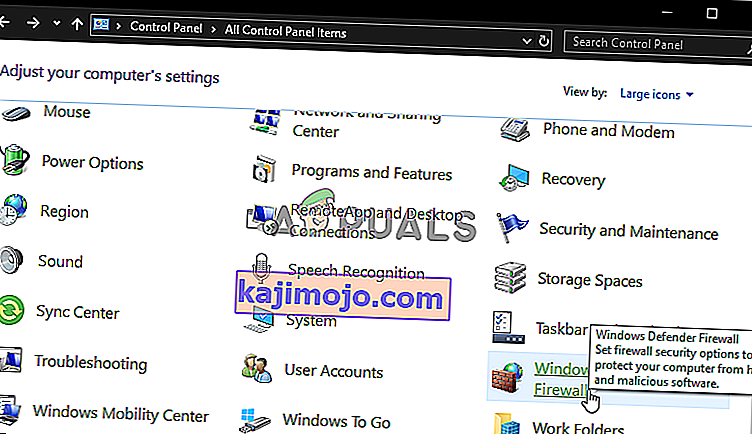
- In the Control Panel, click on the “ViewBy:” option and select the “Large Icons” button.
- After making this selection, click on the “Windows Defender Firewall” option to launch the Firewall and then select the “Turn Windows Defender Firewall On or Off”.
- Make sure to check the “Turn on Windows Defender Firewall” for both the available options to turn the Firewall on.
- After making this selection, save your changes and close out of the Window.
- After doing so, check to see if the issue still persists.


Method 8: Run SFC Scan
In some situations, you might’ve installed a bad driver on your computer or at some point, due to a storage failure, some system files or drivers might’ve been corrupted. Therefore, in this step, we will be running a complete system scan to identify any drivers that are missing signatures or to fix any abnormalities in the system files. For that:
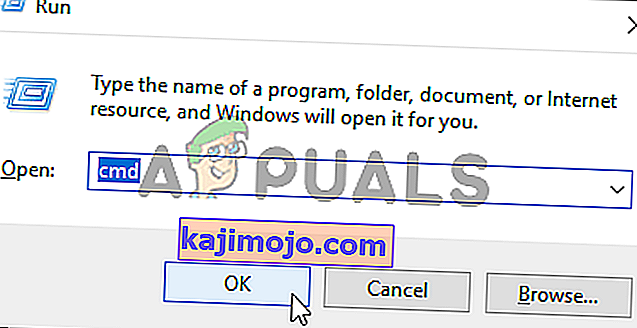
- Press “Windows’ + “R’ to open the Run prompt.
- Type in “cmd” and then press “Shift’ + “Ctrl” + “Enter” to provide admin permissions.Running the Command Prompt
- Type in the following command inside the command prompt and press “Enter” to execute it.
sfc /scannow
- Let the computer scan for any broken or corrupted items and it should automatically replace them with working ones.
- Check to see if doing so fixes the error message.

Method 9: Disabling Data Execution Prevention
Data Execution Prevention is a program that prevents certain programs or executables from being able to run on your computer because it suspects that they might be viruses. Due to this prevention, sometimes, as a false alarm, legit applications might also face issues while trying to run on your computer. Therefore, in this step, we will be disabling this setting from the system configuration panel. For that:
- Press ‘Windows’ + “R’ to open the Run prompt.
- Type in “Control Panel” and press “Enter” to launch the classical control panel interface.

- Inside the Control Panel, click on the “View By:” icon and then select the “Large Icons” option.
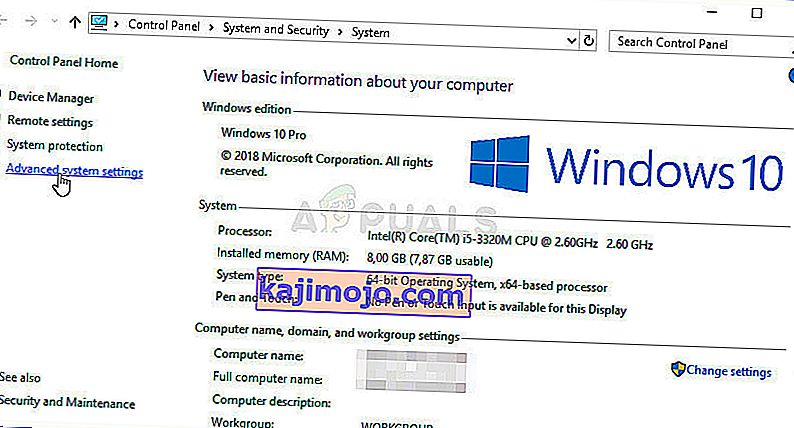
- After selecting Large Icons, select the “System” option.
- Click on the “Advanced System Settings” option on the left side of the screen.
- In the advanced System Settings, click on the “Advanced” tab from the top.
- In the advanced tab, click on the “Settings” option under the “Performance” heading.
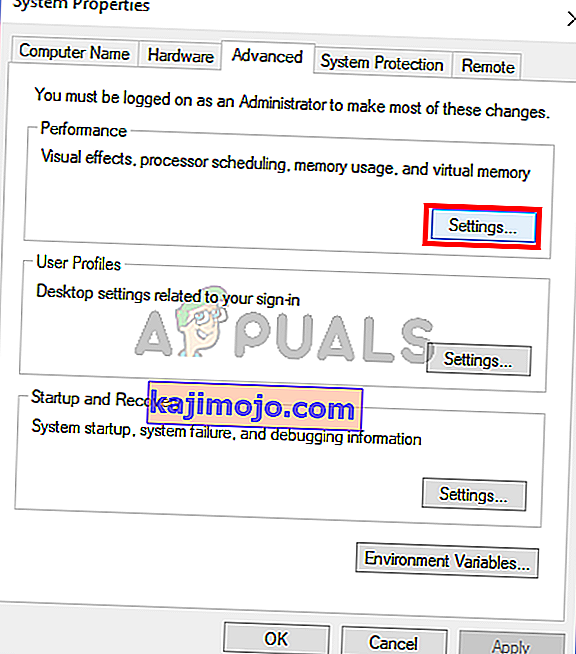
- On the next window that opens up, click on the “Data Execution Prevention” tab, and then select the “Turnon DEP for all programs except thoseI Select” option.
- After that, click on the “Add” option and point to the executable of the application that you are facing issues with.
- This way, that application will no longer come under the jurisdiction of the DEP program.
- Check to see if doing so has fixed the issue.


If the above process is unable to fix the issue, it might be because the executable isn’t the only one being affected by the DEP program. Sometimes the DEP might actually be preventing a herd of executables from being run on the computer and to counter this we will be disabling DEP completely.
Disabling DEP completely cannot be done through any Windows setting and it needs to be done manually through the command prompt. Remember to take this step as a last resort because this can in some cases makes your computer more vulnerable to viruses and malware attacks. In order to disable DEP through the command prompt:
- Press “Windows” + “R’ to open the Run prompt.
- Inside the Run prompt, type in “cmd” and then press “Shift” + “Ctrl” + “Enter” to launch in admin mode.
- Inside the command prompt, type in the following command and press “Enter” to execute it on your computer.
bcdedit.exe /set {current} nx AlwaysOff - Once the command has been executed, run the application that you want to and check to see if the error message still persists.
Method 10: Disable Firewall and Windows Defender
In some situations, the executable that you want to run on the computer might actually be blocked by the Firewall and it would not be able to make contact with its servers this way. Therefore, we will have to allow the executable in our Firewall for both public and private networks which should get it working if the Firewall is preventing it.
In addition to that, sometimes the Windows Defender might prevent the application from running on your computer because its local files might be suspicious and not properly signed. This can be due to a false alarm as well so we will be disabling the Windows Defender for the application as well by adding an exclusion. In order to do that:
- Press “Windows” + “R” to launch the Run prompt.
- Type in “ControlPanel” and press “Enter” to launch the classical control panel interface.
- Click on the “View by:” button, select “Large Icons” and then click on the Windows Defender Firewall option.
- Select the “Allow an app orfeature through the Firewall” button on the left pane and then click on the “Change Settings” button and accept the prompt.
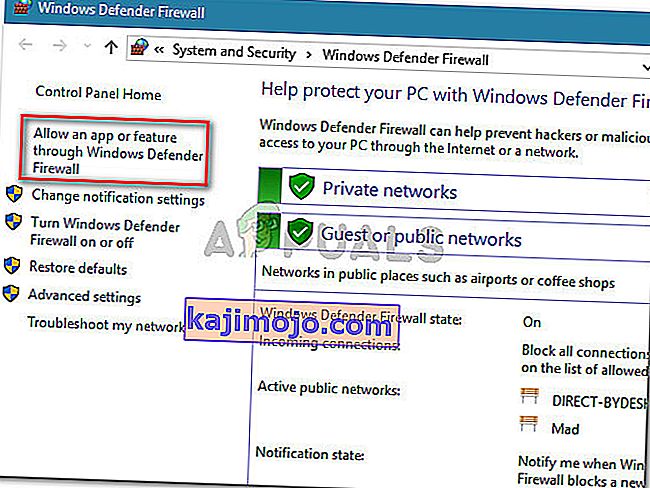
- From here, make sure that you check both the “Public” and the “Private” options for the application and its entries.
- Save your changes and exit out of the window.
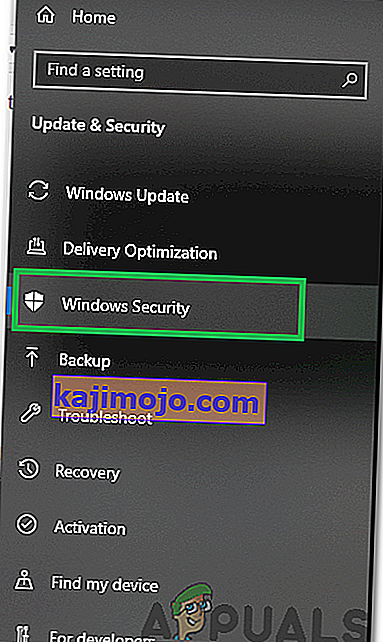
- After that, press “Windows” + “I” to launch the settings and click on the “Updateand Security” option.
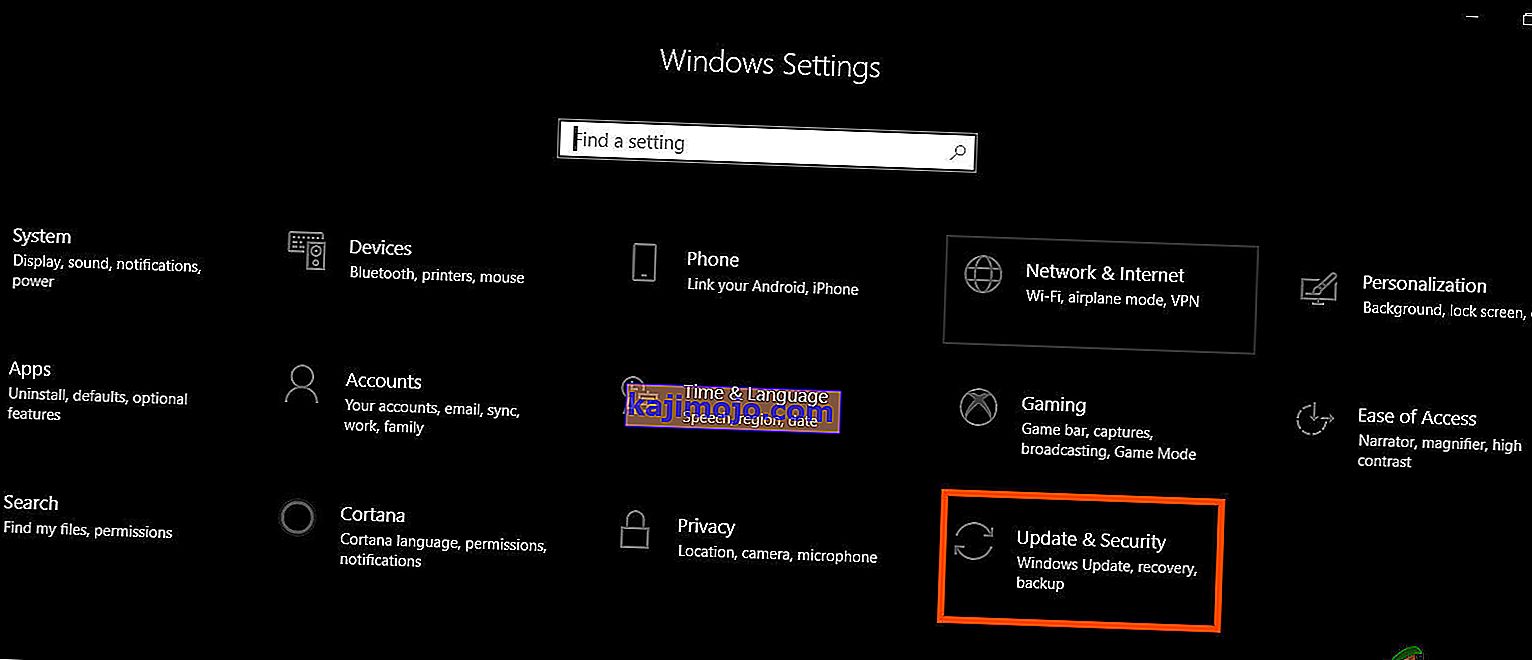
- From the left pane, click on the “Windows Security” button and then click on the “Virus and Threat Protection” button.
- Select the “Manage Settings” button under the Virus and Threat Protection Settings heading.
- Scroll down and click on the “Add or Remove Exclusions” button in the next window.
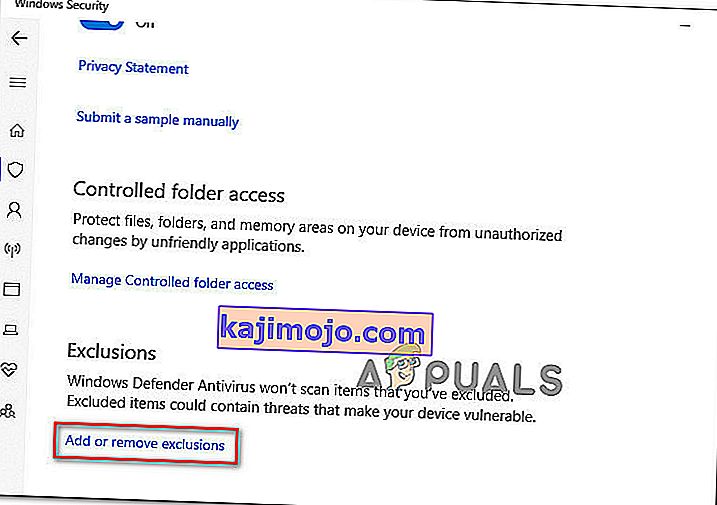
- Click on the “Add an Exclusion” option and select “Folder’ from the File type.
- Make sure to specify the application’s folder with which the issue is occurring and exit out of this window after saving your changes
- Check and see if doing so has fixed the error message.


Method 11: Reinstall Firefox
If you are getting this error while trying to launch Firefox, it might be occurring because the applications haven’t been installed properly on your computer. Therefore, in this step, we will be launching the app management window and uninstalling Firefox after which we will reinstall it completely by downloading it from the Firefox website. For that:
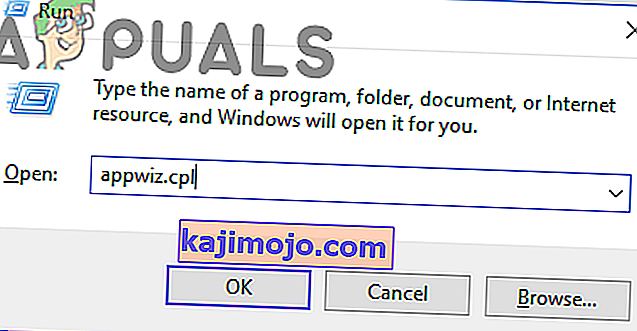
- Press “Windows” + “R” to open the Run prompt.
- Type in “appwiz.cpl” and press “Enter” to open the app management window.
- In the app management window, scroll down and right-click on the “Firefox” application.
- Select “Uninstall” from the list and then follow the on-screen instructions to remove the software from your computer.
- Repeat this step for all instances and bundled applications of the software installed on your computer.
- Make sure to disable any third-party antiviruses at this point to make sure that the software is installed smoothly.
- Head on over to the Mozilla website and click on the download button.

- Click on the downloaded executable and install it on your computer following the on-screen instructions.
- Check to see if doing so has fixed the error message on your computer.


Method 12: Scanning for Malware
It is possible in some cases that the computer has acquired malware that is preventing the user from being able to run all the system functions on their computer. Therefore, in this step, we will be using the default Windows Defender to scan our computer thoroughly for any viruses or malware that might’ve found its way on our computer. For that:
- Press the “Windows” + “I” keys simultaneously on your PC to open the Settings tab.
- Navigate to the Update& Security option and then click on the “Windows Security” button on the left tab.
- After that, click on the “Open Windows Security” and select the “Virus and Threat Protection” option.
- After that, click on the “Scan Options” button below the “Quick Scan” window.
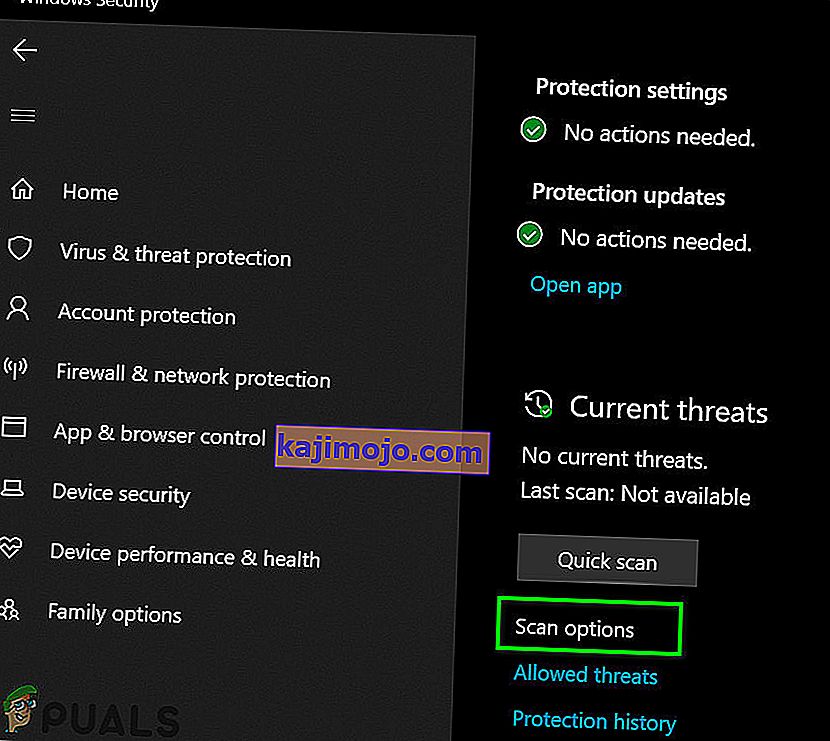
- Click on the “Full Scan” option and then hit the button of “Scan Now”.
- Wait for a few seconds while this process gets completed and then finally check if the error gets resolved now.


Microsoft Security Scanner is an additional tool that you can use to test the system for any further viruses and malware because sometimes the default tool isn’t able to perform the scan properly. Therefore, in this step, if the issue still hasn’t been resolved, we will be using the Microsoft Security Scanner to further make sure for any issues.
- Launch your browser and download the Microsoft Security Scanner from here.
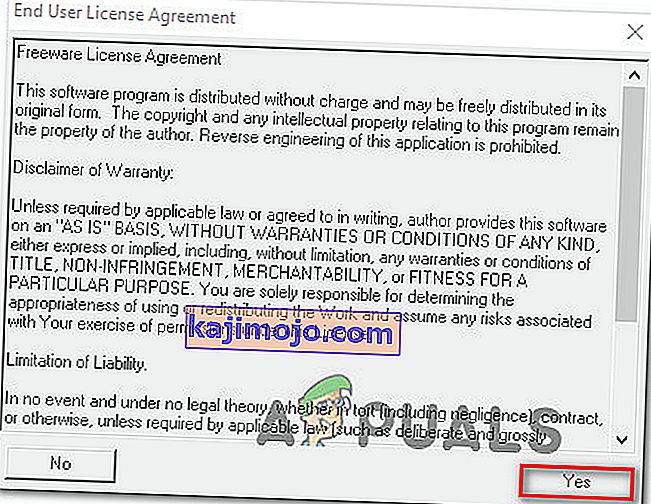
- After downloading the executable, run it on your computer and let it install.
- Accept the License Agreement terms and click on “Next”.
- Select “Full Scan” and click on “Next”.
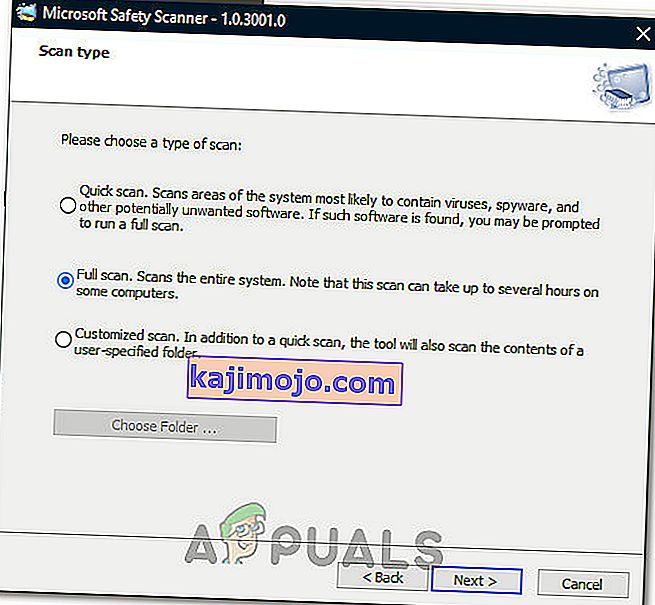
- After you opt for a full scan, the software will start scanning your entire computer to look for any malware or viruses that might’ve disguised themselves as normal executables or applications.
- After this scan has been finished, check to see if the error message still persists.


Method 13: Install Missing Drivers
It is possible in some situations that your device is missing certain drivers due to which this particular issue is being triggered on your computer. Therefore, we will be checking for any missing drivers and then we will check to see if the error is fixed. In order to do this, follow the guide below.
- Download Driver Easy on your computer.

- Run the downloaded executable and install the software on your computer.
- Run the check and see if there are any missing drivers on your computer.
- Install these missing drivers and then install them either manually or automatically using the Software.
- After installing all the missing drivers, check to see if the issue still persists.

Method 14: Reconfigure Registry
It is possible that in some cases, you haven’t properly configured all the registry settings or that you unknowingly configured something incorrectly. Therefore, in this step, we will be reconfiguring our Registry to fix a certain key that sometimes, if misconfigured, causes this particular error on Windows. In order to do this, follow the guide below.
- Press “Windows” + “R” to open the Run prompt.
- Type in “regedit” and press “enter” to launch the registry editor.

- Inside the registry editor, navigate to the following location.
HKLM\SOFTWARE\Microsoft\Windows NT\CurrentVersion\Windows\AppInit_Dlls
- Double click on the “LoadAppInit_DLLs” entry on the right side of the screen.
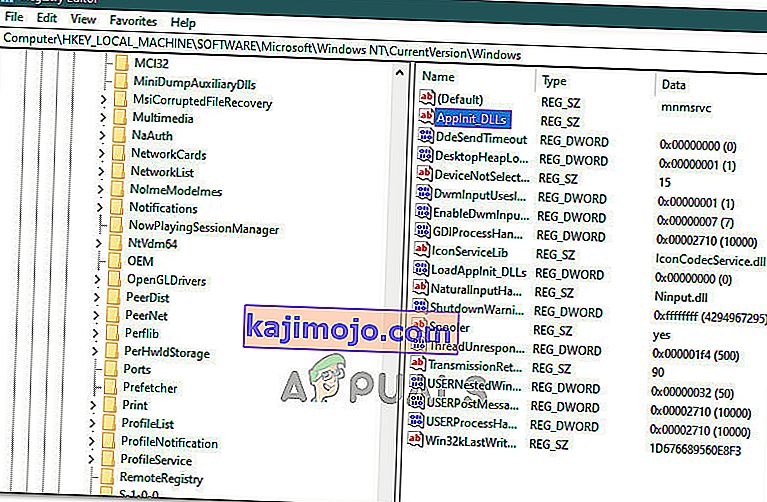
- Change the value of this registry from “1” to “0”.
- Save your changes and exit the registry editor.
- Check to see if doing so has fixed the error.


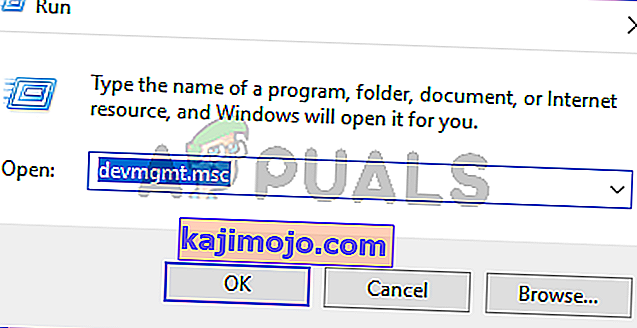
Method 15: Update Disk Drivers
In some cases, the Disk Drivers that are being used to control your Storage and other Disks installed on the computer might have been outdated due to which the error is being triggered. Therefore, in this step, we will first be opening the Device Management Window and from there, we will be updating these drivers. In order to do so, follow the steps mentioned below.
- Press “Windows’ + “R” to open the Run prompt.
- Type in “Devmgmt.msc” and press “Enter” to launch the device management window.
- In the Device Manager, double click on the “DiskDrives” option to expand it.
- Right-click on the storage device listed and select the “Update Driver” option.
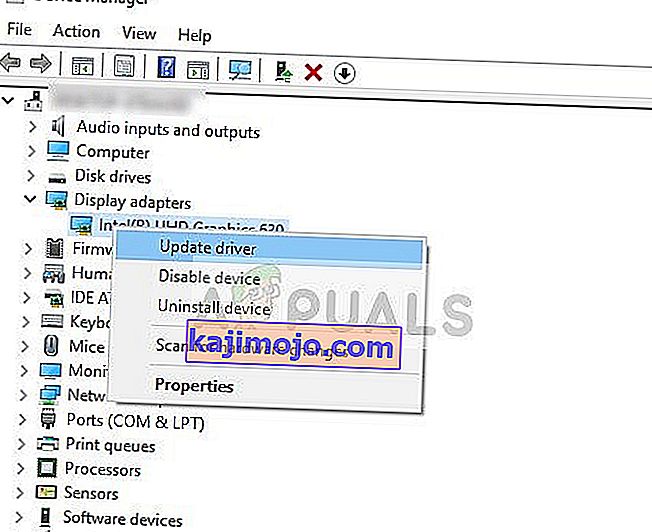
- Select the “Search Automatically for Drivers” option and let the setup search.
- If there are any drivers available, Windows will automatically check for them and install them on your computer.
- Check to see if doing so has fixed the issue.


Method 16: Disabling Automatic Updates and Uninstalling Updates
It is possible in some cases, that this error is stemming from a faulty update install. Microsoft is notorious for pushing out updates that aren’t properly customized to work for all hardware combinations and often go on to break things instead of making them better. Therefore we will make sure that the recent update isn’t installed on our computer.
In order to do this, we will have to first disable automatic updates on our computer and then we will be uninstalling the recently installed updates. Make sure to back up any important data that you don’t want to lose just in case this goes bad.
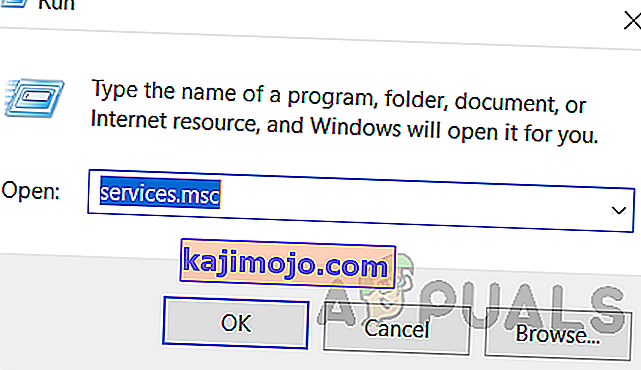
- Press “Windows” + “R’ to open the Run prompt.
- Type in “service.msc” and press “Enter”.
- Scroll through the list and double click on the “Windows Update” service.
- Click on the “Stop” button and then click on the “Startup Type” dropdown.
- Select “Disabled” from the list and select the “Apply” button from the window.
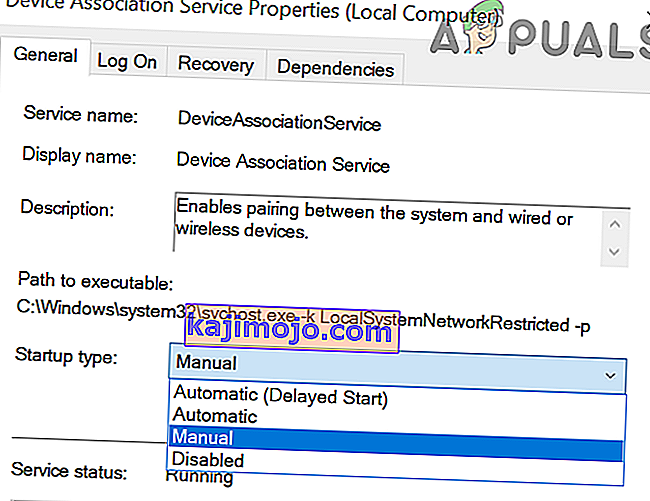
- Click on “OK” to close out of this window.
- Check to see if doing so has stopped your computer from updating.


After stopping the computer from updating, we will now be uninstalling the recent updates that have been installed on your computer. For that:
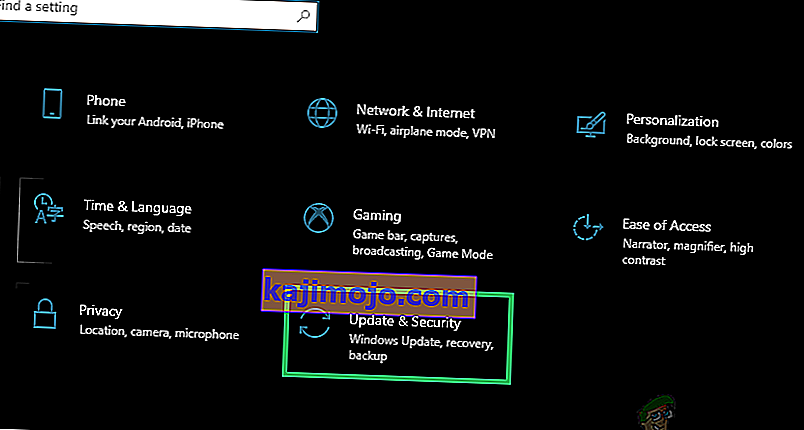
- Press “Windows” + “I” buttons to open the settings.
- In settings, click on the “Update and Security” option and then select the “Windows Update” button from the left pane.
- In the Windows Update, click on the “View Update History” option.
- In the Update History, click on the “Uninstall Updates” option and it should take you to the uninstallation screen where all the recently installed updates will be listed.
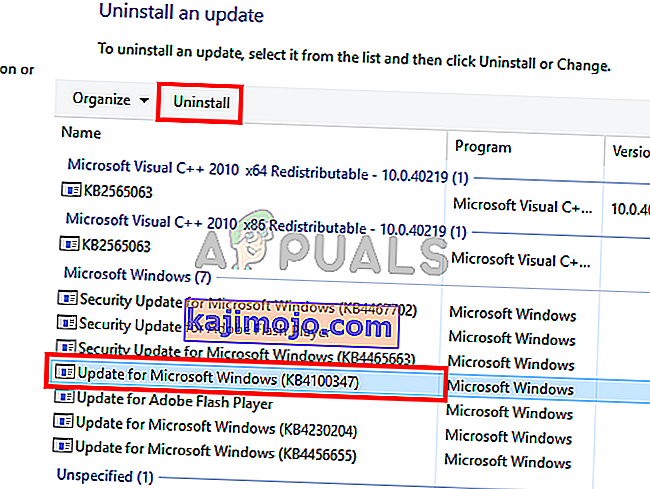
- From the list, right-click on the update that was installed recently and caused this error on your computer.
- Right-click on this update and select the “Uninstall” button to remove it completely from the computer.
- Follow through with the on-screen instructions.
- Check to see if uninstalling has fixed this issue.


Additional Fixes:
- In addition to some of the recommendations given above, you should try to check if there are any bad memory modules (RAM) installed on your computer which can be a cause of this.
- Selain itu, pastikan untuk memeriksa apakah Anda belum melakukan overclock RAM ke tingkat di luar batas yang disarankan. Jika Anda telah melakukannya, coba kembalikan ke default pabrik dan periksa apakah itu memperbaiki masalah Anda ..