Kesalahan " Pengecualian win32 tidak ditangani terjadi di * nama_aplikasi * 'biasanya terjadi saat pengguna mencoba meluncurkan aplikasi yang dibuat di Visual Studio. Sebagian besar kejadian yang dilaporkan dari kesalahan ini terkait dengan Uplay, Internet Explorer dan beberapa game Legacy yang awalnya dibuat untuk versi Windows yang lebih lama.

Catatan : Berikut cara memperbaiki Pustaka Runtime yang terkait dengan Visual C ++.
Apa Penyebab Kesalahan "Pengecualian yang Tidak Ditangani Terjadi di Aplikasi Anda" di Windows?
Ada beberapa penyebab sederhana dari masalah ini dan masalah tersebut dapat ditangani secara efektif jika Anda dapat mengenali skenario Anda hanya dengan mengidentifikasi penyebab yang benar. Simak daftarnya di bawah ini:
- Antivirus Anda mungkin penyebabnya - Beberapa alat antivirus seperti Panda Antivirus diketahui menyebabkan masalah ini, jadi pastikan Anda menggantinya.
- Program atau malware tertentu mungkin sedang berjalan - Jika program yang diinstal atau malware berjalan di komputer Anda, Anda mungkin ingin menghapusnya. Pastikan Anda melakukan boot ke boot bersih untuk melihat apakah itu penyebab yang benar.
- Penginstalan Microsoft .NET Framework rusak - Jika file intinya rusak, Anda dapat mencoba memperbaiki penginstalannya, menginstal versi yang lebih baru, atau melakukan pemindaian SFC.
- Debugging skrip diaktifkan melalui Registry - Ternyata, kunci registri tertentu dapat menyebabkan munculnya masalah ini. Untuk mengatasinya, Anda harus menonaktifkan Debugging Skrip Melalui Kunci Registri.
- Pelanggaran akses di Msvcr92.dll - Buffer sumber yang melebihi atau byte akhir yang tidak tepat juga merupakan penyebab potensial dari masalah ini. Untuk mengatasinya, Anda perlu menginstal setiap pembaruan Windows yang tertunda.
- Menghapus kunci registri peluncur Ubisoft - Jika Anda melihat kesalahan ini saat mencoba meluncurkan Uplay.exe, itu karena ada bug dengan Ubisoft Game Launcher. Masalah ini juga dapat diselesaikan melalui registri dengan menghapus nilai milik peluncur ini.
- Kerusakan file sistem - Ketidakkonsistenan file sistem juga dapat menyebabkan masalah ini. Korupsi ringan dapat diatasi dengan pemindaian DISM dan SFC sederhana. Dalam keadaan yang lebih parah, pemasangan bersih atau pemasangan perbaikan akan membantu Anda dalam menyelesaikan masalah.
Solusi 1: Instal setiap Pembaruan Windows yang tertunda
Salah satu penyebab paling umum yang akan menyebabkan kesalahan " Terjadi pengecualian win32 yang tidak tertangani 'adalah aplikasi yang dibuat untuk platform x64 menggunakan MSVCR90.DLL yang akhirnya memanggil fungsi strncpy.
Dalam kasus ini, pelanggaran akses yang dipicu dalam file Msvcr92.DLL kemungkinan besar akan menyebabkan aplikasi berhenti merespons dalam fungsi strncpy. Buffer sumber yang melebihi atau byte akhir yang tidak tepat adalah kemungkinan besar penyebab masalah ini.
Untungnya, Microsoft telah mengetahui masalah ini dan telah meluncurkan perbaikan terbaru untuk masalah ini yang akan menyelesaikannya secara otomatis. Untuk memanfaatkannya, yang perlu Anda lakukan hanyalah memperbarui versi OS Anda ke versi terbaru yang tersedia.
Catatan: Perbaikan terbaru ini didorong dalam revisi Visual Studio 2008, yang diperbarui secara otomatis oleh Windows, sehingga langkah-langkah di bawah ini bersifat universal dan akan berfungsi terlepas dari versi OS Anda.
Berikut panduan cepat untuk memperbarui versi Windows Anda ke versi terbaru untuk menginstal perbaikan terbaru untuk Visual Studio 2008 dan menyelesaikan masalah:
- Tekan tombol Windows + R untuk membuka kotak dialog Run . Selanjutnya, ketik 'ms-settings: windowsupdate' dan tekan Enter untuk membuka tab pembaruan Windows dari aplikasi Pengaturan .
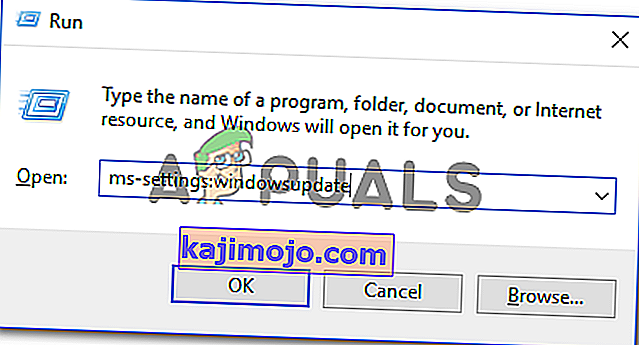
Catatan: Jika Anda mengalami masalah ini di Windows 7 atau Windows 8.1. gunakan perintah 'wuapp' sebagai gantinya.
- Setelah Anda berhasil masuk ke dalam layar Pembaruan Windows, mulailah dengan mengklik Periksa pembaruan . Kemudian, mulailah mengikuti petunjuk di layar untuk menyelesaikan penginstalan setiap Pembaruan Windows yang saat ini menunggu untuk diinstal.

Catatan: Perlu diingat bahwa Anda harus menginstal setiap pembaruan, bukan hanya yang penting. Karena hotfix disertakan dalam revisi Visual Studio, Anda mungkin menemukan pembaruan tersebut di bawah Opsional, jadi pastikan untuk menginstal semuanya.
- Jika Anda diminta untuk memulai ulang sebelum Anda mendapatkan kesempatan untuk menginstal setiap pembaruan yang tersedia, lakukanlah. Namun pastikan untuk kembali ke layar yang sama ini setelah startup berikutnya selesai untuk menyelesaikan penginstalan pembaruan lainnya.
- Setelah setiap pembaruan yang tertunda dipasang, mulai ulang komputer Anda untuk terakhir kalinya dan kemudian ulangi tindakan yang sebelumnya menyebabkan pesan kesalahan untuk melihat apakah masalah telah diperbaiki.


Jika Anda masih menemukan kesalahan " Terjadi pengecualian win32 tidak tertangani ', pindah ke metode berikutnya di bawah.
Solusi 2: Ganti Antivirus Anda
Alat antivirus gratis bisa sangat membantu dan mereka dapat melakukan tugasnya melindungi komputer Anda, tetapi terkadang mereka tidak cocok dengan hal-hal lain di komputer Anda. Pertimbangkan untuk mengganti antivirus Anda jika itu menyebabkan masalah ini saat dihidupkan!
- Klik pada menu Start dan buka Control Panel dengan mencarinya. Atau, Anda dapat mengklik ikon roda gigi untuk membuka pengaturan jika Anda menggunakan Windows 10.
- Di Control Panel, pilih View as - Category di sudut kanan atas dan klik Uninstall a Program di bawah bagian Programs.

- Jika Anda menggunakan aplikasi Pengaturan, mengklik Aplikasi akan segera membuka daftar semua program yang diinstal pada PC Anda.
- Temukan alat antivirus Anda di Control Panel atau Pengaturan dan klik Uninstall .
- Wisaya pencopotan pemasangannya akan terbuka jadi ikuti petunjuk untuk menghapusnya.

- Klik Selesai ketika uninstaller menyelesaikan proses dan restart komputer Anda untuk melihat apakah kesalahan masih akan muncul. Pastikan Anda memilih opsi antivirus yang lebih baik .
Solusi 3: Menghapus nilai Launcher Registry (jika ada)
Jika Anda menemui kesalahan “ Terjadi pengecualian win32 yang tidak tertangani 'saat mencoba meluncurkan Uplay.exe atau aplikasi lain milik Ubisoft, kemungkinan besar itu karena bug dengan Ubisoft Game Launcher mereka.
Ternyata, ini tampaknya menjadi masalah yang tersebar luas di Windows 10, terutama di antara pengguna yang menginstal Steam dan Uplay secara bersamaan.
Beberapa pengguna yang terpengaruh yang kami perjuangkan untuk menyelesaikan masalah ini telah berhasil memperbaikinya dengan menggunakan Editor Registri untuk menemukan nilai registri string milik peluncur dan menghapusnya. Ini seharusnya menghilangkan konflik, memungkinkan kedua aplikasi berfungsi dengan baik di bawah mesin yang sama.
Berikut panduan cepat untuk menghapus nilai Registry yang terkait dengan peluncur Uplay:
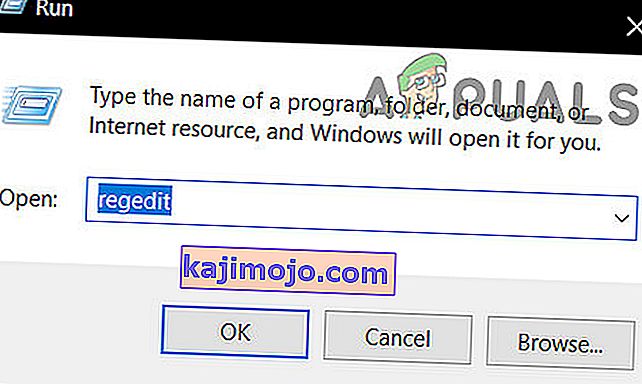
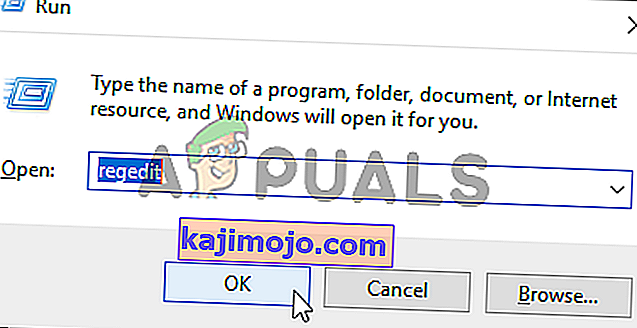
- Tekan tombol Windows + R untuk membuka kotak dialog Run . Di dalam kotak teks, ketik 'regedit' dan tekan Enter untuk membuka Editor Registri . Saat Anda diminta oleh UAC (Kontrol Akun Pengguna) , ketik Ya untuk memberikan hak administratif.
- Once you’re inside the Registry Editor, use the left-hand side section of the window to navigate to the following location:
Computer\HKEY_LOCAL_MACHINE\SOFTWARE\WOW6432Node\Ubisoft
Note: You can either navigate there manually or you can paste the location directly into the navigation bar at the top and press Enter to get there instantly.
- After you manage to land in the correct location, move down to the right-hand section of the screen, right-click on Launcher and choose to Delete to get rid of it.

Note: In case you can delete the key, here’s how to take ownership of registry keys.
Note: After you delete it, the launcher will be forced to create a new Launcher string value with fresh data, which should resolve the issue.
- Once the key has been deleted, close Registry Editor and restart your computer.
- At the next computer startup, repeat the action that was previously causing the “An unhandled win32 exception occurred‘ error and see if the problem is resolved.


In case the same issue is persisting, move down to the next potential fix below.
Solution 4: Reset Internet Explorer (if applicable)
Another potential instance with the potential of creating this issue is a series of corrupted Internet Explorer (IE). If you’re encountering the “An unhandled win32 exception occurred in iexplore.exe’ error chances are it appears after a failing script.
To fix this issue, you should reset your Internet Explorer settings via the Internet Options menu. This operation was confirmed to be successful by a lot of users that were dealing with this error.
Here’s a quick guide on resetting Internet Explorer in order to resolve the “An unhandled win32 exception occurred‘ error:
- Ensure that Internet Explorer, Edge or any other associated instance is turned off and no background process is running.
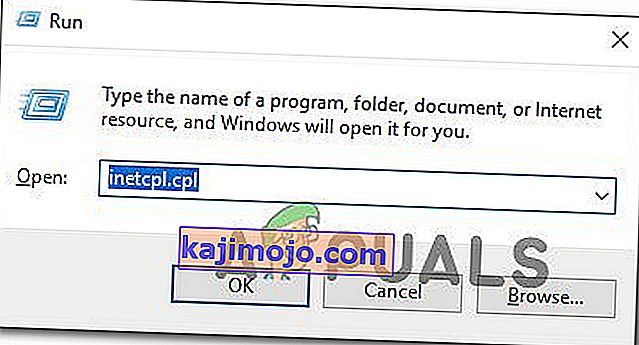
- Press Windows key + R to open up a Run dialog box. Inside the text box, type ‘inetcpl.cpl’ and press Enter to open up the Internet Options menu.
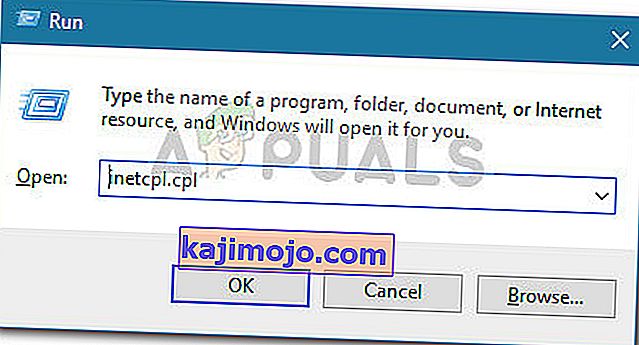
Note: If you are prompted by the UAC (User Account Control), click Yes to grant administrative privileges.
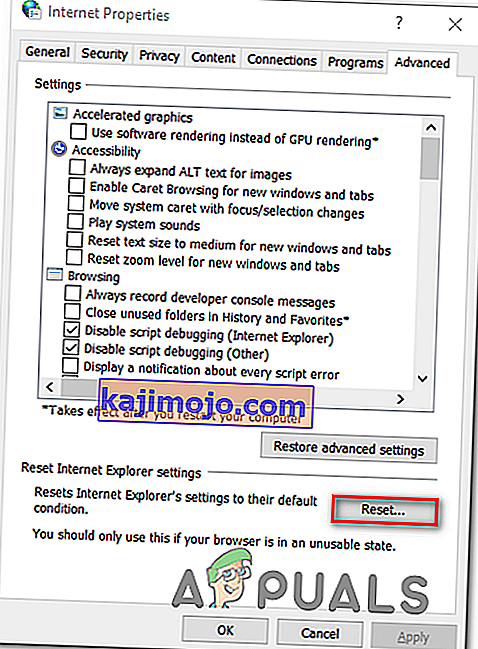
- After you manage to get inside the Internet Properties screen, select the Advanced tab from the horizontal menu at the top. Next, go to the Reset Internet Explorersettings and click on the Reset button.
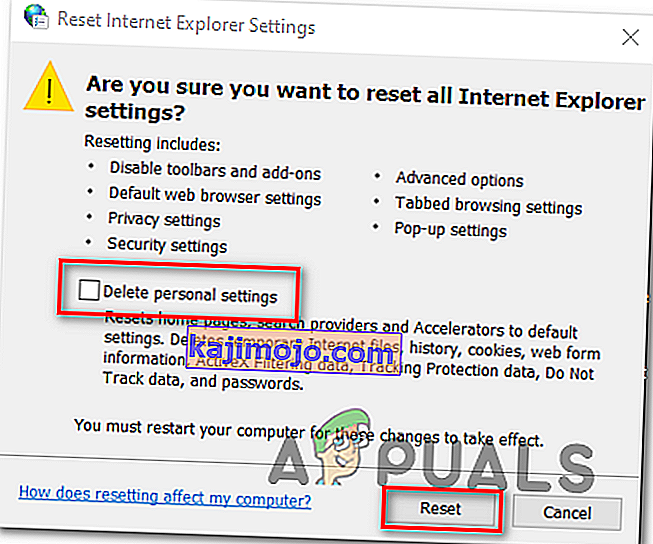
- Once you see the confirmation screen, ensure that the box associated with Delete personal settings is checked, then click on the Reset button.
- Wait until the operation is complete, then restart your machine and see if the issue is resolved at the next computer startup.


In case the same “An unhandled win32 exception occurred in iexplore.exe’ error is still occurring, move down to the next method below.
Solution 5: Disable Script Debugging and associated Registry Keys (if applicable)
If you’re encountering the issue with Internet Explorer on a machine that has VS installed on it, the issue can also occur due when Script Debugging is enabled and the registry entries end up containing corrupted data.
Several affected users that encountered this issue have confirmed that the issue was resolved after they accessed the Internet Options menu to disable Script Debugging and then deleted the associated keys using Registry Editor.
Here’s a quick guide on doing this in order to fix the “An unhandled win32 exception occurred in iexplorer.exe’ error:
- Press Windows key + R to open up a Run dialog box. Next, inside the text box, type ‘inetcpl.cpl’ and press Enter to open up the Internet Options menu. If you are prompted by the User Account Control (UAC), click Yes to grant administrative privileges.
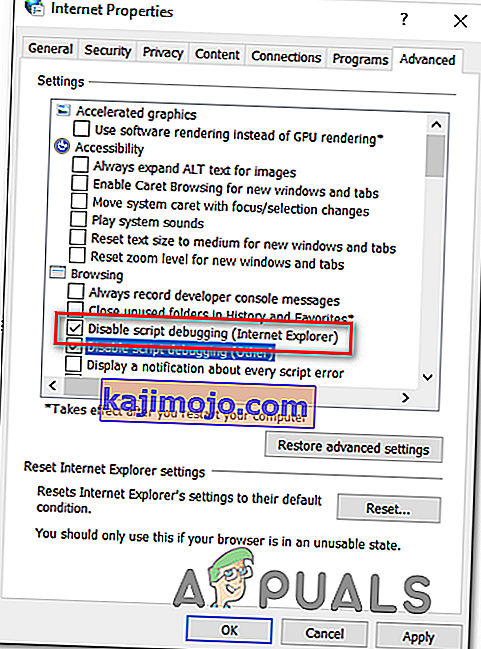
- Once you manage to find yourself inside the Internet Properties screen, use the menu at the top to select the Advanced tab.
- Inside the Internet Properties screen, scroll down through the Settings menu and check the box associated with Disable script debugging (Internet Explorer).
- Once the modification is enforced, hit Apply to save the changes, then close the Internet Properties window.
- Press Windows key + R once again to open up another dialog box. This time, type ‘regedit’ and press Enter to open up Registry Editor. You will need to grant admin access, so click Yes when prompted by the User Account Control window.
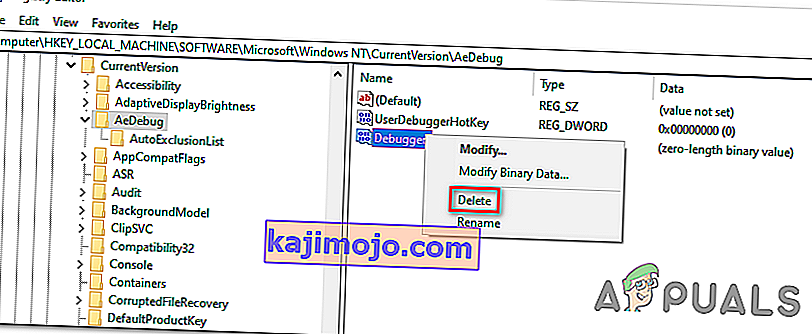
- Inside the Registry Editor, navigate to the following location using the left-hand menu:
HKEY_LOCAL_MACHINE\SOFTWARE\Microsoft\Windows NT\CurrentVersion\AeDebug (32 - Bit Machine) HKEY_LOCAL_MACHINE\SOFTWARE\Wow6432Node\Microsoft\Windows NT\CurrentVersion\AeDebug (64 - Bit Machine)
Note: The location of the file we need to delete is different depending on the Windows version that you’re using. If you have a 32 – bit Windows version use the first location, else, use the second.
- Once you arrive to the correct location, move down to the right-section, right-click on Debugger and choose Delete from the context menu.
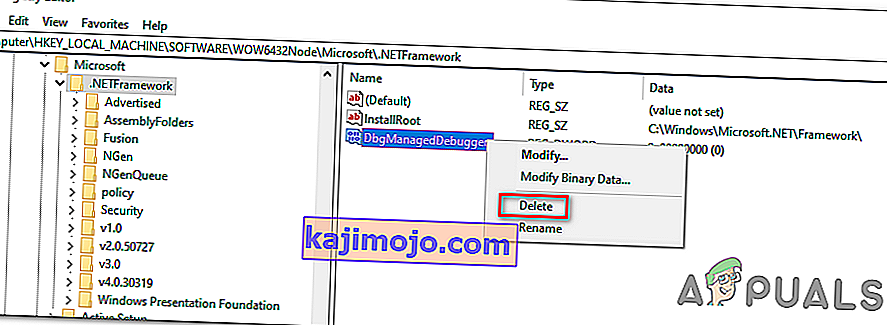
- Once this key is deleted, navigate to this second location:
HKEY_LOCAL_MACHINE\SOFTWARE\Microsoft\.NETFramework\ (32 - Bit Machine) HKEY_LOCAL_MACHINE\SOFTWARE\Wow6432Node\Microsoft\.NETFramework (64 - Bit Machine)
Note: Access the registry key associated with your Windows bit version that you’re using.
- When you arrive at the correct location, move over to the right-hand section and delete the DbgManagedDebugger value by right-clicking on it and choosing Delete from the context menu.
- After you manage to delete the value, close the Registry Editor and restart your computer.
- Once the next startup is complete, see if the same issue is still occurring.


In case the “An unhandled win32 exception occurred’ error is still occurring, move down to the next method below.
Solution 6: Install the Latest Version of NET Framework and Repair it
Having NET Framework installed on your computer is vital and plenty of modern games and programs depend on you having it installed. Before repairing it, follow the steps below in order to install the latest version on your computer.
Navigate to this link and click the red download button in order to download the latest version of the Microsoft .NET Framework. After the download has finished, locate the file you downloaded and run it. Note that you will need to have constant access to the Internet. Follow the instructions on-screen to proceed with the installation.
- After installing the latest version, it’s time to check its integrity. On your keyboard, use the Windows Key + R key combination to open the Run dialog box.
- Type in control.exe and click OK in order to open it.

- Click the Uninstall a Program option and click Turn Windows features on or off. Make sure you locate the .NET Framework 4.x.x entry and make sure it’s enabled. ‘x.x’ marks the latest version available for your operating system.
- If the checkbox next to .NET Framework 4.x.x is not enabled, enable it by clicking the box. Click OK to close the Windows Feature window and reboot the computer.

- If .Net Framework 4.x.x is already enabled, you can repair .Net Framework by clearing the box and rebooting the computer. After the computer has restarted, re-enable .Net Framework and restart the computer again.
Solution 7: Perform a Clean Boot
There are various other programs and services which can affect the proper functionality of the Microsoft .NET Framework suite. In most cases, the cause is the antivirus you have installed and you can try disabling it to see if the error persists. However, to make sure nothing can interfere with the installation, we recommend you perform a clean boot which will disable all non-Microsoft programs and services from starting up. This way, you can easily deduct just which program causes this error to happen!
- Use the Windows + R key combination on your keyboard. In the Run dialog box type MSCONFIG and click OK.
- Click on the Boot tab and uncheck the Safe Boot option (if checked).

- Under the General tab in the same window, click to select the Selective startup option, and then click to clear the Load startup items check box to make sure it’s not checked.
- Under the Services tab, click to select the Hide all Microsoft services check box, and then click Disable all.

- On the Startup tab, click Open Task Manager. In the Task Manager window under the Startup tab, right click on each startup item which is enabled and select Disable.

- After this, you will need to perform some of the most boring processes and that is enabling the Startup items one by one and restarting your computer. After that, you need to check whether the problem appears again. You will need to repeat the same process even for the Services which you have disabled in Step 4.
- Once you locate the problematic startup item or service, you can undertake action in order to solve the problem. If it is a program, you can reinstall it or repair If it is a service, you can disable it, etc.
Solution 8: Use SFC to Scan for Memory Leaks
It has been reported that the Microsoft .NET Framework corruption is related to faulty system files. These problems are rooted deep inside the system files and the only way to try to resolve them is by running the System File Checker (SFC). It will scan your system files for errors and possible repair or replace them. Follow the steps below in order to do so!
- Search for “Command Prompt” by typing it either right in the Start menu or by pressing the search button right next to it. Right-click the first entry which will pop up as a search result and select the “Run as administrator” context menu entry.
- Additionally, you can also use the Windows Logo Key + R key combination in order to bring up the Run dialog box. Type in “cmd” in the dialog box which appears and use the Ctrl + Shift + Enter key combination for admin Command Prompt.

- Type in the following commands in the window and make sure you press Enter after typing each one. Wait for the “Operation completed successfully” message or something similar to know that the method worked.
sfc /scannow
- Try to restart your computer and check to see if the Unhandled Exception has Occurred in your Application error continues to appear on your computer.
Solution 9: Performing a Clean Install
If none of the methods presented below have managed to help you in resolving the issue, it’s very likely that you’re dealing with some kind of Windows inconsistency that cannot be resolved conventionally.
If this scenario is applicable, you should be able to fix the issue by resetting every component associated with your Windows installation. If you want to go this route, you have two ways forward. It all boils down to the procedure that you want to follow:
- Repair install (in-place repair) – This procedure is the best approach when you need to refresh every OS component, but some users might end up considering it a little too tedious for their taste. Keep in mind that you will need a compatible installation media in order to enforce this fix, but the major advantage is that all your personal data (including games, applications and personal media) will be preserved even if you don’t back up your computer.
- Clean install – If you’re looking for the simplest solution, this is the way to go. You will not need an installation media to enforce it (it’s all done through the Windows GUI). But unless you back up your data in advance, be prepared for total data loss.